|
|
|||||||||
| Software: RF Cascade Workbook | RF Symbols for Office | RF Symbols & Stencils for Visio | Espresso Workbook | ||||||||||
|
|||||||||||||||||||||||||||||||
   |
   |
||||||||||||||||||||||||||||||
|
Please Support RF Cafe by purchasing my ridiculously low-priced products, all of which I created. RF & Electronics Symbols for Visio RF & Electronics Symbols for Office RF & Electronics Stencils for Visio T-Shirts, Mugs, Cups, Ball Caps, Mouse Pads These Are Available for Free |
|||||||||||||||||||||||||||||||


Module 8 - Introduction to Amplifiers
Navy Electricity and Electronics Training
Series (NEETS)
Chapter 2: Pages 2-1 through 2-10

Module 8 - Introduction to Amplifiers
Pages i, 1-1, 1-11, 1-21, 1-31, 2-1, 2-11, 2-21, 2-31, 3-1, 3-11, 3-21, 3-31, 3-41, 3-51, 3-61, AI-1, Index
| NEETS Modules | |
| - | Matter, Energy, and Direct Current |
| - | Alternating Current and Transformers |
| - | Circuit Protection, Control, and Measurement |
| - | Electrical Conductors, Wiring Techniques, and Schematic Reading |
| - | Generators and Motors |
| - | Electronic Emission, Tubes, and Power Supplies |
| - | Solid-State Devices and Power Supplies |
| - | Amplifiers |
| - | Wave-Generation and Wave-Shaping Circuits |
| - | Wave Propagation, Transmission Lines, and Antennas |
| - | Microwave Principles |
| - | Modulation Principles |
| - | Introduction to Number Systems and Logic Circuits |
| - | - Introduction to Microelectronics |
| - | Principles of Synchros, Servos, and Gyros |
| - | Introduction to Test Equipment |
| - | Radio-Frequency Communications Principles |
| - | Radar Principles |
| - | The Technician's Handbook, Master Glossary |
| - | Test Methods and Practices |
| - | Introduction to Digital Computers |
| - | Magnetic Recording |
| - | Introduction to Fiber Optics |
| Note: Navy Electricity and Electronics Training Series (NEETS) content is U.S. Navy property in the public domain. | |
Chapter 2
Video and RF Amplifiers
Learning Objectives
Upon completion of this chapter, you will be able to:
1. Define the term "bandwidth of an amplifier."
2. Determine the upper and lower frequency limits of an amplifier from a frequency-response curve.
3. List the factors that limit frequency response in an amplifier.
4. List two techniques used to increase the high-frequency response for a video amplifier.
5. State one technique used to increase the low-frequency response of a video amplifier.
6. Identify the purpose of various components on a schematic of a complete typical video amplifier circuit.
7. State the purpose of a frequency-determining network in an RF amplifier.
8. State one method by which an RF amplifier can be neutralized.
9. Identify the purpose of various components on a schematic of a complete typical RF amplifier.
Introduction
In this chapter you will be given information on the frequency response of amplifiers as well as specific information on video and RF amplifiers. For all practical purposes, all the general information you studied in chapter 1 about audio amplifiers will apply to the video and RF amplifiers which you are about to study.
You may be wondering why you need to learn about video and RF amplifiers. You need to understand these circuits because, as a technician, you will probably be involved in working on equipment in which these circuits are used. Many of the circuits shown in this and the next chapter are incomplete and would not be used in actual equipment. For example, the complete biasing network may not be shown. This is done so you can concentrate on the concepts being presented without being overwhelmed by an abundance of circuit elements. With this idea in mind, the information that is presented in this chapter is real, practical information about video and RF amplifiers. It is the sort of information that you will use in working with these circuits. Engineering information (such as design specifications) will not be presented because it is not needed to understand the concepts that a technician needs to perform the job of circuit analysis and repair. Before you are given the specific information on video and RF amplifiers, you may be wondering how these circuits are used.
Video amplifiers are used to amplify signals that represent video information. (That's where the term "video" comes from.) Video is the "picture" portion of a television signal. The "sound" portion is audio.
Although the Navy uses television in many ways, video signals are used for more than television. Radar systems (discussed later in this training series) use video signals and, therefore, video amplifiers. Video amplifiers are also used in video recorders and some communication and control devices. In addition to using video amplifiers, televisions use RF amplifiers. Many other devices also use RF amplifiers, such as radios, navigational devices, and communications systems. Almost any device that uses broadcast, or transmitted, information will use an RF amplifier.
As you should recall, RF amplifiers are used to amplify signals between 10 kilohertz (10 kHz) and 100,000 megahertz (100,000 MHz) (not this entire band of frequencies, but any band of frequencies within these limits). Therefore, any device that uses frequencies between 10 kilohertz and 100,000 megahertz will most likely use an RF amplifier.
Before you study the details of video and RF amplifiers, you need to learn a little more about the frequency response of an amplifier and frequency-response curves.
Amplifier Frequency Response
In chapter 1 of this module you were shown the frequency-response curve of an audio amplifier. Every amplifier has a frequency-response curve associated with it. Technicians use frequency-response curves because they provide a "picture" of the performance of an amplifier at various frequencies. You will probably never have to draw a frequency-response curve, but, in order to use one, you should know how a frequency-response curve is created. The amplifier for which the frequency-response curve is created is tested at various frequencies. At each frequency, the input signal is set to some predetermined level of voltage (or current). This same voltage (or current) level for all of the input signals is used to provide a standard input and to allow evaluation of the output of the circuit at each of the frequencies tested. For each of these frequencies, the output is measured and marked on a graph. The graph is marked "frequency" along the horizontal axis and "voltage" or "current" along the vertical axis. When points have been plotted for all of the frequencies tested, the points are connected to form the frequency-response curve. The shape of the curve represents the frequency response of the amplifier.
Some amplifiers should be "flat" across a band of frequencies. In other words, for every frequency within the band, the amplifier should have equal gain (equal response). For frequencies outside the band, the amplifier gain will be much lower.
For other amplifiers, the desired frequency response is different. For example, perhaps the amplifier should have high gain at two frequencies and low gain for all other frequencies. The frequency-response curve for this type of amplifier would show two "peaks." In other amplifiers the frequency-response curve will have one peak indicating high gain at one frequency and lower gain at all others.
Note the frequency-response curve shown in figure 2-1. This is the frequency-response curve for an audio amplifier as described in chapter 1. It is "flat" from 15 hertz (15 Hz) to 20 kilohertz (20 kHz).
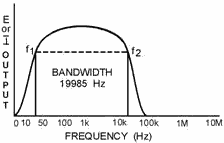
Figure 2-1. - Frequency response curve of audio amplifier.
Notice in the figure that the lower frequency limit is labeled f1 and the upper frequency limit is labeled f2. Note also the portion inside the frequency-response curve marked "Bandwidth." You may be wondering just what a "bandwidth" is.
Bandwidth of an Amplifier
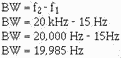
The bandwidth represents the amount or "width" of frequencies, or the "band of frequencies," that the amplifier is MOST effective in amplifying. However, the bandwidth is NOT the same as the band of frequencies that is amplified. The bandwidth (BW) of an amplifier is the difference between the frequency limits of the amplifier. For example, the band of frequencies for an amplifier may be from 10 kilohertz (10 kHz) to 30 kilohertz (30 kHz). In this case, the bandwidth would be 20 kilohertz (20 kHz). As another example, if an amplifier is designed to amplify frequencies between 15 hertz (15 Hz) and 20 kilohertz (20 kHz), the bandwidth will be equal to 20 kilohertz minus 15 hertz or 19,985 hertz (19,985 Hz). This is shown in figure 2-1.
Mathematically:
You should notice on the figure that the frequency-response curve shows output voltage (or current) against frequency. The lower and upper frequency limits (f1 and f2) are also known as Half-Power PointS. The half-power points are the points at which the output voltage (or current) is 70.7 percent of the maximum output voltage (or current). Any frequency that produces less than 70.7 percent of the maximum output voltage (or current) is outside the bandwidth and, in most cases, is not considered a useable output of the amplifier.
The reason these points are called "half-power points" is that the true output power will be half (50 percent) of the maximum true output power when the output voltage (or current) is 70.7 percent of the maximum output voltage (or current), as shown below. (All calculations are rounded off to two decimal places.)
As you learned in NEETS, Module 2, in an a.c. circuit true power is calculated using the resistance (R) of the circuit, NOT the impedance (Z). If the circuit produces a maximum output voltage of 10 volts across a 50-ohm load, then:
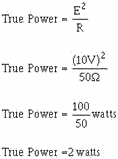
When the output voltage drops to 70.7 percent of the maximum voltage of 10 volts, then:
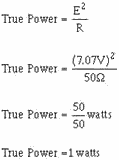
As you can see, the true power is 50 percent (half) of the maximum true power when the output voltage is 70.7 percent of the maximum output voltage. If, instead, you are using the output current of the above circuit, the maximum current is

The calculations are:
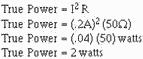
At 70.7 percent of the output current (.14 A):

On figure 2-1, the two points marked f 1 and f2 will enable you to determine the frequency-response limits of the amplifier. In this case, the limits are 15 hertz (15 Hz) and 20 kilohertz (20 kHz). You should now see how a frequency-response curve can enable you to determine the frequency limits and the bandwidth of an amplifier.
Reading Amplifier Frequency-Response Curves
Figure 2-2 shows the frequency-response curves for four different amplifiers. View (A) is the same frequency-response curve as shown in figure 2-1. View (B) is the frequency-response curve of an amplifier that would also be classified as an audio amplifier, even though the curve is not "flat" from 15 hertz to 20 kilohertz and does not drop off sharply at the frequency limits. From the curve, you can see that the lower frequency limit of this amplifier (f1) is 100 hertz. The upper frequency limit (f2) is 10 kilohertz. Therefore, the bandwidth of this amplifier must be 10 kilohertz minus 100 hertz or 9900 hertz. Most amplifiers will have a frequency-response curve shaped like view (B) if nothing is done to modify the frequency-response characteristics of the circuit. (The factors that affect frequency response and the methods to modify the frequency response of an amplifier are covered a little later in this chapter.)
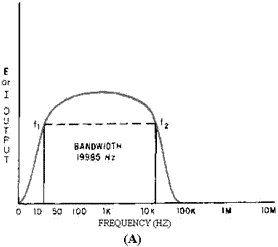
Figure 2-2A. - Frequency response curves.
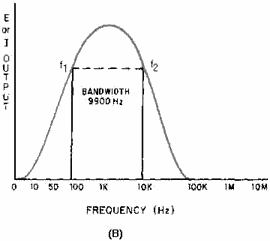
Figure 2-2B. - Frequency response curves.

Figure 2-2C. - Frequency response curves.
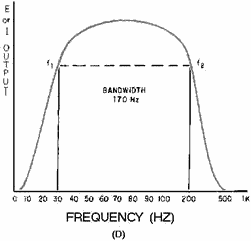
Figure 2-2D. - Frequency response curves.
Now look at view (C). This frequency-response curve is for an RF amplifier. The frequency limits of this amplifier are 100 kilohertz (f1) and 1 megahertz (f2); therefore, the bandwidth of this amplifier is 900 kilohertz.
View (D) shows another audio amplifier. This time the frequency limits are 30 hertz (f1) and 200 hertz (f2). The bandwidth of this amplifier is only 170 hertz. The important thing to notice in view (D) is that the frequency scale is different from those used in other views. Any frequency scale can be used for a frequency-response curve. The scale used would be determined by what frequencies are most useful in presenting the frequency-response curve for a particular amplifier.
Q-1. What is the bandwidth of an amplifier?
Q-2. What are the upper and lower frequency limits of an amplifier?
Q-3. What are the upper and lower frequency limits and the bandwidth for the amplifiers that have frequency-response curves as shown in figure 2-3?

Figure 2-3A. - Frequency-response curves for Q3.

Figure 2-3B. - Frequency-response curves for Q3.
Factors Affecting Frequency Response of an Amplifier
In chapter 1 of this module, the fact was mentioned that an audio amplifier is limited in its frequency response. Now you will see why this is true.
You should recall that the frequency response of an a.c. circuit is limited by the reactive elements (capacitance and inductance) in the circuit. As you know, this is caused by the fact that the capacitive and inductive reactances vary with the frequency. In other words, the value of the reactance is determined, in part, by frequency. Remember the formulas:

If you ignore the amplifying device (transistor, electron tube, etc.), and if the amplifier circuit is made up of resistors only, there should be no limits to the frequency response. In other words, a totally resistive circuit would have no frequency limits. However, there is no such thing as a totally resistive circuit because circuit components almost always have some reactance. In addition to the reactance of other components in the circuit, most amplifiers use RC coupling. This means that a capacitor is used to couple the signal in to and out of the circuit. There is also a certain amount of capacitance and inductance in the wiring of the circuit. The end result is that all circuits are reactive. To illustrate this point, figure 2-4 shows amplifier circuits with the capacitance and inductance of the wiring represented as "phantom" capacitors and inductors. The reactances of the capacitors (XC) and the inductors (XL) are shown as "phantom" variable resistors. View (A) shows the circuit with a low-frequency input signal, and view (B) shows the circuit with a high-frequency input signal.
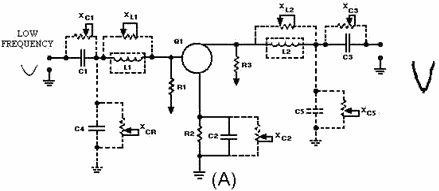
Figure 2-4A. - Amplifiers showing reactive elements and reactance.

Figure 2-4B. - Amplifiers showing reactive elements and reactance.
The actual circuit components are: C1, C2, C3, R1, R2, R3, and Q1. C1 is used to couple the input signal. R1 develops the input signal. R2, the emitter resistor, is used for proper biasing and temperature stability. C2 is a decoupling capacitor for R2. R3 develops the output signal. C3 couples the output signal to the next stage. Q1 is the amplifying device.
The phantom circuit elements representing the capacitance and inductance of the wiring are: L1, L2, C4, and C5. L1 represents the inductance of the input wiring. L2 represents the inductance of the output wiring. C4 represents the capacitance of the input wiring. C5 represents the capacitance of the output wiring.
In view (A) the circuit is shown with a low-frequency input signal. Since the formulas for capacitive reactance and inductive reactance are:

You should remember that if frequency is low, capacitive reactance will be high and inductive reactance will be low. This is shown by the position of the variable resistors that represent the reactances. Notice that XL1 and XL2 are low; therefore, they do not "drop" very much of the input and output signals. XC4 and XC5 are high; these reactances tend to "block" the input and output signals and keep them from going to the power supplies (VBB and VCC). Notice that the output signal is larger in amplitude than the input signal.
Now look at view (B). The input signal is a high-frequency signal. Now XC is low and XL is high. XL1 and XL2 now drop part of the input and output signals. At the same time XC4 and XC5 tend to "short" or "pass" the input and output signals to signal ground. The net effect is that both the input and output signals are reduced. Notice that the output signal is smaller in amplitude than the input signal.
Now you can see how the capacitance and inductance of the wiring affect an amplifier, causing the output of an amplifier to be less for high-frequency signals than for low-frequency signals.
Posted November 8, 2021

Copyright: 1996 - 2026 |
About RF Cafe RF Cafe began life in 1996 as "RF Tools" in an AOL screen name web space totaling 2 MB. Its primary purpose was to provide me with ready access to commonly needed formulas and reference material while performing my work as an RF system and circuit design engineer. The World Wide Web (Internet) was largely an unknown entity at the time and bandwidth was a scarce commodity. Dial-up modems blazed along at 14.4 kbps while tying up your telephone line, and a lady's voice announced "You've Got Mail" when a new message arrived... |
Copyright 1996 - 2026 All trademarks, copyrights, patents, and other rights of ownership to images
and text used on the RF Cafe website are hereby acknowledge My Hobby Website: My Daughter's Website: |
