Module 3 -- Introduction to Circuit Protection, Control, and Measurement
Pages i,
1-1,
1-11,
1-21,
1-31,
1-41,
1-51,
1-61,
1-71,
2-1,
2-11,
1-21,
2-31,
2-41,
3-1,
3-11,
3-21,
3-31,
AI-1,
AII-1,
AIII-1,
IV-1,
Index

Figure 1-30. - Reading a voltmeter at various ranges.
In figure 1-30(A) the meter is in the 1000-volt range. The pointer is barely
above the 0 position. It is not possible to accurately read this voltage. In figure
1-30(B) the meter is switched to the 250 volt range. From the pointer position it
is possible to approximate the voltage as 20 volts. Since this is well below the
next range, the meter is switched, as in figure 1-30(C). With the meter in the 50-volt
range, it is possible to read the voltage as 22 volts. Since this is more than the
next range of the meter (10 volts), the meter would not be switched to the next
(lower) scale.
Q34. How is it possible to use a current sensitive meter movement
to measure voltage?
Q35. What is voltmeter sensitivity?
Q36. What method is used to allow a voltmeter to have several
ranges?
Q37. Why should you always use the highest range when connecting
a voltmeter to a circuit?
ELECTROSTATIC METER MOVEMENT
The final meter movement covered in this chapter is the ELECTROSTATIC METER MOVEMENT.
The other meter movements you have studied all react to current, the electrostatic
meter movement reacts to voltage.
The mechanism is based on the repulsion of like charges on the plates of a capacitor.
The electrostatic meter movement is actually a large variable capacitor in which
one set of plates is allowed to
1-31
move. The movement of the plates is opposed by a spring attached to the plates.
a pointer that indicates the value of the voltage is attached to these movable plates.
As the voltage increases, the plates develop more torque. To develop sufficient
torque, the plates must be large and closely spaced. a very high voltage is necessary
to provide movement, therefore, electrostatic voltmeters are used only for High
Voltage measurement.
VOLTMETER Safety PRECautionS
Just as with ammeters, voltmeters require safety precautions to prevent injury
to personnel and damage to the voltmeter or equipment. The following is a list of
the MINIMUM safety precautions for using a voltmeter.
· Always connect voltmeters in parallel.
· Always start with the highest range of a voltmeter.
· Deenergize and discharge the circuit completely before connecting
or disconnecting the voltmeter.
· In dc voltmeters, observe the proper circuit polarity to prevent
damage to the meter.
· Never use a dc voltmeter to measure ac voltage.
· Observe the general safety precautions of electrical and electronic
devices.
Q38. What type of meter movement reacts to voltage rather than
current?
Q39. What is the only use for the voltage sensitive meter movement?
Q40. List the six safety precautions for the use of voltmeters.
OHMMETERS
The two instruments most commonly used to check the continuity (a complete circuit),
or to measure the resistance of a circuit or circuit element, are the OHMMETER and
the MEGGER (megohm meter). The ohmmeter is widely used to measure resistance and
check the continuity of electrical circuits and devices. Its range usually extends
to only a few megohms. The megger is widely used for measuring insulation resistance,
such as between a wire and the outer surface of the insulation, and insulation resistance
of cables and insulators. The range of a megger may extend to more than 1,000 megohms.
The ohmmeter consists of a dc ammeter, with a few added features. The added features
are:
1. a dc source of potential (usually a 3-volt battery)
2. One or more resistors (one of which is variable)
3. a simple ohmmeter circuit is shown in figure 1-31.
The ohmmeter's pointer deflection is controlled by the amount of battery current
passing through the moving coil. Before measuring the resistance of an unknown resistor
or electrical circuit, the test leads of the ohmmeter are first shorted together,
as shown in figure 1-31. With the leads shorted, the meter is calibrated for proper
operation on the selected range. While the leads are shorted, meter current is maximum
and the pointer deflects a maximum amount, somewhere near the zero position on the
ohms
1-32
scale. Because of this current through the meter with the leads shorted, it is
necessary to remove the test leads when you are finished using the ohmmeter. If
the leads were left connected, they could come in contact with each other and discharge
the ohmmeter battery. When the variable resistor (rheostat) is adjusted properly,
with the leads shorted, the pointer of the meter will come to rest exactly on the
zero position. This indicates ZERO Resistance between the test leads, which, in
fact, are shorted together. The zero reading of a series-type ohmmeter is on the
right-hand side of the scale, where as the
zero reading for an ammeter or a voltmeter is generally to the left-hand side
of the scale. (There is another type of ohmmeter which is discussed a little later
on in this chapter.) When the test leads of an ohmmeter are separated, the pointer
of the meter will return to the left side of the scale. The interruption of current
and the spring tension act on the movable coil assembly, moving the pointer to the
left side (∞) of the scale.
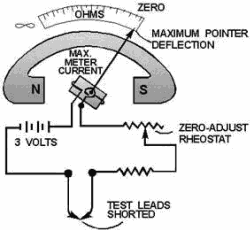
Figure 1-31. - a simple ohmmeter circuit.
USING The OHMMETER
After the ohmmeter is adjusted for zero reading, it is ready to be connected
in a circuit to measure resistance. a typical circuit and ohmmeter arrangement is
shown in figure 1-32.
1-33
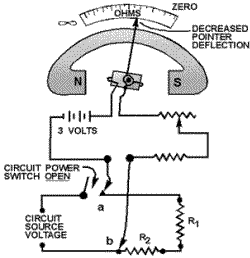
Figure 1-32. - Measuring circuit resistance with an ohmmeter.
The power switch of the circuit to be measured should always be in the ofF position.
This prevents the source voltage of the circuit from being applied across the meter,
which could cause damage to the meter movement.
The test leads of the ohmmeter are connected in series with the circuit to be
measured (fig. 1-32). This causes the current produced by the 3-volt battery of
the meter to flow through the circuit being tested. Assume that the meter test leads
are connected at points a and b of figure 1-32. The amount of current that flows
through the meter coil will depend on the total resistance of resistors R1
and R2, and the resistance of the meter. Since the meter has been preadjusted (zeroed),
the amount of coil movement now depends solely on the resistance of R1and R2. The
inclusion of R1 and R2 raises the total series resistance, decreasing
the current, and thus decreasing the pointer deflection. The pointer will now come
to rest at a scale figure indicating the combined resistance of R1 and R2.
If R1 or R2, or both, were replaced with a resistor(s) having a larger value,
the current flow in the moving coil of the meter would be decreased further. The
deflection would also be further decreased, and the scale indication would read
a still higher circuit resistance. Movement of the moving coil is proportional to
the amount of current flow.
OHMMETER RANGES
The amount of circuit resistance to be measured may vary over a wide range. In
some cases it may be only a few ohms, and in others it may be as great as 1,000,000
ohms (1 megohm). To enable the meter to indicate any value being measured, with
the least error, scale multiplication features are used in most ohmmeters. For example,
a typical meter will have four test lead jacks-Common, R x 1, R x 10, and R x 100.
The jack marked Common is connected internally through the battery to one side of
the moving coil of the ohmmeter. The jacks marked R x 1, R x 10, and R x 100 are
connected to three different size resistors located within the ohmmeter. This is
shown in figure 1-33.
1-34
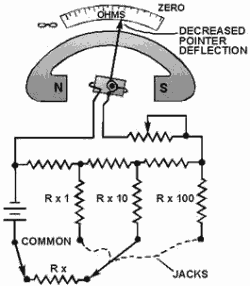
Figure 1-33. - An ohmmeter with multiplication jacks.
Some ohmmeters are equipped with a selector switch for selecting the multiplication
scale desired, so only two test lead jacks are necessary. Other meters have a separate
jack for each range, as shown in figure 1-33. The range to be used in measuring
any particular unknown resistance (Rx in figure 1-33) depends on the approximate
value of the unknown resistance. For instance, assume the ohmmeter in figure 1-33
is calibrated in divisions from 0 to 1,000. If Rx is greater than 1,000 ohms,
and the R x 1 range is being used, the ohmmeter cannot measure it. This occurs because
the combined series resistance of resistor R x 1 and Rx is too great to allow
sufficient battery current to flow to deflect the pointer away from infinity (∞).
(Infinity is a quantity larger than the largest quantity you can measure.) The test
lead would have to be plugged into the next range, R x 10. With this done, assume
the pointer deflects to indicate 375 ohms. This would indicate that Rx has
375 ohms x 10, or 3,750 ohms resistance. The change of range caused the deflection
because resistor R x 10 has about 1/10 the resistance of resistor R x 1. Thus, selecting
the smaller series resistance permitted a battery current of sufficient amount to
cause a useful pointer deflection. If the R x 100 range were used to measure the
same 3,750-ohm resistor, the pointer would deflect still further, to the 37.5-ohm
position. This increased deflection would occur because resistor R x 100 has about
1/10 the resistance of resistor R x 10.
The foregoing circuit arrangement allows the same amount of current to flow through
the meter's moving coil whether the meter measures 10,000 ohms on the R x 10 scale,
or 100,000 ohms on the R x 100 scale.
It always takes the same amount of current to deflect the pointer to a certain
position on the scale (midscale position for example), regardless of the multiplication
factor being used. Since the multiplier resistors are of different values, it is
necessary to ALWAYS "zero" adjust the meter for each multiplication fact or selected.
You should select the multiplication factor (range) that will result in the pointer
coming to rest as near as possible to the midpoint of the scale. This enables you
to read the resistance more accurately, because the scale readings are more easily
interpreted at or near midpoint.
1-35
Q41. What electrical quantity is measured by an ohmmeter?
Q42. What other measurement can an ohmmeter make?
Q43. How is a series-type ohmmeter connected to the circuit
being measured?
Q44. What is used to provide the ohmmeter with several ranges?
Q45. What area of an ohmmeter scale should be used when measuring
circuits?
Shunt OHMMETER
The ohmmeter described to this point is known as a series ohmmeter, because the
resistance to be measured is in series with the internal resistors and the meter
movement of the ohmmeter. Another type of ohmmeter is the Shunt OHMMETER. In the
shunt ohmmeter, the resistance to be measured shunts (is in parallel with) the meter
movement of the ohmmeter. The most obvious way to tell the difference between the
series and shunt ohmmeters is by the scale of the meter. Figure 1-34 shows the scale
of a series ohmmeter and the scale of a shunt ohmmeter.
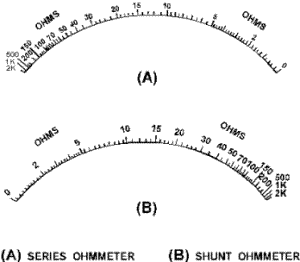
Figure 1-34. - Series and shunt ohmmeter scales.
Figure 1-34(A) is the scale of a series ohmmeter. Notice "0" is on the right
and "∞" is on the left. Figure 1-34(B) is the scale of a shunt ohmmeter. In the
shunt ohmmeter "∞" is on the right and "0" is on the left. a shunt ohmmeter circuit
is shown in figure 1-35.
In figure 1-35, R1 is a rheostat used to adjust the ∞ reading of the meter
(full-scale deflection). R2, R3, and R4 are used to provide the R x 1, R x 10, and
R x 100 ranges. Points a and B represent the meter leads. With no resistance connected
between points a and B the meter has full-scale current and indicates
1-36
∞. If a resistance is connected between points a and B, it shunts some of the
current from the meter movement and the meter movement reacts to this lower current.
Since the scale of the meter is marked in ohms, the resistance of the shunting resistor
(between points a and B) is indicated. Notice that the switch has an ofF position,
as well as positions for R x 1, R x 10, and R x 100. This is provided to stop current
flow and prevents the battery from being discharged while the meter is not being used.
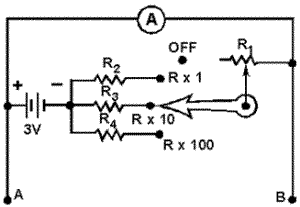
Figure 1-35. - a shunt ohmmeter with internal range resistors.
The shunt ohmmeter is connected to the circuit to be measured in the same way
the series ohmmeter is connected. The only difference is that on the shunt ohmmeter
the ∞ reading is adjusted, while on the series ohmmeter the 0 reading is adjusted.
Shunt ohmmeters are not commonly used because they are limited generally to measuring
resistances from 5 ohms to 400 ohms. If you use a shunt ohmmeter, be certain to
switch it to the ofF position when you are finished using it.
Q46. What are the two types of ohmmeters?
Q47. What is the most obvious difference between the two types
of ohmmeters?
Q48. List the four safety precautions observed when using ohmmeters.
OHMMETER Safety PRECautionS
The following safety precautions and operating procedures for ohmmeters are the
MINIMUM necessary to prevent injury and damage.
· Be certain the circuit is deenergized and discharged before connecting
an ohmmeter.
· Do not apply power to a circuit while measuring resistance.
· When you are finished using an ohmmeter, switch it to the ofF position
if one is provided and remove the leads from the meter.
· Always adjust the ohmmeter for 0 (or ∞ in shunt ohmmeter) after
you change ranges before making the resistance measurement.
1-37
MEGOHMMETER
An ordinary ohmmeter cannot be used for measuring resistance of multimillions
of ohms, such as in conductor insulation. To adequately test for insulation break
down, it is necessary to use a much higher potential than is furnished by the battery
of an ohmmeter. This potential is placed between the conductor and the outside surface
of the insulation.
An instrument called a MEGOHMMETER (MEGGER) is used for these tests. The megger
(fig. 1-36) is a portable instrument consisting of two primary elements: (1) a hand-driven
dc generator, G, which supplies the high voltage for making the measurement, and
(2) the instrument portion, which indicates the value of the resistance being measured.
The instrument portion is of the opposed-coil type, as shown in figure 1-36(A).
Coils a and b are mounted on the movable member c with a fixed relationship to each
other, and are free to turn as a unit in a magnetic field. Coil b tends to move
the pointer counterclockwise, and coil a tends to move the pointer clockwise.
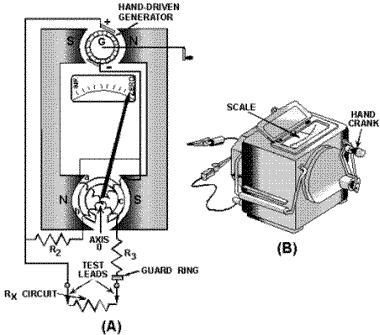
Figure 1-36. - a megger internal circuit.
Coil a is connected in series with R3 and the unknown resistance, Rx, to
be measured. The combination of coil, R3, and Rx forms a direct series path
between the positive (+) and negative (-) brushes of the dc generator. Coil b is
connected in series with R2 and this combination is also connected across
the generator. There are no restraining springs on the movable member of the instrument
portion of the megger. Therefore, when the generator is not operated, the pointer
floats freely and may come to rest at any position on the scale.
1-38
The guard ring intercepts leakage current. Any leakage currents intercepted are
shunted to the negative side of the generator. They do not flow through coil a;
therefore, they do not affect the meter reading.
If the test leads are open-circuited, no current flows in coil a. However, current
flows internally through coil b, and deflects the pointer to infinity, which indicates
a resistance too large to measure. When a resistance such as Rx is connected
between the test leads, current also flows in coil a, tending to move the pointer
clockwise. At the same time, coil b still tends to move the pointer counterclockwise.
Therefore, the moving element, composed of both coils and the pointer, comes to
rest in a position at which the two forces are balanced. This position depends upon
the value of the external resistance, which controls the relative amount of current
in coil a. Because changes in voltage affect both coil a and coil b in the same
proportion, the position of the moving system is independent of the voltage. If
the test leads are short-circuited, the pointer rests at zero because the current
in coil a is relatively large. The instrument is not damaged under these circumstances
because the current is limited by R3.
The external view of one type of megger is shown in figure 1-36(B).
Navy meggers are usually rated at 500 volts. To avoid excessive test voltages,
most meggers are equipped with friction clutches. When the generator is cranked
faster than its rated speed, the clutch slips and the generator speed and output
voltage are not permitted to exceed their rated values. When extremely high resistances-for
example, 10,000 megohms or more-are to be measured, a high voltage is needed to
cause sufficient current flow to actuate the meter movement. For extended ranges,
a 1,000-volt generator is available.
When a megger is used, the generator voltage is present on the test leads. This
voltage could be hazardous to you or to the equipment you are checking. Therefore,
NEVER TOUCH The Test LEADS WHILE The MEGGER Is BEING useD and isolate the item you
are checking from the equipment before using the megger.
Using the Megger
To use a megger to check wiring insulation, connect one test lead to the insulation
and the other test lead to the conductor, after isolating the wiring from the equipment.
Turn the hand crank until the slip clutch just begins to slip and note the meter
reading. Normal insulations should read infinity. Any small resistance reading indicates
the insulation is breaking down.
Megger Safety Precautions
When you use a megger, you could be injured or damage equipment you are working
on if the following MINIMUM safety precautions are not observed.
· use meggers on high-resistance measurements only (such as insulation
measurements or to check two separate conductors on a cable).
· Never touch the test leads while the handle is being cranked.
· Deenergize and discharge the circuit completely before connecting
a megger.
· Disconnect the item being checked from other circuitry, if possible,
before using a megger.
Q49. What is the primary use of a megger?
1-39
Q50. What is the procedure for using a megger to check the
insulation of a conductor?
Q51. What is a normal indication on a megger when checking
insulation?
Q52. List the four safety precautions observed when using a
megger.
MULTIMETER
A MULTIMETER is the most common measuring device used in the Navy. The name multimeter
comes from MULTIple METER, and that is exactly what a multimeter is. It is a dc
ammeter, a dc voltmeter, an ac voltmeter, and an ohmmeter, all in one package. Figure
1-37 is a picture of a typical multimeter.
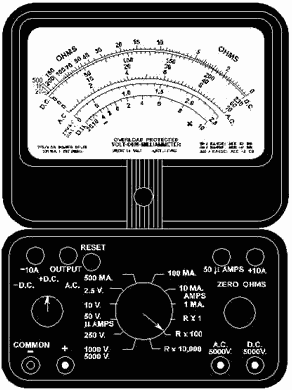
Figure 1-37. - a typical multimeter.
1-30
| - |
Matter, Energy,
and Direct Current |
| - |
Alternating Current and Transformers |
| - |
Circuit Protection, Control, and Measurement |
| - |
Electrical Conductors, Wiring Techniques,
and Schematic Reading |
| - |
Generators and Motors |
| - |
Electronic Emission, Tubes, and Power Supplies |
| - |
Solid-State Devices and Power Supplies |
| - |
Amplifiers |
| - |
Wave-Generation and Wave-Shaping Circuits |
| - |
Wave Propagation, Transmission Lines, and
Antennas |
| - |
Microwave Principles |
| - |
Modulation Principles |
| - |
Introduction to Number Systems and Logic Circuits |
| - |
- Introduction to Microelectronics |
| - |
Principles of Synchros, Servos, and Gyros |
| - |
Introduction to Test Equipment |
| - |
Radio-Frequency Communications Principles |
| - |
Radar Principles |
| - |
The Technician's Handbook, Master Glossary |
| - |
Test Methods and Practices |
| - |
Introduction to Digital Computers |
| - |
Magnetic Recording |
| - |
Introduction to Fiber Optics |
| Note: Navy Electricity and Electronics Training
Series (NEETS) content is U.S. Navy property in the public domain. |
|


