Module 12 − Modulation Principles
Pages i,
1−1,
1−11,
1−21,
1−31,
1−41,
1−51,
1−61,
1−71,
2−1,
2−11,
2−21,
2−31,
2−41,
2−51,
2−61,
3−1,
3−11,
3−21,
3−31, AI−1, Index, Assignment 1, 2

Figure 1-14A. - Waveforms across two nonlinear impedances.

Figure 1-14B. - Waveforms across two nonlinear impedances. If the two sine wave generators are of different frequencies, then the sum of the instantaneous
values will appear as a complex wave across the impedances, as shown in figure 1-15, views (A) and (B). To
determine the wave shape across each individual impedance, assume only one generator is connected at a 1-21
time and compute the sine-wave voltage developed across each impedance for that generator input. Then,
combine the instantaneous voltages (caused by each generator input) to obtain the complex waveform across each
impedance. The nature of the impedance (resistive or reactive) will determine the shape of the complex waveform.
Because the complex waveform is the sum of two individual sine waves, the composite waveform contains only the two
original frequencies.
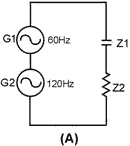
Figure 1-15A. - Sine-wave generators with different frequencies and linear impedances.

Figure 1-15B. - Sine-wave generators with different frequencies and linear impedances. Linear impedances may alter complex waveforms, but they do not produce new frequencies. The output of
one generator does not influence the output of the other generator. TWO SINE WAVE GENERATORS and a
Combination of LINEAR and NONLINEAR ImpedanceS Figure 1-16 illustrates a circuit that contains two
sine-wave generators (G1 and G2), linear impedance Z1, and nonlinear impedance Z2, in series. When a single
sine-wave voltage is applied to a 1-22
combined linear and nonlinear impedance circuit, the voltages developed across the impedances are
complex waveforms.
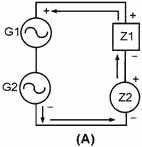
Figure 1-16. - Sine-wave generators with a combination of impedances. When two sine wave voltages are applied to a circuit, as in figure 1-16, nonlinear impedance Z2 reshapes
the two sine-wave inputs and their harmonics, resulting in a very complex waveform. Assume that nonlinear impedance Z2 will allow current to flow only when the sum of the two sine-wave
generators (G1 and G2) has the polarity indicated. The waveforms present across the linear impedance will appear
as a varying waveform. This will be a complex waveform consisting of: • a dc level • the two
fundamental sine wave frequencies • the harmonics of the two fundamental frequencies
• the sum of the fundamental frequencies • the difference between frequencies
The sum and difference frequencies occur because the phase angles of the two fundamentals are
constantly changing. If generator G1 produces a 10-hertz voltage and generator G2 produces an 11-hertz voltage,
the waveforms produced because of the nonlinear impedance will be as shown in the following list: • a
10-hertz voltage • an 11-hertz voltage • harmonics of 10 hertz and 11 hertz (the higher the
harmonic, the lower its strength) • the sum of 10 hertz and 11 hertz (21 hertz) • the
difference between 10 hertz and 11 hertz (1 hertz) 1-23
Figure 1-17 illustrates the relationship between the two frequencies (10 and 11 hertz). Since the
waveforms are not of the same frequency, the 10 hertz of view (B) and the 11 hertz of view (A) will be in phase at
some points and out of phase at other points. You can see this by closely observing the two waveforms at different
instants of time. The result of the differences in phase of the two sine waves is shown in view (C). View (D)
shows the waveform that results from the nonlinearity in the circuit.

Figure 1-17A. - Frequency relationships. 
Figure 1-17B. - Frequency relationships. 
Figure 1-17C. - Frequency relationships. 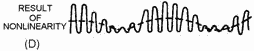
Figure 1-17D. - Frequency relationships.
The most important point to remember is that when varying voltages are applied to a circuit which contains a
nonlinear impedance, the resultant waveform contains frequencies which are not present at the input source. The process of combining two or more frequencies in a nonlinear impedance results in the production of new
frequencies. This process is referred to as heterodyning. 1-24
SPECTRUM ANALYSIs The heterodyning process can be analyzed by using SPECTRUM
ANALYSIs (the display of electromagnetic energy arranged according to wavelength or frequency). As shown in figure
1-18, spectrum analysis is an effective way of viewing the energy in electronic circuits. It clearly shows the
relationships between the two fundamental frequencies (10 and 11 hertz) and their sum (21 hertz) and difference (1
hertz) frequencies. It also allows you to view the Bandwidth (the amount of the frequency spectrum that signals
occupy) of the signal you are studying.
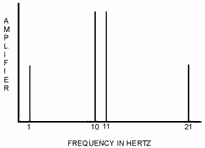
Figure 1-18. - Spectrum analysis of heterodyned signal. Typical HETERODYNING Circuit Two conditions must be met in a circuit for
heterodyning to occur. First, at least two different frequencies must be applied to the circuit. Second, these
signals must be applied to a nonlinear impedance. These two conditions will result in new frequencies (sum and
difference) being produced. Any one of the frequencies can be selected by placing a frequency-selective device
(such as a tuned tank circuit) in series with the nonlinear impedance in the circuit. Figure 1-19
illustrates a basic heterodyning circuit. The diode D1 serves as the nonlinear impedance in the circuit.
Generators G1 and G2 are signal sources of different frequencies. The primary of T1, with its associated
capacitance, serves as the frequency-selective device.
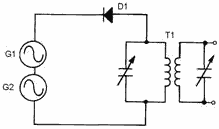
Figure 1-19. - Typical heterodyning circuit. 1-25
The principles of this circuit are similar to those of the block diagram circuit of figure 1-16.
Notice in figure 1-19 that the two generators are connected in series. Therefore, the resultant waveform of their
combined frequencies will determine when the cathode of D1 will be negative with respect to the anode, thereby
controlling the conduction of the diode. The new frequencies that are generated by applying these signals to
nonlinear impedance D1 are the sum and difference of the two original frequencies. The frequency-selective device
T1 may be tuned to whichever frequency is desired for use in later circuit stages. Heterodyning action takes
place, intentionally or not, whenever these conditions exist. Heterodyning (MIXING) circuits are found in most
electronic transmitters and receivers. These
transmitter and receiver circuits will be explained in detail later in this module. Q-14. Define
the heterodyne principle. Q-15. What is a nonlinear impedance? Q-16. What is
spectrum analysis? Q-17. What two conditions are necessary for heterodyning to take place?
Amplitude-MODULATED Systems Amplitude modulation refers to any method of
varying the amplitude of an electromagnetic carrier frequency in accordance with the intelligence to be
transmitted by the carrier. The CARRIER frequency is a radio-frequency wave suitable for modulation by the
intelligence to be transmitted. One form of this method of modulation is simply to interrupt the carrier in
accordance with a prearranged code. CONTINUOUS WAVE (CW) The "on-off" KEYING of a
continuous wave (CW) carrier frequency was the principal method of modulating a carrier in the early days of
electrical communications. The intervals of time when a carrier either was present or absent conveyed the desired
intelligence. This is still used in modern communications. When applied to a continuously oscillating
radio-frequency source, on-off keying is referred to as CW signaling. This type of communication is sometimes
referred to as an interrupted continuous wave (ICW). Development The use of a CW
transmitter can be very simple. All that is required for the transmitter to work properly is a device to generate
the oscillations, a method of keying the oscillations on and off, and an antenna to radiate the energy. Continuous
wave was the first type of modulation used. It is still extensively used for long-range communications. When
Marconi and others were attempting the transfer of intelligence between two points, without reliance on a
conducting path, they employed the use of a practical coding system known as Morse code. You probably know that
Morse code is a system of on-off keying developed for telegraph that is capable of passing intelligence over wire
at an acceptable rate. Morse code consists only of periods of signal and no-signal.
Figure 1-20 is the International Morse code used with telegraphy and cw modulation. Each character in the
code is made up of a series of elements referred to as DOTS or DASHES. These are short (dot) and long (dash)
bursts of signal separated by intervals of no signal. The dot is the basic time element of the code. The dash has
three times the duration of a dot interval. The waveforms for both are shown in figure 1-21. The elements within
each character are separated by intervals of no signal with a time duration of one dot. The characters are
separated by a no-signal interval equal in duration to one dash. Each interval 1-26
during which signal is present is called the MARKING interval, and the period of no signal is called
the SPACING interval. Figure 1-22 shows the relationships between the RF carrier view (A), the on-off keying
waveform view (B), and the resultant carrier wave view (C).

Figure 1-20. - International Morse code. 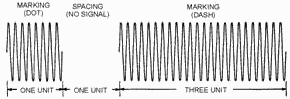
Figure 1-21. - Dot and dash in radiotelegraph code. 1-27

Figure 1-22A. - Essential elements of ON-ofF keying. 
Figure 1-22B. - Essential elements of ON-ofF keying. 
Figure 1-22C. - Essential elements of ON-ofF keying. 1-28
Keying Methods Keying a transmitter causes an RF signal to be radiated only
when the key contacts are closed. When the key contacts are open, the transmitter does not radiate energy. Keying
is accomplished in either the oscillator or amplifier stage of a transmitter. a number of different keying systems
are used in Navy transmitters. In most Navy transmitters, the hand telegraph key is at a low-voltage
potential with respect to ground. a keying bar is usually grounded to protect the operator. Generally, a keying
relay, with its contacts in the center-tap lead of the filament transformer, is used to key the equipment. Because
one or more stages use the same filament transformer, these stages are also keyed. a class C final amplifier, when
operated with fixed bias, is usually not keyed. This is because no output occurs when no excitation is applied in
class C operation. Keying the final amplifier along with the other stages is not necessary in this case.
Oscillator KEYING. - Two methods of Oscillator KEYING are shown in figure 1-23. In view (A) the grid
circuit is closed at all times. The key (K) opens and closes the negative side of the plate circuit. This system
is called PLATE KEYING. When the key is open, no plate current can flow and the circuit does not oscillate. In
view (B), the cathode circuit is open when the key is open and neither grid current nor plate current can flow.
Both circuits are closed when the key is closed. This system is called CATHODE KEYING. Although the circuits of
figure 1-23 may be used to key amplifiers, other keying methods are generally employed because of the high
values of plate current and voltage encountered.
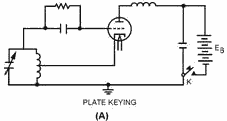
Figure 1-23A. - Oscillator keying. 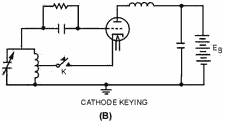
Figure 1-23B. - Oscillator keying. 1-29
BlockED-GRID KEYING. - Two methods of BlockED-GRID KEYING are shown in figure 1-24.
The key in view (A) shorts cathode resistor R1 allowing normal plate current to flow. With the key open, reduced
plate current flows up through resistor R1 making the end connected to grid resistor Rg negative. If R1 has a high
enough value, the bias developed is sufficient to cause cutoff of plate current. Depressing the key short-circuits
R1. This increases the bias above cutoff and allows the normal flow of plate current. Grid resistor Rg is the
usual grid-leak resistor for normal biasing.
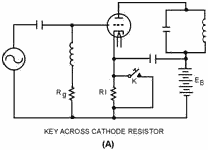
Figure 1-24A. - Blocked-grid keying. 
Figure 1-24B. - Blocked-grid keying.
The blocked-grid keying method in view (B) affords a complete cutoff of plate current. It is one of the
best methods for keying amplifier stages in transmitters. In the voltage divider with the key open, two- thirds of
1,000 volts, or 667 volts, is developed across the 200-kilohm resistor; one-third of 1,000 volts, or 333 volts, is
developed across the 100-kilohm resistor. The grid bias is the sum of 100 volts and 333 volts, or 433 volts. This
sum is below cutoff and no plate current flows. The plate voltage is 667 volts. With the key closed, the
200-kilohm resistor drops 1,000 volts. The plate voltage becomes 1,000 volts at the same time the grid bias
becomes 100 volts. Grid bias is reduced enough so that the triode amplifier will conduct only on the peaks of the
drive signal. 1-30
| - |
Matter, Energy,
and Direct Current |
| - |
Alternating Current and Transformers |
| - |
Circuit Protection, Control, and Measurement |
| - |
Electrical Conductors, Wiring Techniques,
and Schematic Reading |
| - |
Generators and Motors |
| - |
Electronic Emission, Tubes, and Power Supplies |
| - |
Solid-State Devices and Power Supplies |
| - |
Amplifiers |
| - |
Wave-Generation and Wave-Shaping Circuits |
| - |
Wave Propagation, Transmission Lines, and
Antennas |
| - |
Microwave Principles |
| - |
Modulation Principles |
| - |
Introduction to Number Systems and Logic Circuits |
| - |
- Introduction to Microelectronics |
| - |
Principles of Synchros, Servos, and Gyros |
| - |
Introduction to Test Equipment |
| - |
Radio-Frequency Communications Principles |
| - |
Radar Principles |
| - |
The Technician's Handbook, Master Glossary |
| - |
Test Methods and Practices |
| - |
Introduction to Digital Computers |
| - |
Magnetic Recording |
| - |
Introduction to Fiber Optics |
| Note: Navy Electricity and Electronics Training
Series (NEETS) content is U.S. Navy property in the public domain. |
|