|
|||||||||||||
 |
|||||||||||||
Loudspeaker Repairs Anyone Can Make
|
|||||||||||||
There are a couple YouTube videos at the bottom of the page demonstrating speaker repair. Loudspeaker Repairs Anyone Can Make  With a minimum of equipment you can correct
many speaker defects by following these instructions. With a minimum of equipment you can correct
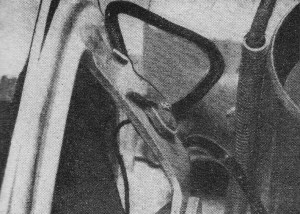
many speaker defects by following these instructions.Loudspeaker defects are not too common in present-day radio and television sets but occasionally they do occur! When such faults crop up they are often due to carelessness on the part of the hobbyist who accidentally pushes through the fiber or pokes a hole in the cone itself. Here are a few of the more common loudspeaker defects which you will encounter, along with the simple repair methods anyone can use to correct them. Before we get too involved, the author wishes to point out that he in no way encourages the repair of high-quality speakers, particularly those that are used in today's high fidelity systems. Home repair of speakers is usually a temporary expedient. Needless to say, to restore a speaker to its original performance level it is advisable to return the unit to the manufacturer for servicing. Broken voice coil lead: This defect will cause a "dead" set. The voice coil leads are flexible wires between the loudspeaker frame and the paper cone, and are located at the back of the speaker. See Fig. 1. Breakage usually occurs either at the terminal on the loudspeaker frame or at the connection point on the cone.
Fig. 1 - Although only one is shown in photo, there are two voice coil leads on every speaker, extending from speaker frame to the cone.
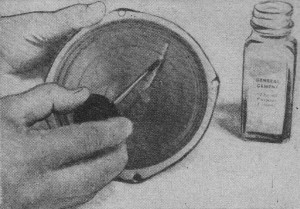
Fig. 2 - Correct method for applying cement to repair an open seam on outer rim of speaker. Do not use speaker until cement has hardened.
Fig. 3 - Small punctures and tears in the speaker cone may also be repaired by careful application of cement over injured area.
Fig. 4 - Larger tears in the paper cone of the speaker may be repaired by patching over with cheesecloth held in place by cement.
Fig. 5 - Correct procedure for testing a speaker for an off-center voice coil is shown in this photo. See text for full details.
Fig. 6 - To loosen the voice coil and cone assembly on speakers that do not have a centering screw, apply solvent to rim as shown.
Fig. 7 - After cone assembly has been loosened, insert three shims between voice coil and pole piece. Shims must be equally spaced.
Fig. 8 - Final step is replacing the felt pad over the speaker center by cementing it in place as shown. This pad keeps out dust. Repair a broken lead by resoldering the connection. If the break has occurred at the cone terminal, do the soldering job as quickly as possible to avoid burning the paper cone. Use a hot, clean, well-tinned soldering iron and rosin base flux. Open cone seam: Loudspeaker cones are of two general types - the seamless type which are molded, and the formed type which have a cemented seam. Since the cement dries out gradually, the seam on the latter type may open after a period of several years. The loose edges may touch, causing a vibration that produces a papery, rattling sound. The remedy is to put fresh cement along the seam, as shown in Fig. 2. General "loudspeaker cement," available at radio supply stores, may be used for the job - or, if you prefer, you can use Duco household cement. Don't use the loudspeaker until the cement has had time to set thoroughly. Torn cone: Tears in the paper cone may cause symptoms similar to those encountered with an open seam, and may also cause other types of distortion. Small "puncture" tears will result when a sharp pencil or screwdriver is pushed through the cone accidentally. These may be repaired simply by brushing on cement, as shown in Fig. 3. Gently push the torn edges together after applying the cement on both sides of the tear. Longer tears may be repaired by patching with cement and cheese-cloth, as shown in Fig. 4. If the tear is extensive, however, have a new cone installed. This job is not too expensive, but does require a fair amount of skill. It can be handled best by a professional. Off-center voice coil: This is probably the most common loudspeaker defect. If the voice coil is off center, it will rub against the pole piece and field magnet, distorting the sound. You can check for this defect by holding the speaker by its edges and gently moving the cone back and forth with your thumbs, as shown in Fig. 5. Use only enough pressure to move the cone. If the cone is off center, you can easily feel the voice coil rubbing against the magnet on one side. To re-center the cone and voice coil, you'll need several thin shims. These can be purchased in sets at your radio supply store and are available both in non-magnetic steel and in fiber. You can also cut the shims from thin card stock if you do not have the regular shim stock. On many old style speakers, a "centering screw" is provided. This may be located either behind the magnet or in the middle of the "spider" in the center of the cone. On most newer speakers, no such adjustment is available and the whole voice coil and cone assembly must be loosened by applying cement solvent. Use an eye-dropper and brush to apply the solvent to the rim of the speaker, as shown in Fig. 6. Apply solvent to the central dust felt also and remove this piece. You'll have to wait a short while for the solvent to loosen the cement before the cone can be freed. Proceed carefully and do not try to remove the cone until it is entirely free. Otherwise, the cone may be torn. After loosening the cone assembly, either by adjusting the centering screw or by using solvent, insert three shims between the voice coil and the pole piece, as shown in Fig. 7. The shims should be equally spaced around the pole piece (120° apart). With the shims inserted, retighten the centering screw or re-cement the cone. After the cement is thoroughly set, remove the shims carefully by pulling up on them gently but firmly. Complete the job by cementing a new dust felt in place, as shown in Fig. 8. Exercise every caution in using the tweezers, for a careless slip on your part at this point could poke a nasty hole in the speaker cone and provide you with more problems than when you started out. Other defects: Sometimes the speaker frame will become bent or warped, throwing the voice coil off center. This defect may often be corrected by twisting the frame by hand in the direction opposite the warp. In many cases, however, a new speaker must be installed. An open voice coil winding requires a new cone assembly and it is a good idea to have a professional repairman handle this job for you. Here are some YouTube videos for repairing speakers:
Posted July 18, 2022 |
|||||||||||||
 |
|||||||||||||
|
|||||||||||||


|
||||||||||||||||||||||||||||||||||||