|
I suppose the term "Subminiature"
as it applies to electronics components is as relative as the word "Modern" is in
book titles. They might be accurate at the time of the writing, but passage of time
renders them ambiguous. Subminiature in 1957, when this Radio & TV News
magazine article appeared, meant anything other than full-size vacuum tubes, huge
power transformers, multi-layer wafer switches, and hookup wire larger than 20 AWG.
The advent of peanut tubes, very early versions of transistors and solid state diodes,
and ever-higher operational frequencies permitted component sizes to be shrunk by
a factor of two or more. Rather than using a pistol-style soldering gun or a soldering
iron designed for assembling copper guttering, a precision pencil-type iron could
be used and greasy tools from the garage no longer sufficed for turning screws and
nuts. A lot of the material in this article is still useful for hobbyists and even
electronics professionals in the lab. Subminiature Construction
Techniques for the Home Builder
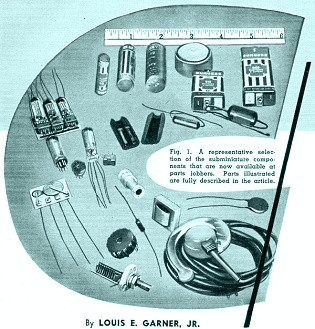
Fig. 1 - A representative selection of the subminiature
components that are now available at parts jobbers. Parts illustrated are fully
described in the article.
By Louis E. Garner, Jr.
The availability of these tiny parts makes it possible for hobbyists with limited
space to build electronic equipment.
For some time, the average home builder or electronics experimenter has
followed a rather general path as he acquired greater skill and ability in his
hobby. Starting with simple one- and two-tube receivers or amplifiers, the
builder would work into more and more complex (and larger) equipment, eventually
building such items as ten- to fifteen-tube communication receivers, complex
test equipment, hi-fi audio
amplifiers, and television receivers. Almost every hobbyist has, at one time or
another, reached the point where "what to build next?" becomes an important problem.
Today, however, with the increasing availability of miniature and subminiature
components, an entirely new construction field has opened for the experimenter -
assembling subminiature equipment. Nor is this field restricted only to the experimenter;
hams will find that the construction of subminiature receivers and transmitters
offers a real challenge to their skill, hi-fi "bugs" can apply subminiature construction
techniques to the assembly of compact preamplifiers, and technicians will find that
subminiature test equipment reduces the weight and space requirements of equipment
that must be "toted" to a customer's home.
In addition to the advantages just outlined, assembling subminiature equipment
is the ideal solution to the problem of the experimenter who lives in an apartment
and has limited space at his disposal. The equivalent of a "shop full" of tools
may be carried in a large briefcase. Enough components to assemble several receivers
and amplifiers may be easily stored in a cigar box and a coffee or end table offers
ample working area for most projects.
Subminiature Components
Recently subminiature components have become widely available at local radio-electronic
wholesale supply houses. Previously, such parts were so difficult to obtain that
the would-be builder soon gave up in disgust. Today most of these components may
be purchased across the counter as stock items. A few still have to be obtained
on special order, but delivery time is now reckoned in days rather than in weeks
and months.
A sample selection of components that were purchased at a local radio wholesaler
is shown in Fig. 1. The 6" rule in the photo illustrates the sizes of the components
shown.
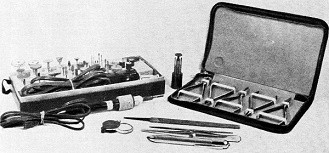
Fig. 2 - Some of the tools that the builder of subminiature
gear will find useful. Shown are power tool, jeweler's screwdrivers and pliers,
soldering pencil, etc.
Across the back is shown (from left to right) Burgess No. 7 and type Z penlite
cells and Mallory RM-12 (RM-1200) and RM-4000 mercury cells. These cells are generally
used as "A" batteries in subminiature equipment. Also shown is a Burgess U10, 15-volt
hearing aid battery and a Burgess U20, 30-volt hearing aid battery. Batteries of
this type are used as "B" supplies.
On the left side is shown (from top to bottom), a Centralab PC-201 3-stage printed
circuit audio amplifier, two types of "subminiature" tubes with their corresponding
sockets (a Sylvania type 1E8 and a Raytheon type CK512), a printed circuit "Couplate,"
a standard 1/2-watt carbon resistor, and a miniature volume control (Centralab type
B16-224). The miniature volume controls are available in a number of resistance
values and both with and without switches.
On the right side of the photograph is shown a small iron-core audio transformer,
a miniature ceramic coil form, a miniature tuning capacitor, a miniature "metallized"
paper capacitor (size shown is .25 µfd., 200 volts), a miniature tubular paper
unit, and a disc ceramic capacitor. The small iron-core audio transformers are available
from a number of manufacturers, although the UTC SO (Sub-Ouncer) and SSO (Sub-Sub-Ouncer)
series are the ones most often carried in stock by local suppliers.
Millen manufactures the miniature ceramic coil form shown and can supply these
forms with either adjustable iron cores or brass slugs as stock items. The tuning
capacitor shown is also a stock item and is manufactured by the E. F. Johnson Co.
A type 20M11 is shown (2.6-19.7 µµfd.).
Large-capacity, small-size metalized paper capacitors are made by a umber of
manufacturers and stocked by most suppliers. A Pyramid type MT capacitor is shown
in the photograph as representative.
In addition to the above the photo shows a miniature two-conductor jack Walsco
type 791) and a midget ear-set (Telex No. A4680). Again, both of these are stock
items.
In addition to the items shown, :here are a number of other miniature and subminiature
components available that might appeal to the specialized builder. Such items include
miniature sensitive relays hardly bigger than a standard miniature tube (such relays
are manufactured by Potter & Brumfield). However, the items shown in the photograph
are those most likely to be encountered as "stock" items at local distributors.
Tools
The builder of subminiature equipment will find it worthwhile to obtain tools
that fit in best with his hobby. A typical assortment of tools is shown in Fig. 2.
The collection shown includes a Casco power tool with an assortment of accessories,
including drills, brushes, slitting saws, etc. A set of Moody jeweler's screwdrivers
is shown in the background. On the right is a set of jeweler's type pliers manufactured
by Kraeuter and purchased by the author at a local radio wholesalers. Included are
"dikes," "long-noses," and other useful pliers.
In the foreground are shown an Ungar pencil iron with small tip, a magnifying
glass, a small triangular file, a small rat-tail file, a pair of tweezers, and a
penlite.
Another useful tool, not shown in the photograph, is a small bench or hand vise.
If a vise is not available, a small C-clamp may sometimes be used instead.
Materials
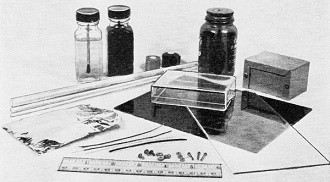
Fig. 3 - "Accessory" items used in assembling small equipment.
Service cement, Bakelite cement, Scotch tape, aluminum and plastic boxes, foil,
tubing, etc. are shown.
Some of the materials used in the assembly of subminiature equipment are illustrated
in Fig. 3. Included are service cement, Bakelite cement, Scotch tape, Scotch
electrical tape, rubber cement, a small aluminum box (Bud "Minibox"); a small plastic
box, sheets of Bakelite and plastic, plastic tubing and rods, aluminum foil (used
for shielding), small wire and spaghetti tubing, and small size machine screws and
nuts (the "large" screws are size 4-40, the smaller ones size 2-56).
Not all the material shown may be available at local radio supply houses, and
it may be necessary to go to a plastics "hobby" shop to obtain a supply of plastic
sheets, rods, and tubing. Aluminum foil may be obtained at many drug stores and
at most supermarkets. Rubber cement can be obtained at dime stores or stationery
stores. Small machine screws and nuts may generally be purchased at hardware stores.
The prospective builder will find it convenient to purchase corresponding taps and
dies at the same time.
In addition to the material shown, the builder will find it worthwhile to check
through the small parts assortments offered in packages by most radio parts wholesalers.
Assortments of small brackets, springs, and similar components often prove handy
when assembling equipment.
Small diameter wire is likely to prove a little difficult to obtain in some cases,
for many radio wholesalers do not stock wire smaller than #20 or #22 gauge, and
these sizes are considered as "bus bars" in some types of subminiature construction
work. However, it is often possible to "manufacture" small sized wire by removing
individual strands from large size stranded wire and using small diameter plastic
spaghetti tubing as insulation.
Although the basic methods used when designing subminiature electronic equipment
are the same as those used when designing conventional sized equipment, there are
certain special considerations that must be kept in mind.
First, since most subminiature equipment is self-powered, using small batteries,
it is necessary that the current drains be kept to a minimum to insure long battery
life. Tubes or transistors should be selected so that optimum performance at minimum
battery drain is obtained. As few parts as are necessary to accomplish the builder's
minimum requirements should be used.
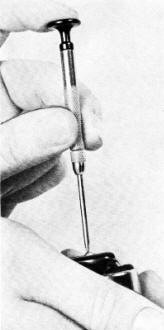
Fig. 4 - One technique for working with subminiature parts.
A jeweler's screwdriver should be used on small machine screws.
An example is in the design of audio amplifiers. While most conventional audio
amplifiers are designed to have considerably more than the average gain needed,
so that gain controls are left near "zero" in most work, it is not unusual to find
a subminiature audio amplifier with the gain control usually adjusted almost to
"full gain" as a normal operating condition.
This requirement makes it imperative to avoid the use of power amplifiers unless
absolutely necessary, and here only to drive an earphone. While it is possible to
build a subminiature amplifier with sufficient output power to operate a loudspeaker,
this may result in the production of signal distortion.
The compact construction necessary in subminiature equipment requires small coils
with, usually, high distributed capacities to ground. These factors lead to low
"Q" circuits. Because of this, r.f. circuits selected for subminiature assembly
must be capable of operating satisfactorily with low "Q" coils. With subminiature-type
tubes, "B" voltages as low as 15 volts may often be used, while a "high B" voltage
is 45 volts. This makes it necessary to select circuits which can operate with very
low "B" voltages, and sometimes makes an additional stage necessary to obtain sufficient
over-all gain.
The builder of subminiature equipment will also find that "high fidelity" is
actually difficult to achieve except in resistance-coupled stages due to the small
amount of iron used in the miniature audio transformers.
Better results with subminiature r.f. circuits will be obtained if the builder
chooses parts designed specifically for the type of work contemplated. Check through
the characteristics carefully before picking a particular component.
Wiring Techniques
A small "pencil" type soldering iron with a 1/8" tip will be found satisfactory
for most subminiature wiring. The iron should be kept well tinned.
Most connections are made by pre-tinning the components to be wired and using
simple "lap" joints, applying the iron only as long as is necessary to flow the
solder. Care should be taken not to overheat subminiature components.
Some builders prefer to clamp the soldering iron in a small vise and to hold
the subminiature assembly or components to the iron tip, as illustrated in Fig. 5.
Note that this technique is just the opposite to that employed in wiring conventional
sized equipment. If this method is used, be careful when clamping the iron in the
vise. Use enough pressure to hold the iron securely, but remember that too much
pressure may damage the iron.
Point-to-point wiring is generally used in subminiature construction in order
to reduce overall space requirements.
Tubes are sometimes wired directly into the circuit while, at other times, the
special subminiature sockets are employed. The choice of which to use is a matter
of individual preference.
Construction Practices
The builder contemplating subminiature construction should spend a little time
becoming familiar with the tools used (Fig. 2). Somewhat greater skill and
patience is required when working with subminiature components than is necessary
when working with "full-sized" equipment.
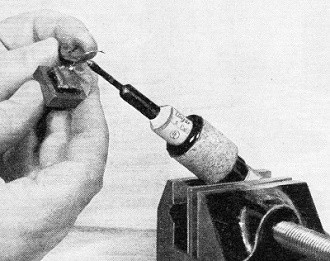
Fig. 5 - Pencil type soldering-iron is ideal for subminiature
electronic construction work. To avoid damage to components, iron can be clamped
in a vise - with part brought to the tip instead of usual technique.
Special care is required when working with small machine screws and the use of
a "jeweler's" screwdriver is almost mandatory. One technique for using such a screwdriver
is illustrated in Fig. 4 (the author is left-handed). Note that this technique
makes it virtually impossible to apply very much twisting force to the screwdriver
handle, thus avoiding any tendency to bend the screwdriver blade or to "strip" the
threads of the small screws used.
It is customary to mount many parts (even including small iron core transformers
and complete printed circuit amplifiers) simply by cementing them in place, using
either Duco cement or regular radio service cement.
When it is desired to keep a plastic surface free from scratches during construction
work and layout, plain white paper may be cemented to the surface using rubber cement.
All layout may be made directly on the paper, using a lead pencil. Once the construction
is completed, the paper may be "peeled" off, with excess rubber cement removed simply
by rubbing it with a finger.
Subminiature equipment is more often assembled in plastic cases than in metal
because of the greater ease of mounting parts (using cement) and of avoiding wiring
shorts. Where shielding is necessary, two techniques may be employed; one is to
mount the plastic cased assembly inside a larger metal case, the other is to cement
aluminum foil to the plastic case as a close fitting shield. "Heavy" grade aluminum
foil should be used.
When working with plastics, an ordinary scratch awl makes an admirable "center
punch" for small holes. Hand pressure is generally all that is needed to make a
good sharp impression in most plastic materials to guide the drill.
It is generally not practical to "punch" large holes in plastic. Rather, a large
drill or a series of small holes around the circumference of the large hole may
be used instead, with the final "sizing" obtained with a file or pocket knife. Still
another technique (generally used by the author) is to layout the desired hole and
then to use one of the "carving" bits of the electric power tool set to cut out
the plastic.
Conclusion
Subminiature construction offers interesting possibilities to the electronics
experimenter, ham, or home builder. Very little space and no "heavy" equipment is
required.
As far as cost is concerned, the builder will find that individual items are
generally somewhat more expensive than their counterparts in conventional sized
equipment; however, the total cost of components for a finished piece of equipment
is likely to be no higher than its full-sized "equivalent." This is due primarily
to the use of batteries in place of expensive a.c.-operated power supplies and filter
circuits.
Construction projects are numerous, being limited primarily by the ingenuity
and interest of the builder. Typical projects are hearing aids, small preamplifiers,
"vest-pocket" broadcast receivers, miniature transceivers, and transmitters (for
licensed hams), vibration pickups an" amplifiers, etc.
Posted May 8, 2024
(updated from original post
on 7/17/2013)
|


