July 1957 Radio & TV News
 [Table
of Contents] [Table
of Contents]
Wax nostalgic about and learn from the history of early
electronics. See articles from
Radio & Television News, published 1919-1959. All copyrights hereby
acknowledged.
|
1957 was part of the heyday of
the newfound radio-in-your-car craze, and the public was voraciously consuming all
the high tech equipment it could afford. Rock and Roll music was on every teenager's
mind and many guys for the first time were able to have their own wheels and were
outfitting them with sound systems that could blast the latest works of Buddy Holley,
Chuck Berry, Elvis Presley, and Fats Domino. Those machines were the first babe
magnets used for cruising the strip on Saturday nights. Radio stations were popping
up all over the country, enabling cross-country travel with non-stop music, news,
and variety show entertainment. Ford and Chevrolet were not going to miss an opportunity,
so they delved into the high end mobile radio manufacturing business. As the quality
of broadcasts increased, noise caused by automobile ignition systems bubbled to
the top of issues affecting listening pleasure, including the distance over which
a broadcast could be received. This 1957 Radio & TV News article describes
Ford's efforts to please their customers' demands.
Here is the equivalent report for
1957 Chevrolet radios.
1957 Auto Radios: Ford

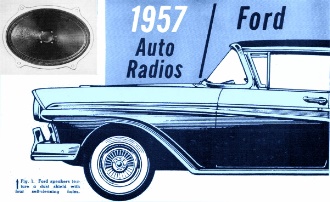
Fig. 1 - Ford speakers feature a dust shield with four self-cleaning
holes.
A systematic check can pinpoint many faults without chassis removal. Dismantling
itself is no problem.
If readers of our other presentations on this year's car receivers have retained
any doubts as to the established position of transistors, low-voltage miniature
tubes, and printed circuits in this field, the three basic radios used in the 1957
Fords do nothing to encourage such hesitation. All three models follow the noted
trends.
Some innovation also appears in the speakers used. Continued reliable performance
from these components is assured by the use of a sealed magnetic structure and incorporation
of dirt-release holes. The four release holes can be seen near the apex of the cone
in Fig. 1. Vibration of the speaker in ordinary use propels foreign particles
out of these openings, but the valve-like action provided by the small size of the
openings impedes the return of dirt and dust.
One of the receivers available for all Ford cars except the "Thunderbird" is
the 75MF. This push-button hybrid includes among its five tubes a 12BL6 r.f. amplifier,
a 12AD6 converter, a 12AF6 i.f. amplifier, a 12AJ6 detector - 1st audio stage, and
a 12K5 audio driver. A 2N176 audio output transistor is mounted on a heat sink at
one side of the chassis.
Another five-tube unit also using low-voltage tubes in a hybrid design is the
75BF. It uses a 12AF6 as the r.f. amplifier, but otherwise follows tube line-up
of the 75MF up to the 1st i.f. stage. This is followed by a 2nd i.f, amplifier (12CN5),
which feeds a 12J8 detector-1st audio tube. The usual audio driver for the transistor
is here omitted, with the 12J8 directly feeding the 2N176.
For those who like their auto radios with plus features, Model 78MF provides
search tuning and push-pull transistor output, supported with eight low-voltage
tubes. Two 12AD6's are used as the r.f. amplifier and converter. The two-stage i.f.
strip employs a pair of 12AF6's; and the detector-1st audio portion is handled by
a 12AJ6. The conventional 12K5 audio driver feeds the push-pull 2N176 pair of transistors.
The trigger amplifier for the search tuner, a 12AE6, feeds the 12K5 control tube,
which operates the relay.

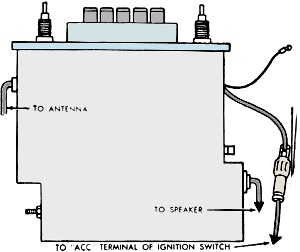
Fig. 2 - Location of leads to receiver.

Fig. 3 - The receiver and the dashboard.

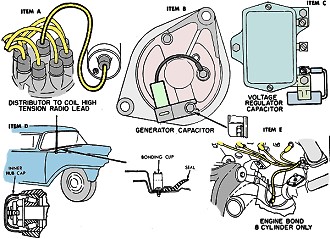
Fig. 4 - Details for installing or checking noise suppression
equipment. See text.
As with most auto radios, a defective receiver, once it has been determined that
the fault is in the circuit itself, can be handled on the service bench with no
more difficulty than is experienced with any other radio. Two problems must be faced
first, however. The first of these involves prior determination of whether the symptom
under examination is actually traceable to the receiver. Then, if it is indeed found
to be in the circuit, the business of getting the chassis out of its secure position
behind the dash panel (and subsequently that of returning it in satisfactory fashion)
must be faced.
To attack the problem systematically, a kit of parts for troubleshooting is recommended.
These include spare 5- and 7.5-ampere fuses, one each of every tube type used in
the receivers, a spare speaker, a spare antenna with lead, and a set of suppression
equipment. All parts except fuses should be pre-tested and marked so that they will
not be left in the radio inadvertently during substitution tests. Thus armed, the
technician is ready to localize symptoms with the receiver still mounted.
No reception: The fuse is checked first. If it is blown, a new one is tried.
If this also blows, the next step is removal to the bench. If it does not blow,
check to. see whether the tubes are lit. If they are not, the availability of voltage
at the A lead (see Fig. 3) should be checked with a meter. If tubes are lit,
the substitute antenna should be tried to see whether the trouble can be isolated
to this section. Similarly, the substitute speaker can be tried. To avoid damage
to the transistor, never operate the radio without a speaker.
If none of the measures noted localizes the trouble, step-by-step substitution
for each tube is the final test before removal to the bench becomes mandatory. Check
of the output transistor(s) should not be attempted with the radio in the vehicle.
This component is not considered a likely source of trouble in any case.
Noisy or erratic reception: To iso-late, it is important to know when the noise
occurs. If it is present when the engine is not running, the defect is probably
in the receiver. However, all leads to and from the chassis (Figs. 2 and 3) should
be checked first for secure connections. If noise is present only when the engine
is running, and even when the vehicle is not in motion, check the suppression equipment.
More detailed reference will be made to this equipment later in connection with
Fig. 4. Also make sure that the receiver is properly grounded both to its support
bracket and to the contact with the instrument panel. Noise that occurs only when
the auto is in motion may be due to intermittent contact to automobile ground, through
either the support bracket or the instrument panel. However, also keep in mind the
fact that, if there is intermittent contact with the antenna or another part of
the antenna system, similar indications will result. These other possibilities should
also be checked when the noted symptoms are present.
Distorted or garbled sound: Before dismantling the radio, it is a good idea to
check the speaker and individual tubes by substitution. Sometimes, if the speaker
is improperly mounted, bending or twisting may throw the voice coil out of alignment.
Mounting nuts should be tightened by hand only. If wrench or pliers are used for
this operation, there may be a tendency to over-tighten, with poor sound resulting.
Some cases of weak reception can also be corrected without chassis removal. The
antenna trimmer, which is accessible externally (Fig. 3), may be misaligned.
It should be adjusted with the antenna fully extended. When the search tuner tends
to run continuously without stopping on certain stations, it is well to remember,
the actual trouble may also be poor sensitivity. In this connection, note that poor
sensitivity and the other symptoms that may result from it can be evident when the
auto's battery voltage is low. A check of battery voltage may often save the job
of dismounting the radio for a bench check.
Suppression equipment: When it becomes necessary to check or install suppression
equipment, make certain that all paint and dirt are removed from between capacitors
and the vehicle and that all nuts and bolts are tight. The lead shown as Item A
in Fig. 4 is the high-voltage distributor-to-coil wire. The generator suppressor
capacitor is shown as Item B. To remove or install it, it is not necessary to remove
the bolt. The latter need only be loosened enough to slide the mounting bracket
under the lock washer. The capacitor for the voltage regulator is shown at G, and
the bonding clip is located as shown in Item D.
To get at the static collectors, the front hub grease caps, as shown, must be
removed. Make sure that the cotter key is bent away from the spindle center hole
so that it will not interfere with the static collector. The bonding cable - this
applies to 8-cylinder models only - is shown in heavy outline in Item E.
Physical considerations: When tube substitution is necessary, access is obtained
simply by removing the bottom cover of the receiver. This should present no problem.
The tubes may then be found, protruding downward from the chassis plate and within
convenient reach. When the receiver itself has to be taken out, the most advantageous
position to assume for this chore is in the center of the front seat, directly in
front of the receiver dial. Be sure that the ignition switch is off. As a preliminary
step, the air-duct assembly on the right hand should be removed to get it out of
the way.
The three leads connecting to the radio - the antenna lead, the A lead, and the
pilot-light lead - should now be disconnected, and the fuse withdrawn from its holder.
Next remove the control knobs, bezel-mounting nuts, bezel, and the panel-mounting
nuts. The leads are shown in Figs. 2 and 3. The hardware should present no problems.
The lock washer on the stud at the right side of the chassis is then removed,
and the mounting bracket is pushed away from the stud. Now the bolt from the other
bracket, at the lower left of the chassis, is also removed.
Now the receiver is free of its mounting, but must still be maneuvered out of
the space in which it is located and into the clear. To complete removal, grasp
the chassis with both hands, push it forward, and tilt it toward the toe-board until
it clears the instrument panel. This completes the job.
To get the receiver back into position, the dismantling procedure is reversed
with very little change. The entire unit is guided into position with both hands
but, once it is oriented, it is steadied in place with one hand while the other
is used to install the panel-mounting nuts finger-tight only.
While it is thus held, slide the right-hand mounting bracket over the stud at
the right side of the chassis, and install the nut and lock washer here. Be sure
that all cables and wires are clear of the chassis, else you may have to perform
partial dismantling again when you find that leads cannot be connected properly
because they have to become caught. Now you can install bolt and lock washer to
the stud on the left side. Getting the bezel and the hardware in place is a relatively
simple matter. Next the speaker plug, A lead, antenna lead, and fuse are returned
to place. Be sure that they are securely connected. Last, don't commit the common
oversight of forgetting to put the air-duct in place.
Posted November 4, 2023
(updated from original
post on 2/6/2014)
|


