|
|
|||||||||
| Software: RF Cascade Workbook | RF Symbols for Office | RF Symbols & Stencils for Visio | Espresso Workbook | ||||||||||
|
|||||||||||||||||||||||||||||||
  |
   |
||||||||||||||||||||||||||||||
|
Please Support RF Cafe by purchasing my ridiculously low-priced products, all of which I created. RF & Electronics Symbols for Visio RF & Electronics Symbols for Office RF & Electronics Stencils for Visio T-Shirts, Mugs, Cups, Ball Caps, Mouse Pads These Are Available for Free |
|||||||||||||||||||||||||||||||


Rejuvenating Old Meters
February 1943 QST

February 1943 QST Wax nostalgic about and learn from the history of early electronics. See articles from QST, published December 1915 - present (visit ARRL for info). All copyrights hereby acknowledged. |
An article with instructions relating to subjects like overthrow, balance, friction, and cleaning could very well be about a country's revolutionary struggles. In this case, it is an article about how to rejuvenate a persnickety or inaccurate mechanical (aka analog) meter movement. W.R. Triplett, relative (I assume) of meter manufacturer Ray L. Triplett, is the author (Triplett is now owned by Jewel Instruments). There are a lot of analog meters around in labs, workshops, and garages. Unless they have been burnt out, most probably still work like new. Occasionally, however, the movements get sticky because of accumulations of dirt and dust, bug filth, or even from corrosion. This article offers some great tips for making them serviceable again.
 I have a Micronta (Radio Shack) model
22-208 FET-VOM that I bought back in the late 1970s. I put a new 9V battery
in it every 5 years or so and it keeps going like the Energizer bunny (in fact
it now uses an Energizer battery). Analog meters are more useful than digital
meters, IMHO, when making adjustments where you are looking for a peak reading
or if you are watching a slow-changing voltage. They are also really good for
troubleshooting low frequency circuits because you can see an AC component on
a DC signal that might be missed or misinterpreted with a DMM.
I have a Micronta (Radio Shack) model
22-208 FET-VOM that I bought back in the late 1970s. I put a new 9V battery
in it every 5 years or so and it keeps going like the Energizer bunny (in fact
it now uses an Energizer battery). Analog meters are more useful than digital
meters, IMHO, when making adjustments where you are looking for a peak reading
or if you are watching a slow-changing voltage. They are also really good for
troubleshooting low frequency circuits because you can see an AC component on
a DC signal that might be missed or misinterpreted with a DMM.
Here is a brief history of the Triplett company, which was started in 1904 when Ray was 19 years old and sold in 2007. Yes, he built that!
If that meter with the stationary pointer isn't actually burned out, there's a chance that it can be put back into operating condition with a little careful work. Here's how to go about it.
Practical hints for Servicing D.C. and A.C. Instrument
W. R. Triplett, W80WW
It is hardly necessary to say that at present, and probably for the duration, amateurs will be unable to buy new meters - or get old ones repaired - without top priorities. So there is no alternative but to make use of what we have.
This article has been prepared for the amateur who needs meters, and who has some which may be inoperative but can be fixed up to be serviceable. But let not false hopes arise; the majority of damaged meters are beyond repair by the amateur. Nevertheless, if there is nothing seriously wrong it should not be difficult to put many of them back in operating condition. Consideration will be given only to small moving-coil d.c, and moving-iron a.c, meters, since these are the most common types.
Meter Terms
For those not familiar with the terminology, some of the terms used will be explained.
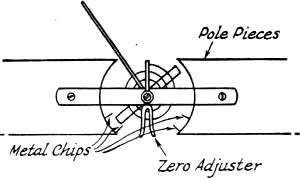
Fig. 1 - Iron or steel chips clinging to the magnet will prevent free movement of the coil assembly and cause the pointer to stick.

Fig. 2 - Converting a paper clip into a tool for removing chips.
Friction - A meter is said to have friction when, after gradual application of current to cause the pointer to advance slowly to a specified point, tapping the meter gently causes the pointer to show an increase in reading. For most commercial meters the change in reading caused by tapping should not exceed 1/2 per cent. However, the amateur can allow considerable leeway depending on the particular application. Friction is caused by dirty points and jewels, dull pivots, cracked jewels, or lint. If the meter has been handled roughly it may have excessive friction.
Balance - Theoretically the pointer should remain on zero (with no current, of course) no matter in what position the meter is held. If this is not the case, the meter is said to be off balance. Practical limits permit one degree deviation from zero. The movement is balanced by small adjustable weights, or else by a flexible "tail weight" which is bent until balance is obtained. Another method is to use small amounts of quick-drying paint or shellac, though this is not recommended because of changes in balance due to humidity and temperature.
Overthrow - This term applies to the distance the pointer can move beyond full scale or below zero. The amount of overthrow should be at least 3 per cent of the total scale and can be adjusted by moving the pointer stops, which frequently are porcelain beads mounted on wire.
Accuracy - Commercial tolerances permit variations from the true reading of ± 2 per cent. This is understood to mean ± 2 per cent of full-scale deflection.
Repairing D.C. Meters
In repairing any meter it is advisable to proceed as follows: On a clean, well-lighted table place a clean white piece of glazed paper. Using a small paint brush, clean off any metal chips that may be on the tools you use. Do not use a cloth since the lint will float around and eventually get in the meter.
Carefully unease the meter, but do not unsolder shunts or springs. No attempt should be made to remove the coil and movement from the magnet.

Fig. 3 - A heating device for burning lint in close quarters.
A quick check will indicate whether further labor is worthwhile. If the springs or coil are burned, the meter is beyond repair by the amateur. If the case or glass is broken, it is a sure bet that the pivots are dull, causing excessive friction. However, considerable friction may be tolerated in some applications. The amateur should no try to replace or sharpen the pivots.
If the coil and springs appear satisfactory, set up a battery or power supply and potentiometer so the pointer can be slowly run up and down scale. Then check for stickiness and friction.
Stickiness - Stickiness is usually caused by chips (see (Fig. 1). These can be seen by looking through the pole pieces against the white paper. Bend a steel paper clip and file it as shown in Fig. 2. Brush off the filings before using. Carefully insert the straightened end between the pole piece and the core, being careful not to touch the springs or the coil. The chip will be attracted to the steel clip and can usually be pulled out. A few tries may be necessary until you get the knack of it.
Stickiness is also caused by lint touching the coil or pointer. Look for this with a magnifying glass or eye loop. The least amount of lint can cause erratic readings, so examine thoroughly all possible places where lint may interfere with a moving part. Lint can sometimes be removed with tweezers, but frequently must be burned out with a heater unit as is shown in Fig. 3. If the heater is used, care must be exercised not to burn the springs or coil wire.
If stickiness is caused simply by the pointer touching the dial, straighten the pointer with tweezers. If you chip the paint, a little India ink will fix it up.
Friction - If there is excessive friction, look for fuzz or lint and remove as explained above. If the friction is not caused by lint, probably the pivots are dull or the jewel is cracked. Neither of these can be fixed at home.
Sometimes the bearings are too tight. Try loosening the jewel screw a half revolution or so. Meters with excessive friction may be used where accuracy is not too important.
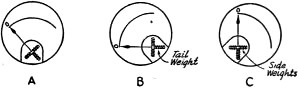
Fig. 4 - The three steps in balancing a meter. (A) Set pointer on zero by means of zero adjustment screw while holding meter with plane of dial in horizontal position. (B) Adjust tail weight until pointer is on zero while holding meter with plane of dial in vertical position. (C) Adjust side weight until pointer is on zero while holding meter with plane of dial in vertical position.
The method of balancing will be readily ascertained from an examination of the meter. Perhaps a special tool or tweezers will have to be made to move screw-type weights. The design of such tools must be left to individual ingenuity, depending upon the particular construction.
The balancing procedure is indicated in Fig. 4. After completing the process, repeat it for checking and making final adjustments. As little pressure as possible should be used in adjusting the weights because the pivots can easily be damaged in this operation. Also be careful not to touch the springs. After finishing with the balancing, check for any fuzz or lint that may have been left on the weights.
Follow a similar procedure if a flexible tail weight or shellac is used for balancing.
Overthrow - If the meter has pointer stops, these can be adjusted to get an overthrow of a few divisions above full scale and behind zero. Make certain the pointer hits the stop before the moving element hits in order to prevent sticking at end scale.
Cleaning - Dial marks can be removed with a rubber eraser. Clean the case with the paint brush; again take care not to use a cloth rag.
Put the meter back in its case, being careful not to break the tip on the zero adjusting screw which is mounted in the cover.
Calibration - If the springs have not been damaged and if the internal shunt or resistance wire has not been unsoldered, the meter should be fairly accurate. However, age or proximity to transformers and leads carrying heavy currents may have weakened the magnet. If the shunt or series resistance wire has been unsoldered, errors may be caused by resoldering at a different point.
If no other meter is available to check the accuracy of the repaired meter, a multimeter can be used with fair results. Perhaps the local service man will loan his.
Using the potentiometer set-up mentioned before, check the calibration using the multimeter or other instrument as the standard. If the accuracy is not satisfactory, remove the cover and make red pencil marks for the points or paste on & new paper dial and mark off a complete scale. When making pencil marks, be sure not to touch the pointer since it may bend and thus upset the meter balance.
It is well to note that the reading of a d.c, meter will decrease when the instrument is mounted in a steel panel. The amount of decrease depends upon the particular meter and the thickness of the panel, If the meter is to be used in a steel panel, it would be well to check the accuracy in the same panel. A.c. meters are not affected appreciably by steel panels.
Repairing A.C. Meters
The same procedure should be followed and similar adjustments made in the case of a.c, moving iron type meters. A few additional words are in order, however.
Usually there will be no metal chips in an a.c. meter because there is no magnet to hold them there.
Most a.c. meters employ a fan swinging in a closely fitted chamber to obtain damping. Dirt or fuzz in this chamber will cause stickiness or excessive friction.
It is important not to bend the soft iron vane (either movable or stationary) since the meter accuracy is dependent upon the proper placing of these vanes. The same holds true to an extent for the pointer on a.c, meters. Also, changing the position of the coil around the vanes will affect the accuracy.
Extending Meter Ranges
The formulas for extending the ranges of d.c. voltmeters and milliammeters are given in The Radio Amateur's Handbook. These apply to a.c, meters as well, if the resistors are non-inductive and the value of meter resistance used is the a.c. resistance. Since the resistors mayor may not be non-inductive, and the a.c. resistance of the meter mayor may not be close to the d.c. value, it will probably be advisable to check the calibration.
Best accuracy is of course obtained with precision wire-wound resistors. Lacking these, carbon resistors will have to suffice. Probably this type will not be obtainable in the correct resistance values, so the advice is, use what you have and mark the dial accordingly.
Posted March 9, 2021
(updated from original post on 12/6/2012)

Copyright: 1996 - 2026 |
About RF Cafe RF Cafe began life in 1996 as "RF Tools" in an AOL screen name web space totaling 2 MB. Its primary purpose was to provide me with ready access to commonly needed formulas and reference material while performing my work as an RF system and circuit design engineer. The World Wide Web (Internet) was largely an unknown entity at the time and bandwidth was a scarce commodity. Dial-up modems blazed along at 14.4 kbps while tying up your telephone line, and a lady's voice announced "You've Got Mail" when a new message arrived... |
Copyright 1996 - 2026 All trademarks, copyrights, patents, and other rights of ownership to images
and text used on the RF Cafe website are hereby acknowledge My Hobby Website: My Daughter's Website: |
