Improve Your Television Picture |
|
Anyone who used to watch television in the days when reception quality at any given time depended on whether your neighbor parked in certain spot in the driveway, or put up a big metal utility shed or even a large above-ground swimming pool, or if the air was exceptionally humid or a hammering downpour of rain or a blizzard was occurring, knows the lengths to which people would go to obtain a good picture. All sorts of tricks were used by those not familiar with engineered type solutions as shown in this 1949 issue of Radio-Electronics magazine. Whereas author Allan Lytel instructs on how to properly tune transmission lines for optimal reception (including constructing shorting stubs and tuning them with a razor blade), we uneducated (at the time) rubes resorted to adding lengths of crumpled tin foil to rabbit ears, rolling the TV (if on a stand) around the room, repositioning the 300-ohm twin lead cable from the roof-mounted antenna, and even standing or sitting in certain places in the room to affect the best picture. Yes, many of us did that, including yours truly. We didn't know why it often worked, but it did. The same goes for radio reception. To this day I have the AC power cord of my 1980s General Electric roll-down-display clock radio hiked up onto a map pin in the wall to get good reception. Improve Your Television Picture
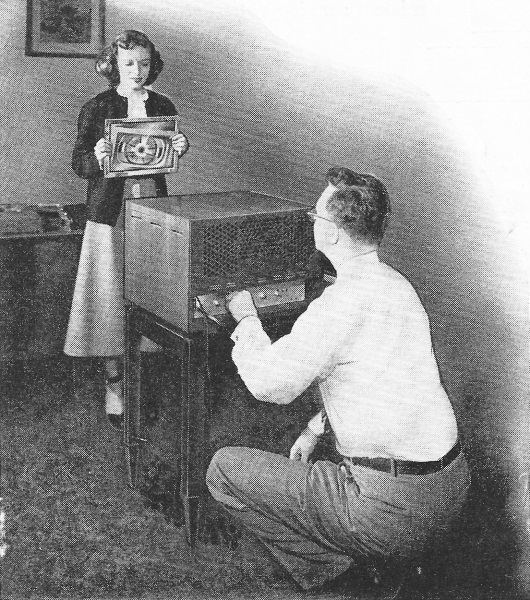
When you adjust the rear-panel controls, have someone hold a mirror so you can see how adjustments are affecting the picture. Large mirror is best. By Allan Lytel Without knowing a thing about radio, you can better your reception. A "how-to-do-it" for non-technical TV set owners If you drive a car, you probably feel fully capable of telling when the gas tank is empty, of filling your tires with air to the right pressure, and of putting antifreeze in the radiator when winter comes along - even though you're no mechanic. Despite the fact that you may not know a resistor from an inductor, there are certain improvements you can make on your television installation, too. But wait a minute! Put down that screwdriver and that pair of pliers. It's definitely not a good idea to go barging into the set's innards - that's work for your professional television service technician. There are dangerous high voltages inside that back cover. There are also delicate adjustments, disturbing anyone of which might put your set out of commission. But there are plenty of improvements you can make without taking the back cover off the set. Your first area of operation might very well be your roof if you have an outdoor antenna. Your regular radio has probably been doing very well with a built-in antenna; but your television set is much more critical for two good reasons. First, the very short waves used for television transmission won't travel around corners - they travel in straight lines, though they will bounce off flat surfaces. That means that for best reception the antenna should be placed where radiation from the transmitter can reach it directly, without obstructions or detours. Second, a little noise on your radio doesn't bother the ear much; but on television the noise (interference or static) makes little spots, lines, "rain" and "snow," dance all over the screen, and - as you may know from experience -eyes won't stand much of that without complaining. If you have put up your own antenna, the first thing to do is find out whether it is in the right place. Moving the antenna a few feet in any direction can make all the difference in the world. So try moving it around, with a friend watching the TV screen to tell you when the picture is best. You may have to turn down the Contrast control if you get much of an improvement. If the installation is a professional one or if the antenna might damage someone or something if it falls down, better not move it. Probably your service technician has installed it right.
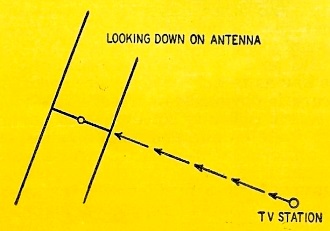
Fig. 1 - Antenna is broadside to the station.
Fig. 2 - Dual-path reception can cause ghosts.
If your picture is this bad, better get to work! The arrows show the genuine and ghost images. Whether or not you relocate the antenna, you may be able to improve reception by turning it a bit. Usually you'll do best by having it broadside to the station, as illustrated in Fig. 1. But that not always being true, try other positions as well. Eliminating ghosts There's nothing mysterious about television ghosts. If you get them, it's because your antenna is picking up two signals from the same-station. Take a look at Fig. 2. The transmitting antenna squirts out energy in all directions. The energy your antenna picks up should be that going along path A - the shortest and most direct route. But suppose some of the energy going in another direction (path B) hits a building, as the drawing shows. It bounces off the building just as light rays reflect from a mirror. (Angle of incidence is equal to angle of reflection.) The reflected energy also reaches your antenna. But because it has traveled over a longer total distance than the direct ray of path A, it arrives a little later. Thus, you have two signals from the same station! The picture on your screen is "painted" by a spot of light that moves across and up and down the screen very fast. At each point on the screen it varies in brightness to give the right shading to that part of the picture. And the amount of brightness at each instant is dictated by the signal it receives at that instant from the station. Now, let us say that the signal of path A tells the spot to make your screen black in the center of the picture of a man's vest. Then the signal of path B comes along a fraction of a second later with the same command. By that time the spot of light has moved over into the whiteness of a light-colored wall. But the path-B signal tells the spot to go black - and it does. Result: you see two dark areas (two vests) where there should have been only one! The second vest, to the right of the first, is the ghost. The problem is to eliminate the signal of path B. If your antenna is of a very directional type - that is, it rejects all energy not approaching it directly - you'll probably have little trouble. If you do get ghosts, try revolving the antenna while a friend watches the screen. You'll very likely be able to find one position at which ghosts will be at a minimum for all or most stations. If there is no such position, you'll probably have to get a more directional antenna. There's no way to predict in advance whether you'll have ghosts; they are not caused by the set itself. They are entirely an antenna problem - therefore experiment until you're satisfied. Better results downstairs After you've finished with the antenna itself, pay attention to the wire or line connecting it to the set. The connecting line, usually made of two parallel wires embedded in a tough, flexible plastic, is known as ribbon line or Twin-Lead or some similar name. It is usually about 3/8 inch wide, and technicians generally call it "300-ohm" line because of its electrical characteristics. If that's what your installation has, it's time to go to work. Take the tinfoil from a package of cigarettes, tear off about half, and wrap it around the ribbon line a few inches away from your receiver. Keep it in place with a paper clip. The photo will give you the idea. Slide the foil slowly along the line and away [rom. the set, watching the screen. You should have your most difficult-to-receive-station tuned in, with the Contrast control turned down until you can barely see the picture. You will notice that with the tinfoil at a certain spot, the picture gets worse, and that at another spot it brightens up. Leave the tinfoil at the place at which the picture improved. Check all the other stations to make sure you didn't make them worse. If all is well, you've scored a point!
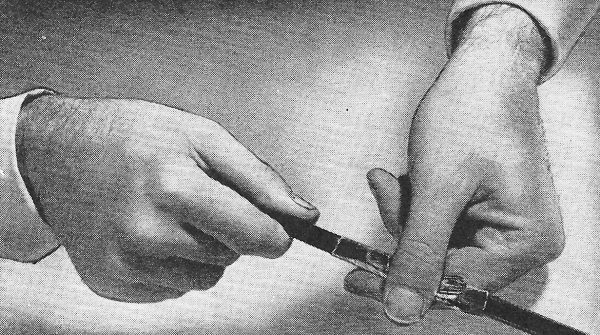
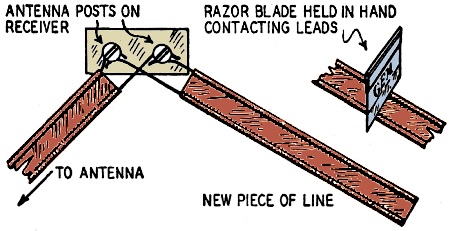
Strip the plastic away from the first couple of inches of your piece of line, and fasten each wire to one of the antenna posts of the receiver. You'll need a screwdriver because the antenna posts are usually screw terminals, to which the line from the antenna is already attached. When you tighten up the two screws again, you should have both the original antenna line and the end of the new piece of the line in place. Fig. 3 illustrates the scheme. Be sure to get one bared wire from each of the two lines securely under the head of each screw. Now, starting at the free end of the new section of line, hold the razor blade across the plastic ribbon and dig it in until the metal contacts both wires. Watch the screen. The picture may improve or get worse. Try this razor-blade. trick at intervals of an inch or so all the way up to the antenna terminals. You will find at least one point where the contact will improve the picture, Cut the line at that point, bare the wires, and twist them together to make the improvement permanent.
This photo shows the strip of tinfoil wrapped around the line and held in place with a clip.
Fig. 3 - Add piece of line and test with blade.
Fig. 4 - A switch selects desired tuning line. While this will probably improve only one station, it isn't very likely to make others worse; therefore you will have gained something again. If two stations are bad, go through the procedure separately for each one, and then use a switching arrangement like that shown in Fig. 4. You can buy the double-pole, double-throw knife switch at a hardware or ten-cent store. When you want to watch programs on station A, throw the switch to contact the line adjusted for that station; ditto for station B. When watching stations needing no improvement, leave the switch entirely open. You can screw the base of the switch to the back of the receiver cabinet. There's one more thing to check in the antenna department. Notice how the ribbon line comes down from the roof. Is it securely anchored all the way so it can't whip about in the wind? If not, move it yourself and see whether there's any effect on the picture. If there is, anchor the line firmly at intervals along the way if possible, and at least at top and bottom. Don't use nails or screws; your radio service shop has special insulators. Adjusting controls You don't have to be an engineer to adjust a television set's controls correctly, but a few tips will help. You use the front-panel controls more often than those on the rear, and you've probably tamed them so they'll perform as scheduled. The little, knobless controls on the rear, though, have probably affected you in one of two ways if you're a more or less average set owner. Either you've left them strictly alone or you've become so curious that you twiddled them all and then were unable to do anything but call your repairman. Of the two, the first reaction is the safest, but there's no reason why you can't go around back and adjust at least some of the controls to get a better picture. As your set "breaks in" and the tubes and parts age, some of the adjustments need changing; you can often do it yourself, without bothering the service technician. But please read on before you touch anything! One wrong move, and the picture may be standing on its ear. Go slowly! Item No. 1 is to get a good-sized mirror if you have one. A hand mirror will do if you can't find a bigger one. After moving the set out so you can get behind it, prop the mirror on a chair in front of the screen. If you can't do that, get someone to hold the mirror for you, as the personable young lady is doing in the photograph. If there isn't much light behind the set, use a flashlight to read the control markings. Usually these are stamped in the metal of the chassis and are hard to read; be sure that the control you are adjusting is the one you want. First adjust the Focus control. (It may be either on the rear or the front of your set.) There are just three ways to do it right. Take your choice. If there is a test pattern on (any channel will do, but choose the one that normally gives you the best picture) tune it in and fix the front-panel controls as usual. Now, watching the image carefully in the mirror, slowly rotate the Focus control until the black lines near the apex of the bottom vertical wedge are clearest and most sharply defined. Fig. 5 is a photo of a perfect test pattern and the arrow shows you the area to be watched. Make the adjustment very precise - so that your eye can separate the black lines to a point as near the center as possible. This is quite a critical adjustment. Another good way is to try and find a channel with FM or similar interference. Try the channels not used by stations in your location. Turn the Contrast control up and watch for a "tweed" (as in men's suits) pattern. If you can find one, adjust the Focus control until every detail of the tweed pattern is crystal-clear. The optimum adjustment can be found very quickly. If there aren't any test patterns and you can't find tweeds, tune in a program. Adjust the Focus control until you can see individual horizontal lines of light across the screen. You'll have to look closely on most sets, and you may have trouble seeing the lines at all on 7-inch and smaller tubes. Using a test pattern is by far the best method of the three mentioned. There are two more controls you can adjust if your set has a 7-inch tube or smaller, These are Vertical Centering and Horizontal Centering. If the picture is too far over to one side of the mask or too high or low, these controls will move it to the right place. Adjustment is very easy - just watch the image and twirl the control shafts. Once again a warning: The other controls on the rear of the set interact; that is, adjusting one affects the functions of another. One twist of a shaft and you're likely to spend the rest of the evening trying to get a good picture. Light filters and enlargers
Fig. 5 - Watch outlined area when focusing. There have been rumors that watching television is bad for the eyes. If your receiver works well and you treat it right, the rumors are - just rumors. For instance, don't locate the set where direct light can fall either on it or on your eyes. If it's under a window or there's a lamp beside it, your eyes will have to withstand quite a change of illumination when you look away from the picture to the comparatively bright sunlight or lamp. If light falls on the screen, the glass will reflect it, along with the light from the picture itself. Effectively that reduces the contrast - "washes out" the picture. So, for best television viewing, keep the room dark except for a little light that doesn't shine on your face or on the screen. Keeping the room entirely dark is hard on the eyes, too. When you look away from the screen, your eyes have to adjust from reasonably bright light (the picture) to utter darkness, a change that's too sharp, according to medical men, to be healthy. Picture-tube filters are sold to "increase contrast" - you've probably seen the ads. Some of them are simply tinted, transparent plastic. The light from the picture itself passes through the filter once and is dimmed to some extent. But any external light reflected from the screen passes through the filter twice - once on its way to the screen and once from the screen to your eye. As you can see, the reflected light is cut down twice as much as that from the picture. As a result, daylight or room lights falling on the screen don't tend to wash out the picture so much. Polaroid filters are a little different. They are tinted, too, and act like the others; but in addition, they have the same properties of cutting down reflected glare as do the Polaroid glasses you may have used while driving a car. Apparently reflected light is polarized much more than direct light; the polarized filter removes most of the polarized reflections. Some viewers like filters and some don't - it's a matter of individual preference. They undoubtedly do prevent eyestrain to some extent by removing the glare from overly bright screens, but you can do the same thing by turning down the Brightness control. If your set has a 20-inch viewing tube like the Du Mont on this month's cover, you probably aren't worrying about getting a bigger picture. But if you have a smaller one, you may want an enlarging lens. Available in many sizes and styles, most of them are either solid or liquid-filled plastic. Unfortunately, you can't get too far off toward the side without getting picture distortion with a lens; but since a bigger picture will allow you to sit farther away from the screen, you can usually get more or less directly in front of the set all the people who want to watch. There's an important limitation to the size of your picture. Remember that a television picture is not a solid "photograph" but an optical illusion. It's made up of 485 horizontal lines of light from top to bottom of the picture. If the tube is small, the lines must be crammed in; they are so close together you can hardly see them. With even a very large picture - the number of lines remains the same; the lines are now far enough apart to be seen. Whatever the size of your screen, you have to get far enough away from it so that the lines blend together and the eye is fooled into thinking it sees a solid picture. Therefore, with a big screen, be sure your room is large enough to allow you to get back from the set a sufficient distance. The distance will vary according to the condition of your eyes and your preferences. Watch a picture of the size you want at your dealer's store to get the information you need. You may have heard that American television stations transmit with a definition of 525 lines. What happened to the difference between 525 and the 485 we mentioned above? The answer is that the time that might be occupied by the missing 40 lines is taken up with "sync pulses". These are electronic instructions which tell the receiver what to do to keep the moving light spot in step with that at the transmitter. Without them - no image! Out in the Country Television stations usually have a maximum useful range of about 40 miles because of the technical characteristics of the wavelengths on which they transmit. Sometimes they'll reach farther, sometimes not the full 40 miles. But if you live more than 25 to 30 miles from a station, you're likely to have a little trouble getting a perfect picture, one without "snow" effect. The best way to proceed if an ordinary installation doesn't get the results you want is to use a special antenna, one that's very directional. These antennas not only suppress static arriving from directions other than that in which the antenna is pointed, but also provide a gain - they receive energy and send it to your receiver much more efficiently than the simpler antennas. If you're still not satisfied, try raising the antenna as high as possible. Some owners in outlying districts have even used telephone poles (bought their own, not climbed up existing ones) or tall metal towers. This matter of reception in fringe areas, as these locations are called, requires considerable study and is best handled by a professional technician. If you are located where the signal is weak, but still strong enough to give you some picture, a booster will often help. These are little amplifiers containing one or two vacuum tubes, that any set owner can install himself. Connected between the antenna line and the receiver, they increase the strength of the signal before it reaches the receiver. Even where some stations come in well, there may be others which perform badly; a booster may help with the bad ones and can be switched off when you are watching a strong station. Improving your television set pays off in better pictures and more satisfying entertainment. But remember this always: your television receiver is a delicate instrument, and it's immensely complex. Leave its insides strictly alone; if something goes wrong that hasn't been wrong before, call your television service technician!
Posted June 16, 2022 |
|