Holes and the Service Technician |
|
It is understandable if, based on this article's title, "Holes and the Service Technician," you thought maybe it had to do with semiconductors. Silicon was beginning to overtake germanium as the substrate of choice it appeared in a 1963 issue of Radio−Electronics magazine. Electron conduction seemed intuitive to most people involved in electronics; however, the concept of hole conduction caused a lot of head scratching. But, I digress. This article discusses how to create various types of holes in metal. It might seem like a no-brainer task, if you have ever needed to make precisely shaped and dimensioned holes in metal, you know it is not always such a simple task - especially in soft sheet metal. Achieving a truly round hole - especially of large diameter - in an aluminum chassis requires securely clamping the work piece to the table and using a sturdy drill press. Otherwise, you almost always get an oblong hole. A machinist at Westinghouse showed me one day back in the 1980's how he would get the chassis secured and drill press positioned, then place a couple layers of paper towel on the metal before lowering the drill bit onto the chassis. It helped fill the space between drill bit flutes to prevent it from "walking" before both sides of the bit had a bite on the metal. It works like magic, even when using a hand drill. To this day I still do that. As someone who also does a lot of woodwork, I can attest to the challenge of achieving a correctly located hole in soft wood (like pine) because of the often extreme difference of density between ring layers that causes the bit to "walk" toward the softer wood. If you've been there, you know of what I speak. BYW, I have successfully used spade type wood bits to drill large diameter holes in metal (steel) exterior house doors (for deadbolt installation) and other thin metal. Holes and the Service Technician
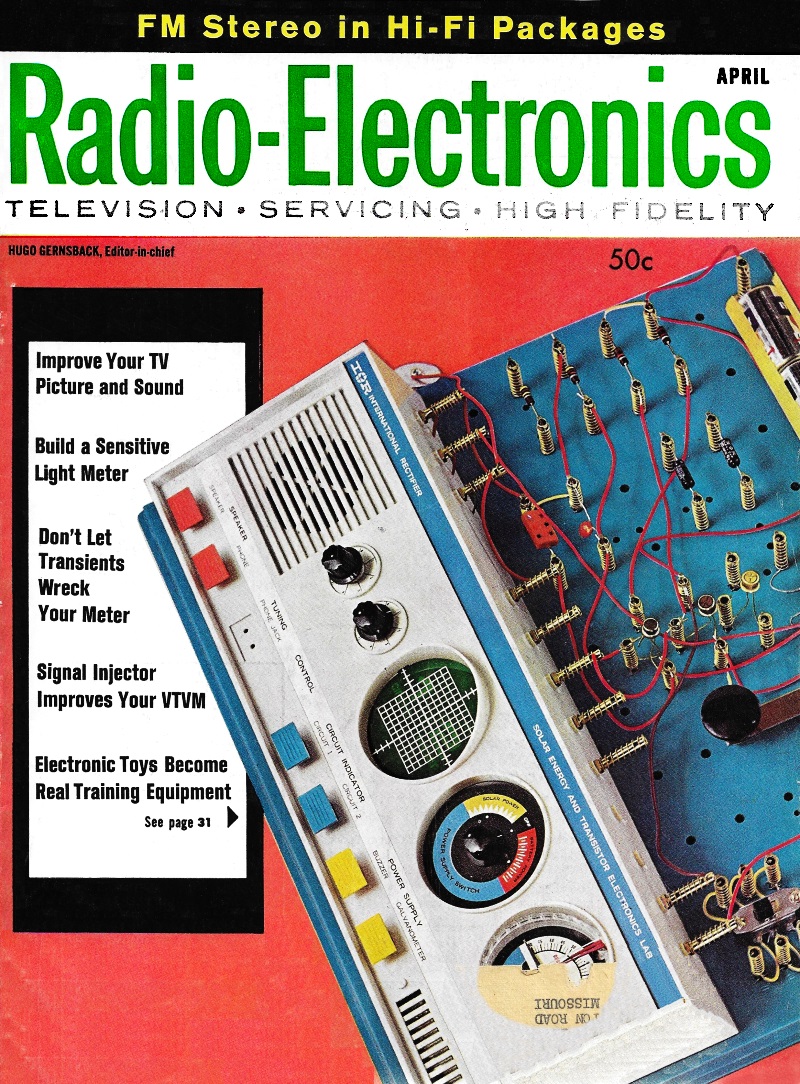
Fig. 2 - This handy backing block can be made from a short piece
of round metal shaft. Grind two flats on one end so it can be held in a vice.
By Jack Darr Service Editor Hole - an open place. But making one in steel or concrete or wood isn't exactly simple. The title of this article might be misleading. Let's straighten this out right now: the holes I'm referring to aren't the kind that wander around in transistors, or that go "Now you see 'em - now you don't" in tunnel diodes, or even the ones in the writer's head. The holes in this article are the plain old-fashioned kind you have to make in TV chassis to hold things. Cutting such holes is a job the service technician often runs into. I thought it might be a good idea to run over some of the ways of making them. Where to make the hole is determined by the part you're mounting. Mark the spot with a soft pencil. Then use a center-punch to make a wee pit to keep the drill from scooting off into nearby parts (Fig. 1). Set the chassis solidly on something that will take the impact of the punch. A good trick here, if you can do it, is to use a backing block of metal. It can be any kind of piece of solid metal. Fig. 2 shows one useful type. It's a short piece of metal shaft with two parallel fiats ground on one end. Shove this end in a vise and place the other end below the place you want to hit. Drills and bits There's some confusion about the terms drill and bit. They are often used interchangeably. In this article, the bit is the part that does the cutting. The drill is the part that holds the bit. The standard twist-drill bit has two spiral flutes on its stem to clear the chips. The tip of the bit is ground so the two cutting edges take off thin chips of metal as they revolve (Fig. 3). These edges must be sharp. Standard bits turn clockwise, looking down on the work.
Wood bit in chuck of electric drill. This is not the type bit used with a hand brace.
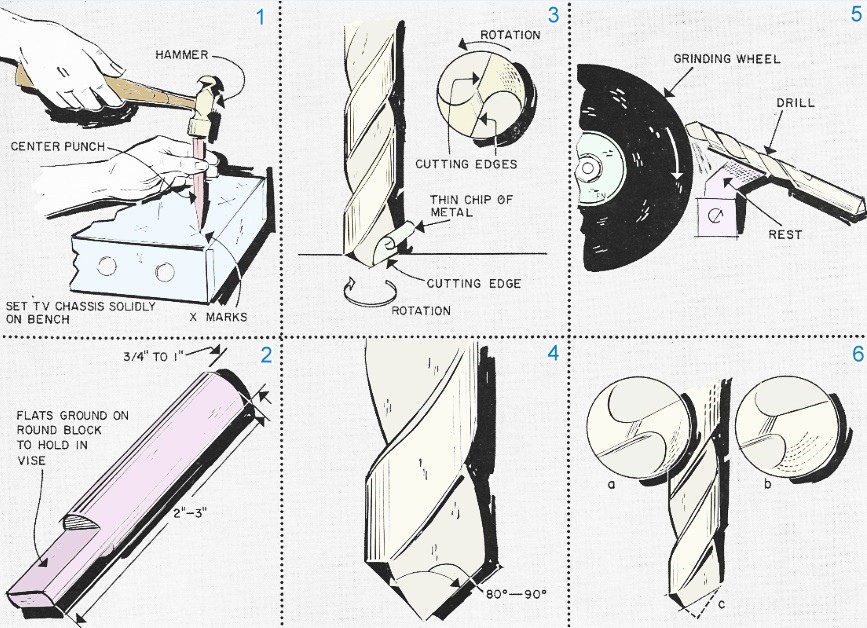
Fly-cutter being used to cut 1-inch hole in car fender for mounting auto-radio antenna.
Small burr and electric drill make job easier in tight places.
Rotary files are ideal for enlarging holes cut in sheet metal.
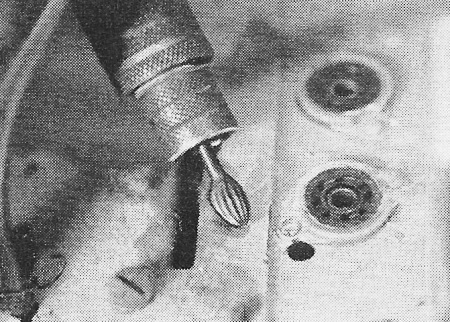
Fig. 7 - The correct way of holding an electric drill.
Fig. 8 - Temporary depth gage is made by wrapping tape around bit.
Fig. 9 - A small burr is often better than a bit for removing rivets.
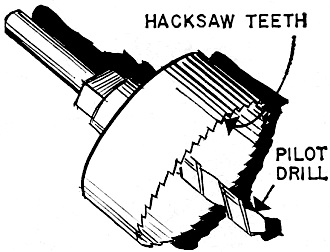
Fig. 10 - Holesaw made for use with an electric drill. They are made in a variety of sizes.
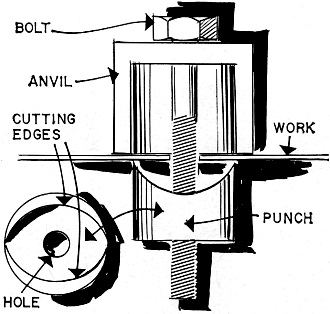
Fig. 11 - Chassis punch uses a threaded bolt to pull the punch through the metal to be cut. Dull bits are standard equipment around the shop. However, they aren't hard to resharpen if you use just the right twist of the wrist. You'll need a smooth, fine-grit grinder. One very important point is the angle of the cutting edges. For sheet-metal work, and this makes up most of our jobs and most of yours, it ought to be about 85° to 90° (Fig. 4). To sharpen a bit right, you've got to hold it very steady. There's a special holder for this purpose, but you can do it by hand, using the tool rest on the grinder (Fig. 5). Hold the tip against the wheel, taking only a very small bite each time. Keep a glass of water handy and dunk the tip in it each time you stop. Never let the tip get too hot. This takes the temper out of the steel and the bit will become dull again very quickly. Touch one face then the other against the wheel. The angle at which the bit is held determines the final tip angle. Be sure to keep the two faces equal (Fig. 6) and flat. Never turn the bit while grinding. The faces, in Fig. 6, must be equal in area and perfectly flat. Drilling plastics For drilling plastics, you can get better results with a flatter angle on the bit. Most plastics tend to melt under the heat generated by the spinning bit, clogging the hole. Drill very slowly. One trick used in drilling thin sheet plastic is to sandwich it between scraps of Masonite, clamping tightly and drilling through all three at once. Even then, take it slow and easy for the neatest results. Electric hand drills The most popular size electric hand drill for TV shop work is one with a 14-inch chuck. There is only one right way to make holes with a hand drill. Hold the drill firmly in both hands as in Fig. 7. Note the knuckle extended below the left hand resting on the top of of the if transformer can. It keeps the bit from plunging on through the sheet-metal chassis and wrecking numerous delicate components underneath. Fig. 1 - Use a center punch to make a small pit in sheet metal. This holds the point of the bit until it gets started and you put the hole right where you want it. When drilling sheet metal, you'll soon learn to recognize the change in pitch of the sound when the drill is just about ready to go all the way through. When you hear that, get ready to catch the weight of the drill to keep it from going too far. By the way, this should have been mentioned first, but always check the chassis under any hole you're thinking of drilling! See what's under there that could be damaged. If you must drill a hole where parts below might be damaged, make a temporary depth gauge by wrapping tape tightly around the bit stem at the proper place (Fig. 8). While it won't stop the drill entirely, it will slow it up enough to let you gain control. When drilling holes in thick metal, use lubricating oil on the tip of the bit to reduce friction and speed cutting. As a further aid, use a small bit first, then change to the final size of bit needed. This is particularly important when the final bit is 1/4 inch or larger. Drilling out rivets Lots of components are riveted in modern chassis. Removing the rivets can be a tough job sometimes. One way is to center-punch the head of the rivet and drill it out (Fig. 9-a). This is all right, but it has its drawbacks. A rivet will often come loose and simply spin instead of sitting tight and being drilled out. The easiest way in the long run is to use a small burr or rotary file (Fig. 9-b). For very tiny rivets a miniature burr is better. They can be used in a 1/4-inch drill. For even better results in tight places, use one of the small electric drills known as a hand grinder. For larger rivets, and also for finishing holes which must be made slightly larger, the 1/4-inch shank rotary files are very handy. They have many other uses, which you'll discover as you go along. (Cleaning rust, paint, etc.) Small holes Once in a while you'll have to drill a very small hole. This can be done with a hand drill if you're very careful. Be sure to keep the pressure off the bit as much as possible. Let the weight of the drill take it into the metal. Hold the drill very straight, so that there is no side pressure on the bit. That breaks small bits immediately. Special tools You can make holes up to 2 inches in diameter with a 1/4-inch drill and the right accessories. You can use either flycutters or holesaws. The flycutter gets its name from the fact that the cutter bar, the small diagonal bar seen at an angle across the shank, cuts as it "flies" around the circle. (The same action is found in a lathe.) The holesaw is a circular hacksaw (Fig. 10). Each of these tools uses a 1/4-inch pilot bit. It makes the starting hole and holds the cutting tool steady after it has penetrated the surface. When using either of these tools, be sure to keep a very tight grip on the drill and feed the cutter into the work very slowly. Watch out for the moment when the cutter goes through the work. Both tools have a tendency to "whip" at this point. Be prepared to cut the power instantly and keep the tool from running wild. Wood boring bits Boring holes in wooden walls, making neat holes in phonograph mounting boards and jobs like those have always been a headache for the TV technician. But a set of electric-drill wood bits can make things much easier. The bits are actually just flat metal shapings in a special holder, which in turn is chucked in the drill. A nut is tightened to hold them in place. These will cut very smooth holes in any kind of wood, in a fraction of the time needed to make a similar hole with a brace and bit. They're real handy for boring through wooden walls when installing TV lead-ins, intercoms, etc. Chassis punches About the final classification would be what I have always called shear punches or chassis punches. These are made in two sections, the anvil and the shear (Fig. 11). In use, a pilot hole is drilled at the center of the larger hole, the punch separated, the bolt passed through the hole, and the shear screwed on it. As the bolt is tightened the two parts are drawn together. The shear has two lips which penetrate the surface of the sheet metal. The anvil is made so that the shear will just slip inside it. When the bolt draws the two halves together, a very neat round hole is punched. They are also made in square, D and keyed types, for making almost any kind of hole needed. Such punches are much used to make holes for tube sockets and other components in radio and TV work. In two-way radio work, the 1 1/4-inch hole needed for installing a mobile whip antenna can be made very easily with one of these. Another type of shear punch is shown in Fig. 12. It is actually a set of punches. Matching shears and anvils are selected, placed into the pilot hole and hit with a hammer. Masonry bits Another place the electric drill is handy is with masonry bits. Any antenna technician who has ever spent a miserable afternoon hanging on a ladder while he tried to make holes in a brick or masonry wall with a star drill and hammer will certainly appreciate these. They look just like ordinary drills, but usually have special silicon carbide tips to withstand the terrible punishment of grinding through stone, mortar and bricks. They come in several sizes from 1/4 inch on up to 1/2, 3/8 and so on. While the tips are extremely tough, they can be resharpened by a machine shop with a diamond wheel, used to resharpen lathe tools. Masonry bits should not be used in a standard 1/4-inch drill. These drills rotate too fast for them and will reduce their life. They should be used with a slow-speed 3/8- or 1/2-inch drill. If you must use a high-speed drill, apply minimum pressure to prolong the life of the bit. When using these bits, be sure to hold the drill perpendicular to the surface you are cutting the hole in. If this is not followed, the silicon carbide tip will wear rapidly and form a bevel on the cutting edge, making it necessary to resharpen the bit before it can be used again. This can happen in a very few minutes, so be extremely careful.
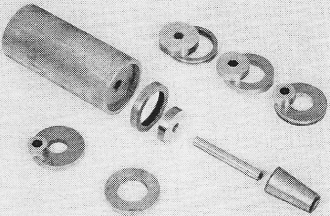
Fig. 12 - This chassis punch is hit with a hammer to make chassis holes. It comes with a variety of punches in different sizes.
Posted February 22, 2023 |
|