Test Bench: Build the Torture Box Environmental Chamber
|
|
Here is a unique type of article from a 1974 issue of Popular Electronics. Author Ralph Tenny presents a poor-man's environmental test chamber constructed with a Styrofoam picnic cooler, a dry ice sump, a heater, a thermocouple, and a bunch of input/output ports for making electrical measurements. While working on my senior project at college - an electronic remote weather station - I needed to verify functionality up to 150°F and down to 0°F. Having the Torture Box would have been handy, but instead I used the kitchen oven and freezer with the interconnect cable mashed between the door gasket and frame. Unfortunately I don't have any photos of the project, but it turned out pretty well. I designed and built the sensors and mechanisms for an anemometer, rain gauge, and temperature. It was connected to the display console with a 100-foot multiconductor cable (no simple wireless transceivers at the time). The display was built from four, 7-segment LEDs (remember them?). A wire-wrap board was hand-wired and all the components were leaded (no surface mount). ICs included lots of TTL and CMOS logic and analog blocks. I carried the whole thing around through many household moves, and finally threw it out about 15 years ago. The schematics and senior project report are around here somewhere, and I still have the el cheapo wire-wrap tool I use on rare occasion. BTW, all the parts were bought from DigiKey, Newark Electronics, and Radio Shack. Test Bench: Build the Torture Box
By Ralph Tenny We all know how strict the temperature tolerance specifications are on components and systems for military and space applications; but do we ever stop to think whether the projects we build in our workshops will operate satisfactorily "in the field"? A fire detector, for example, that works fine in the controlled conditions of the workshop can go haywire in an attic in the summer when the temperature can reach 140°F. A metal locator may operate quite differently in the coolness of the forest in the fall and in the heat of summer on the beach.
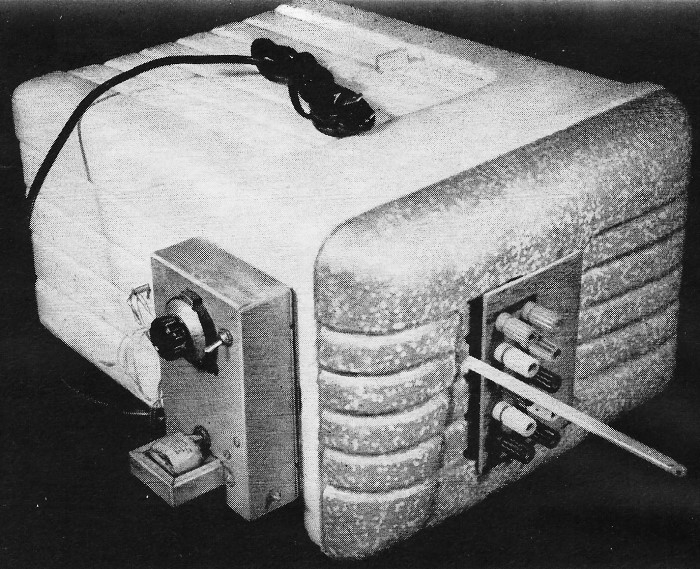
Miniature Environmental Test Chamber Can Be Set from 14°F to 158°F with 1° Accuracy Maybe it's time to take the guesswork out of building for unusual temperature ranges and install your own temperature test chamber, simply by building the Torture Box described here. It can be used to test circuits at, temperatures from below -10°C (14°F) to + 70°C (158°F). Of course, this range is probably more than you will need since it exceeds the range of many commercial components. The Torture Box is a low-cost project that provides a change of pace for experimenters. The electronic circuits are fairly simple, but the project uses a combination of materials and techniques that is a little different. The basic box is an ordinary molded plastic picnic-type cooler. All sub-assemblies in the Torture Box are fastened to thin pieces of plywood or wall-panel material, which are fastened to the plastic using either white furniture glue or aliphatic (fatty, acrylic) resin. Do not use an aromatic glue or cement! The operating range of the Torture Box can be extended, but temperatures higher than 80°C (176°F) should not be attempted since they may soften the plastic. A large quantity of dry ice will lower the tempera-ture below -28°C (-18°F), but the non-linearity of the control thermistor may hamper control below about -10°C. Construction. Select a picnic cooler of sufficient internal volume. The one shown in the photos of the prototype is 12" by 9" by 12" and has an internal volume of about 700 cu in. The assembly of the small mechanical units that are attached to the chamber is described in the following paragraphs. Plan the location of these units in your particular cooler so that the weight distribution will not cause the finished chamber to tip. (Remember that the basic cooler is very light compared to the weight of the mechanical subassemblies.) As shown in the photos, the cooler was placed on its wide side, and four small pieces of a similar plastic were glued to the bottom to serve as feet. Use a sharp instrument to make the required openings and holes. Keep the hot soldering iron away from the plastic. The cover should be tight fitting. If necessary, some type of locking device can be used.
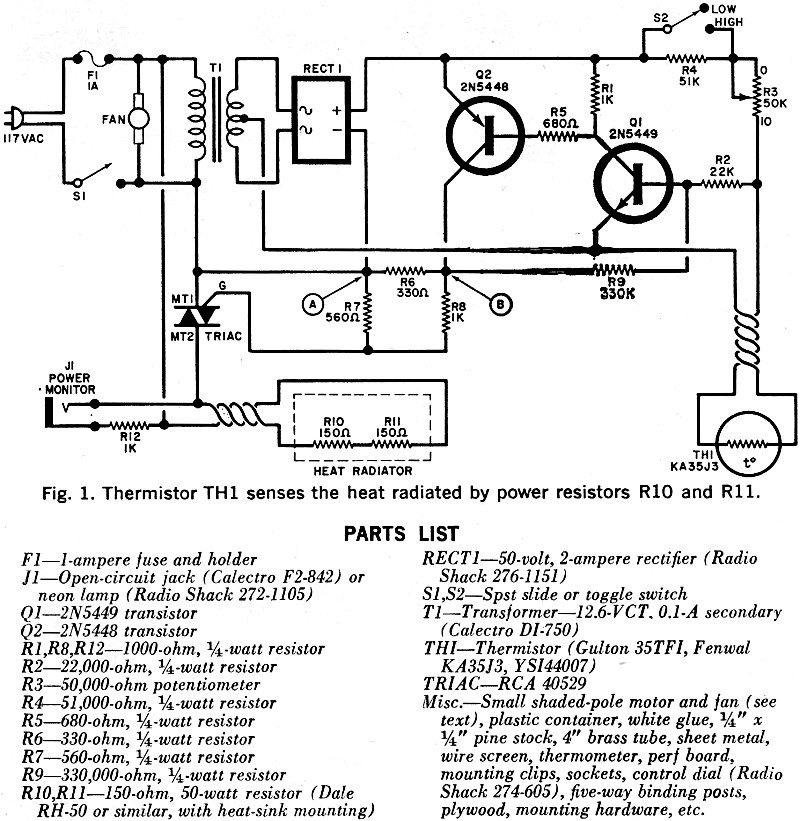
Fig. 1 - Thermistor TH1 senses the heat radiated by power resistors R10 and R11. Fan Motor. Any small motor is suitable. In the prototype, a shaded-pole motor/fan combination originally intended for electronic chassis ventilation was used. After drilling a hole for the motor shaft in the cooler wall, bend a mounting bracket or 1 1/16" aluminum to secure the motor to the wooden mounting plate. Extend the motor shaft (using tubing) so that the fan will be located about 3/4" inside the cooler. Attach the motor mounting to the cooler as shown in Fig. 2. Control Circuit. The control circuit is mounted in a suitable chassis, the bottom plate of which is affixed to the cooler on the side opposite the fan as shown in the photo in Fig. 3. With the exception of the thermistor (TH1), the triac, T1, R10, R11, and potentiometer R3, the circuit can be assembled on a small perf board, which is mounted in the upper portion of the control chassis. Potentiometer R3 is mounted on the front panel and provided with a vernier dial drive. The thermistor is connected to the end of a length of twisted-pair wire which is fed through a narrow tube 3" or 4" long. The tube is then inserted through the Styrofoam so that the thermistor is located within the box and the twisted pair can be connected to the perf board. The triac is mounted on a small heat sink isolated from the metal chassis. Range switch S2 and power monitor connector J1 are mounted on the front panel. The transformer is mounted on the outside of the control chassis. Power resistors R10 and R11 are mounted on a three-piece heat radiator whose configuration is shown in Fig. 4. The radiator consists of three pieces of thin brass sheet at least 2" wide and 4" long. Use heat-sink grease between the pieces of the radiator and between each power resistor and heat sink. When the electronic assembly is complete, temporarily disconnect the triac and connect a 10-volt dc voltmeter between points A and B of Fig. 1. With R3 set to a low resistance, no dc voltage should be indicated between the test points. As the resistance of R3 is increased, a 10-volt signal will appear. Make a check for both positions of range switch S2 and note that the dc voltage appears at a much higher resistance on R3 when S2 is in the low range. If everything is OK, disconnect the unit from the power line and replace the triac.
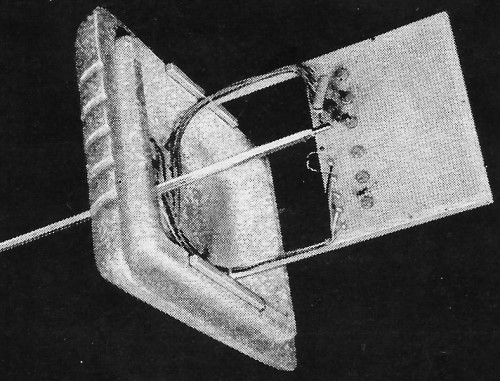
Fig. 2 through Fig. 5 - Various components of the Torture Box Air Baffle. The baffle covers the fan and directs the air to the rear and thus counter-clockwise around the interior of the chamber. The layout is shown in Fig. 5. The baffle is made of thin metal stock but you should make a pattern using a piece of paper first to get the proper size and configuration. The baffle will be fixed to the side wall and bottom of the box using 1/4" square pine blocks. Once the shape has been determined, cut the metal stock and install. Ice Basket. The basket is an open-topped cube, about 3" on each edge, made of wire screen. Four 1/8" round dowels are glued to the comers with epoxy and the dowels are used to secure the basket to a plywood or plastic plate which is secured to the base of the chamber as shown in Fig. 6. When the basket is in place, cut a small hatch directly over it as shown in Fig. 7. Note that the hatch is cut with sloping sides so that the cover cannot drop into the cooler. Any small handle can be used on the cover. Input Terminal Block. A minimum of ten 5-way color-coded binding posts should be provided for input, output, and power supply connections to the equipment being tested. The terminals are affixed to a piece of plywood as shown in Fig. 2, with their leads protruding through the cover of the cooler. Internal Circuit Board. As shown in Fig. 8, the internal terminal block is made from a 4 1/2" by 6" glass-epoxy laminated board mounted in a frame of 1/4" pine strips so that the board is far enough from the cover to be well within the chamber. Make sure that the wooden frame is waterproofed with varnish. The various input binding posts can be connected to color-coded perf-board pins on one edge of the board. Various combinations of sockets and perf-board pins can be attached to the board for testing different types of circuits. Note also, in Fig. 8, that a conventional laboratory-type immersion thermometer is inserted through the cover to check the internal temperature. The thermometer must have an appropriate temperature range so that it can be read from the outside of the chamber. Test and Calibration. Recheck the mechanical assembly of all cooler-mounted components, making sure that all elements are firmly secured and that all glued joints are hard and dry. Recheck all the wiring in accordance with Fig. 1. Keep in mind that power-line ac is present on some leads and be very careful to avoid the possibility of an electrical shock. Set the vernier dial on R3 to 10 and slip the shaft of R3 until the in-circuit resistance is about 3000 ohms. Set the range switch to high and set the control dial to zero. Connect a 150-volt ac meter to J1 and, with a thermometer inserted into the chamber, turn on the power. The fan should start to run and the voltmeter should indicate zero.
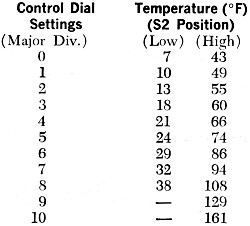
Control Dial Settings Advance the temperature control dial toward 10 until the voltmeter indicates upscale and note the dial indication. Advance the control toward the next major dial graduation and wait until the voltmeter shows that the heater power is cycling on and off every four or five minutes. Record the dial indication and the thermometer temperature. Continue this process until the control dial has reached 10 or the temperature reaches 70°C (158°F). Slip the shaft on R3 until the 10 on the temperature control dial causes the temperature to stabilize at 70°C. Set the range switch to low and the temperature dial to 5. Put approximately 3 cu in. of dry ice into the ice basket (through the small hatch on the top) and operate the system until the voltmeter shows that the heater circuit is cycling. Note the temperature and try new settings until the dial setting for 0°C (32°F) is found. At this point, the operation has been checked and the end points of the operating range have been found and calibrated. You can now fill in a calibration chart by recording temperatures at other major dial settings on both ranges. Here is a typical calibration chart. One-half pound of dry ice (usually available from ice cream stores) is sufficient for most tests. Do not handle dry ice with the bare hands as severe frostbite can result. A wide-mouth thermos bottle can be used to store dry ice for as long as 8 hours, but do not close the lid tightly. Long-term storage of dry ice is essentially not possible for the home experimenter, but between 25% and 50% of a given amount will remain after 24 hours if stored in a good thermos. To break dry ice into chunks, wrap it in a heavy cloth and pound with a hammer. The power monitor jack (J1) can be replaced with a neon lamp if desired since, once the monitor is calibrated, there is no further need for the jack - unless recalibration becomes necessary. How It Works
Fig. 7 - Access hole in Torture Box
Fig. 8 - Internal terminal block and conventional laboratory-type immersion thermometer. The environmental chamber creates hot or cold temperatures by balancing a heater against the cooling effect of dry ice. A fan continuously circulates the air in the chamber, while a thermistor-controlled regulator circuit (Fig. 1) adjusts the temperature to the desired value, which is set on a dial. Transistors Q1 and Q2 form a complementary Schmitt trigger which normally has about 1.5 volts of lag (hysteresis). Since the trigger is powered by full-wave rectified dc with no filtering, the circuit voltage sweeps from zero through about 17 volts at a rate of 120 times per second. This varying power reduces the hysteresis to a few millivolts and thus provides control to ±1 degree. If the thermistor resistance is below tile set point (temperature dial setting), both Q1 and Q2 are cut off and R7 keeps the triac cut off. As the chamber cools, the thermistor resistance increases until Q1 starts to turn on. Shortly after that Q2 turns on and feedback through R9 increases the turn-on signal for Q1, causing the trigger to snap full on. A pulse of current through R8 turns on the triac until the end of that half cycle of ac power. As the power passes through zero, the triac turns off and the cycle starts again. If the thermistor resistance is greatly out of balance, the triac will be turned on early in each cycle; a small unbalance will delay the triac turn-on until late in the cycle. Consequently, heating power (triac current in R10 and R11) is applied in proportion to the difference between the actual temperature measured by the thermistor and the temperature set by the control dial. Range switch S2 and potentiometer R4 extend the control range to low temperatures, without losing the resolution on R3. Consequently, the set point resolution approaches 1°F per division on the specified control dial. Using the Chamber. To test a circuit, you can assemble the circuit on the chamber's internal perf board or attach a finished board to the internal board mounts. Connect the power leads, inputs, and outputs to the cover binding posts and check for normal operation of the circuit with the chamber at room temperature. Then supply power to the chamber, set the desired elevated temperature and see how your circuit works. If it passes this test, cool the chamber, checking circuit operation along the way. If the circuit doesn't pass the temperature test or (more commonly) if its operation drifts with temperature, the circuit must be temperature-compensated to limit drift to allowable levels. This means selecting components whose temperature coefficients compensate for temperature change or adding components that drift in the opposite direction. The term "temperature coefficient" simply means how much a component will change in value with changes in temperature. This is usually expressed as % per °C. For example, a fixed resistor of 1000 ohms having 0.1%/°C temperature coefficient will change 1 ohm for each 1°C change in temperature. A +0.l%/°C coefficient indicates that the resistor will increase 1 ohm for each 1°C change in temperature. If the 1000 ohms is measured at 25°C, the resistor will measure 1050 ohms at 75°C and 975 ohms at 0°C.
Fig. 9 - Temperature compensation circuits. There are capacitors with ether positive or negative temperature coefficients. Most thermistors are resistors with negative temperature coefficients, though some companies also make thermistors with positive temperature coefficients. Also, silicon or germanium diodes can be added to a circuit to compensate for temperature drifts in transistors of the same material. As an example of temperature compensation, consider the circuit in Fig. 9A, where Q1 is a current source feeding a load, Rx. Resistors R1 and R2 set the reference level, while R3 determines the amount of current flowing through the load. As the circuit elements heat up, the current through Q1 will start to increase, thus increasing the load current. One way of compensating for this increase is shown in Fig. 9B, where a diode has been added in series with R1. If Q1 is a silicon type, the diode must also be silicon. The modified circuit acts exactly the same as before except that the reference voltage is now the voltage across R1 and D1. Resistor R2 helps to control the current through the diode, but has less effect than it did in Fig.9A.
To make a complete and proper compensation of load current with temperature, it is now necessary to vary R2 and R3 to get the desired current level and good stability with changes in temperature. You will see this method of temperature compensation used in many commercial units.
Posted February 12, 2018 |
|