Base-Insulating Your Vertical
|
|
As with just about every other type of hobby anymore, creativity and mechanical aptitude is not much of a necessity if you have money to spend. There is such a plethora of options available for every conceivable need to satisfy whatever degree of complexity you want your hobby to entail. The back third of every edition of the ARRL's QST magazine is loaded with advertisements offering antennas, radios, towers, test equipment, guy wires, insulators, cables, connectors, soldering stations, semiconductors, tubes, nuts and bolts. It is a wonderful world we live in if your desire is to engage in the operational aspect of a hobby rather than the building and experimenting aspects. It was not always so. Half a century ago the average hobbyist needed to scrounge for components that could be "repurposed" for use as needed. Sure, there were many sources for common components then, but even if they were available, hobbyists either could not afford them or they had a desire to experience the pride that went along with being a craftsman as well as being an operator. This article from 1962 is a prime example of adapting available parts for achieving a goal. Base-Insulating Your Vertical
Photos point out details of W7OE's unusual vertical antenna.
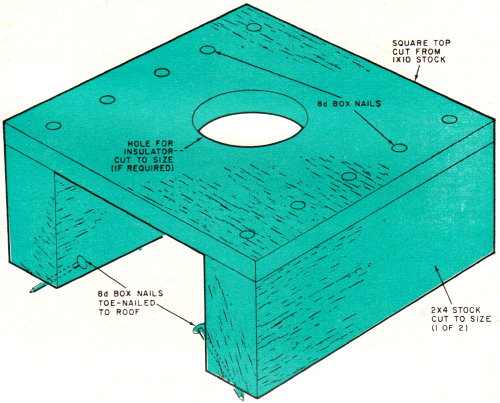
Fig. 1. - If you don't mind nails in your roof, this simple base will do for almost any vertical antenna. It requires few materials and can be built quickly.
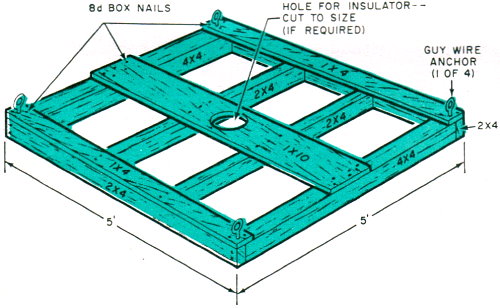
Fig. 2. - This is a more elaborate base which need not be nailed into the roof. Guy-wire anchors can be fastened to corners as shown.
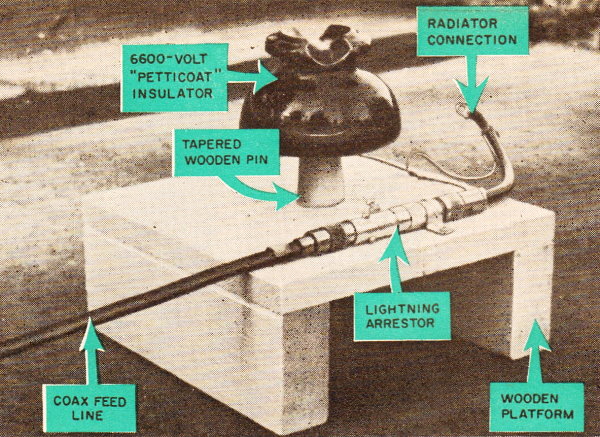
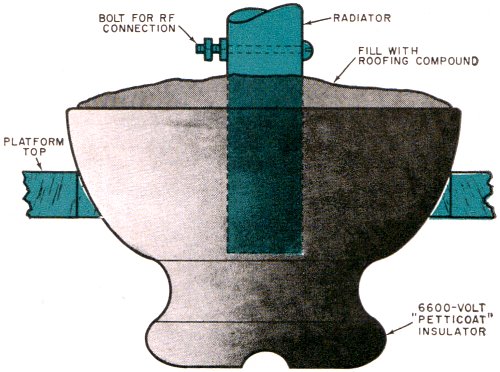
Fig. 3. - High-voltage "petticoat" insulator rests, upside down, in platform top to form cup for radiator. Unused space is filled with roofing compound to prevent rain water from collecting inside.
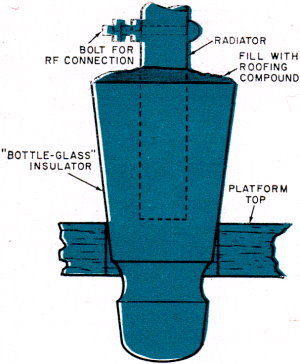
Fig. 4. - Here, the arrangement is identical to that of Fig. 3 except that a telephone-type insulator is used.
Fig. 5. - Ideal for mounting radiator too large to fit insulator. Any play is taken up with wooden plug or blocks. By Howard S. Pyle, W7OE Thousands of Hams find the insulated-base vertical radiator an ideal solution to their antenna problems. But, while the radiating element can be made of water pipe, electrical conduit, aluminum tubing, "rain-gutter" pipe, or even aluminum irrigation piping, the choice of material for the base and base-insulator is often not quite so obvious. Before we illustrate how easy it is to design an effective base-insulating system, a few things about the construction of vertical antennas need to be reviewed. First of all, the most popular height for a vertical is in the neighborhood of 33 feet. This makes a half-wave antenna for the 20-meter band, a quarter-wave for 40 meters, and an eighth-wave (or, with suitable loading, a quarter-wave) antenna for 75 - 80 meters. Any vertical piece of tubing 33 feet long, of course, must be guyed. And, while it's not within the realm of this article to discuss guying methods, it should be mentioned that guy wires must be broken up into short electrical lengths by means of insulators (the small "goose-egg" or "airplane" type is most commonly used). Generally, each guy has one insulator near the radiator, one in the center, and one at bottom. The point we'd like to make here, though, is that the necessity for guy wires is actually an asset when it comes to picking out a base-insulating system. Most of the horizontal stresses caused by the weight of the radiator and the winds are taken up by the wires, the insulator merely acting as a vertical support. This being the case, the insulator need not have great mechanical strength and need not be firmly anchored to the foundation on which it stands. Constructing the Base The first thing you need for your base-insulating system, naturally, is a base. As illustrated in Figs. 1 and 2, this can be a very simple structure - but it should be made of cedar, or some similar weather-resistant wood. And for further protection from the weather, the base should have two coats of outside paint or varnish. If you can toe-nail your base into the roof or into some other rigid surface, the design of Fig. 1 is a good one. It's nothing more than a 10" square of 1" x 10" stock supported on two 2 x 4's. Use 8-penny nails both to put the base together and to fasten it to the roof. A hole for the insulator, if necessary, is made in the center of the square. Should you have reservations about nailing into the roof, you'll probably be more interested in the base illustrated in Fig. 2. Basically a 5'-square platform, it's of heavy enough construction to support a light 33' vertical without being nailed down. Where high winds are often found, however, it's wise to weight the corners with concrete building blocks or some other suitable material. Finally, you can install your guy-wire anchors as shown instead of screwing them into the roof. Either of these two bases should handle almost any type of mounting situation the average ham is likely to encounter. To keep the antenna perpendicular on a sloping roof, though, wooden "shims" may have to be installed under the appropriate corners. Pole-Line Insulators Once you've constructed a base, the next problem is to devise an insulated mounting for the antenna. The author has found that the "pole-line" insulators in common use by telephone and power companies serve very well for this purpose. They are quite inexpensive, and available in many different varieties and voltage ratings at the larger electrical supply houses. Moreover, just about any size will handle even a kilowatt of r.f. with no trouble at all. Illustrated in the photographs is an antenna installation designed around a glazed-porcelain unit known to the electrical trade as a "primary line high-voltage petticoat cross-arm insulator." The size used here happens to be rated at 6600 volts, but was chosen primarily for its physical dimensions. This insulator is mounted on a tapered wooden pin which is fastened to a platform similar to that shown in Fig. 1. The radiating element (which is made of 4" aluminum heating duct) simply rests on top of the insulator, not being fastened in any way. The guy wires keep the element firmly in place. Another way of using the same insulator is diagrammed in Fig. 3. Here the unit rests, upside down, in a circular hole made in the platform top. The base of the antenna fits in the cup-like depression formed by what was originally the bottom of the insulator. Packing the depression with roofing compound keeps it from filling with rain water. Figures 4 and 5 show two methods of employing the heavy "bottle-glass" insulators favored by telephone companies. In both cases, the insulator mounts upside down in the platform top, as before - and an application of roofing compound prevents rain water from collecting. The arrangement of Fig. 4 is similar to that of Fig. 3, with the antenna base resting inside the "bottom" of the insulator. The Fig. 5 arrangement is useful in cases where the radiator is too large to fit inside the insulator. Here, a standard crossarm pin (or a wooden dowel) is fitted into the insulator and the radiator mounted on that. If there's too much space between the radiator and the insulator, the play can be taken up with a wooden plug, or with four wood blocks, as shown. Screw-Base Insulators A "screw-base service-entrance" insulator, ordinarily used to terminate a power line where it enters a house, can also be employed to good advantage (Fig. 6). It comes equipped with a heavy-duty screw, so there's no problem in mounting it on your platform. The bottom of the radiator is then slipped over the top of the insulator-but be sure to select an insulator large enough so that the radiator is held well above the grooves, as shown. These grooves are weak points, and any play in a radiator resting on them will cause a fracture.
Fig. 6. - Service-entrance insulator needs no mounting hole, screws directly into top of platform.
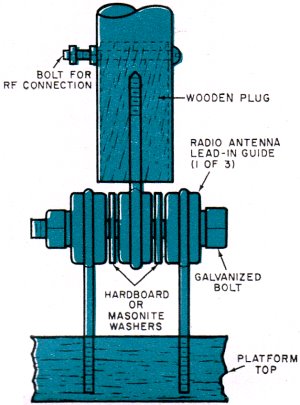
Fig. 7. - Three radio antenna lead-in guides make a unique hinged mounting. Another type of screw-base insulator - this time from the electronic, rather than the electrical, field - makes an interesting hinged mount for the base of your antenna (Fig. 7). As can be seen in the diagram, the system uses three radio-antenna lead-in guides. Consisting of a round porcelain "eyelet" set in a screw-type wire mount, this kind of insulator is somewhat out-of-date - but is still available at many of the larger electronics supply houses. Two of these insulators (Fig. 7) are screwed to the platform, the third to a wooden plug over which the bottom of the radiator is fitted. The two platform-mounted insulators should be spaced so that hardboard or Masonite washers can be inserted between the eyelets; these washers prevent the porcelain faces from grinding against each other. A galvanized bolt, nut, and washer holds the entire assembly together. Be sure that the bolt fits loosely in the porcelain eyelets and that the nut is not drawn up too tightly. Bottles as Insulators While not as good a choice as the types of insulators already described, milk, beer, or soft-drink bottles have often been pressed into service by ingenious hams. Such a bottle may be buried - halfway up to its neck - in the ground, or even set in a small block of concrete. The base of the radiator is then slipped over the "neck" of the bottle and held in place by the "shoulder." Most milk bottles, for example, are just the right size to hold a radiator made of 2"-diameter rain gutter pipe. But, whatever you do, don't try to mount a radiator inside the neck of a milk bottle. Even the small "wobble" of a well-guyed mast will cause it to crack.
Posted July 26, 2021 |
|