Module 16 - Introduction to Test Equipment |
||||||||||||||||||||||||||||||||||||||||||||||||||
|
Module 16 − Introduction to Test Equipment Pages i, 1−1, 1−11, 1−21, 2−1, 2−11, 2−21, 3−1, 3−11, 3−21, 3−31, 4−1, 4−11, 4−21, 5−1, 5−11, 5−21, 5−31, 6−1, 6−11, 6−21, 6−31, 6−41, Index
Chapter 4
Common Test Equipment
Learning Objectives
Upon completing this chapter, you should be able to:
1. Describe the proper operating procedures for using the multimeter.
2. Describe the proper operating procedures for using the digital multimeter.
3. Describe the proper operating procedures for using the differential voltmeter.
4. Describe the proper operation of the transistor tester.
5. Describe the proper procedure for using the RCL bridge to measure resistance, capacitance, and inductance.
Introduction
In the previous chapters, you have learned how to use some basic and miscellaneous measuring instruments to perform required maintenance and upkeep of electronic systems and components. You were also introduced to the construction and operation of basic meter movements in test equipment. This chapter will introduce you to some of the testing instruments commonly used in the Navy today.
MULTIMETERS
During troubleshooting, you will often be required to measure voltage, current, and resistance. Rather than using three or more separate meters for these measurements, you can use the MULTIMETER. The multimeter contains circuitry that allows it to be used as a voltmeter, an ammeter, or an ohmmeter. a multimeter is often called a VOLT-OHM-MILLIAMMETER (VOM).
One of the greatest advantages of a VOM is that no external power source is required for its operation; therefore, no warm-up is necessary. Other advantages are its portability, versatility, and freedom from calibration errors caused by aging tubes, line voltage variations, and so forth.
Q-1. What is one of the greatest advantages of a VOM?
Two disadvantages are that (1) the VOM tends to "load" the circuit under test, and (2) the meter movement is easily damaged as a result of improper testing procedures.
Caution
Never press down on or place any object on the glass face of any multimeter. This can disable the meter movement from operating properly or cause damage.
4-1 MEASURING Resistance, Voltage, and CURRENT WITH a VOM
In the discussion that follows, you will become familiar with the operation and use of the multimeter in measuring resistance, voltage, and current.
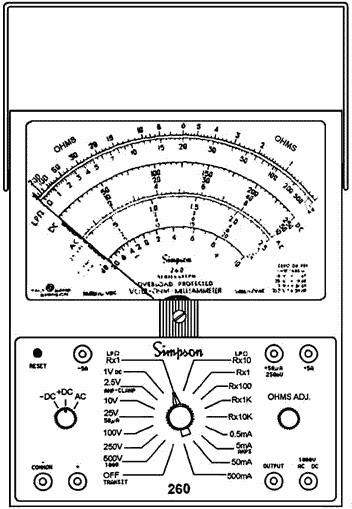
The meter selected for this discussion is the Simpson 260 multimeter, as shown in figure 4-1. The Simpson 260 is a typical VOM used in the Navy today.
Figure 4-1. - Simpson 260 Series 6XLP Volt-Ohm-Milliammeter (VOM).
4-2 The multimeter has two selector switches. The switch on the lower left is the function switch, and the one in the lower center is the range switch. The function switch selects the type of current you will be measuring (+dc, -dc, or ac). The range switch is a 12-position switch that selects the range of ohmmeter, voltmeter, or milliammeter measurements you will make.
The multimeter is equipped with a pair of test leads; red is the positive lead and black is the negative, or common, lead. Eight jacks are located on the lower part of the front panel. To prepare the meter for use, simply insert the test leads into the proper jacks to obtain the circuit and range desired for each application. In most applications, the black lead will be inserted into the jack marked at the lower left with a negative sign (-) or with the word Common.
Measuring Resistance
Before proceeding, you should be aware of the following important safety precaution that must be observed when using the ohmmeter function of a VOM: Caution
Never connect an ohmmeter to a "hot" (energized) circuit. Be sure that no power is applied and that all capacitors are discharged.
Q-2. Before you connect a VOM in a circuit for an ohmmeter reading, in what condition must the circuit be?
The internal components of the multimeter use very little current and are protected from damage by an overload protection circuit (fuse or circuit breaker). However, damage may still occur if you neglect the safety precaution in the Caution instructions above.
Because no external power is applied to the component being tested in a resistance check, a logical question you may ask is, Where does the power for deflection of the ohmmeter come from? The multimeter contains its own two-battery power supply inside the case. The resistive components inside the multimeter are of such values that when the leads are connected together (no resistance), the meter indicates a full-scale deflection. Because there is no resistance between the shorted leads, full-scale deflection represents zero resistance.
Before making a measurement, you must zero the ohmmeter to ensure accurate readings. This is accomplished by shorting the leads together and adjusting the OHMS ADJ control so that the pointer is pointing directly at the zero mark on the OHMS scale. The ZERO OHMS control is continuously variable and is used to adjust the meter circuit sensitivity to compensate for battery aging in the ohmmeter circuits.
An important point to remember when you are making an accurate resistance measurement is to "zero" the meter each time you select a new range. If this is not done, the readings you obtain will probably be incorrect.
When making a resistance measurement on a resistor, you must give the following considerations to the resistor being tested:
4-3
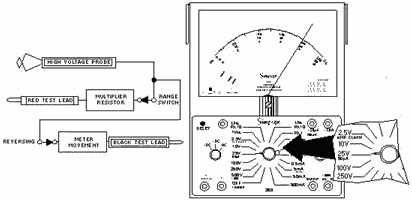
Figure 4-2 is a functional block diagram of the ohmmeter circuit in a VOM. The proper method of checking a resistor is to connect the red lead to one end of the resistor and the black lead to the other end of the resistor.
Figure 4-2. - Functional block diagram of an ohmmeter circuit.
Because zero resistance causes full-scale deflection, you should realize that the deflection of the meter is inversely proportional to the resistance being tested; that is, for a small resistance value, the deflection will be nearly full scale; and for a large resistance value, the deflection will be considerably less. This means that the left portion of the OHMS scale represents high resistance; the right side of the scale represents low resistance. Zero resistance (a short circuit) is indicated on the extreme right side of the scale; infinite resistance (an open circuit) is located on the extreme left side of the scale.
Notice that you read the OHMS scale on the multimeter from RIGHT to LEFT. For example, the pointer of the multimeter in figure 4-3 indicates 8.0 ohms. To determine the actual value of a resistor, multiply the reading on the meter scale by the range switch setting (R x 1, R x 100, or R x 10,000).
4-4
Figure 4-3. - Ohmmeter scale.
Notice that the scale marks are crowded on the left side of the OHMS scale, which makes them difficult to read. Therefore, the best range to select is one in which the pointer will fall in the space from midscale to slightly to the right side of midscale. The divisions in this area of the scale are evenly spaced and provide for easier reading and greater accuracy.
Q-3. When taking resistance readings with a VOM, you will obtain the most accurate readings at or near what part of the scale?
To explain the relationship between the meter readings and the range switch setting, let's use an example. Suppose you have a 2,400-ohm resistor, which you have identified by the resistor color code. With the range switch in the R ´ 1 position, you connect the meter across the resistor. The meter point then deflects between 200 and the point labeled with the infinity symbol (¥) on the extreme left side of the scale. Because the R ´ 1 range is selected, you multiply the reading by 1. Obviously, the scale reading is not accurate enough. Therefore, you move the range selector switch to the next higher scale position (R x 100) to obtain a more easily read value.
In the R x 100 position, you again zero the meter. This time, the pointer moves to the 24 mark on the scale. Because the R x 100 scale is selected, the reading is multiplied by 100. This gives a more accurate reading of 2,400 ohms (24 times 100).
If you position the range switch to the R x 10,000 scale, accuracy decreases. The most accurate readings are obtained at or near midscale. Other VOM instruments have ranges with other settings, such as R x 10, R x 100, or R x 1,000, to make it easier to make such readings.
Another thing to remember when you are measuring resistance is the tolerance of the resistor. If the tolerance of the resistor in the preceding example is 10 percent, we would expect a reading between approximately 2,160 and 2,640 ohms. If the reading is not within these limits, the resistor has probably changed value and should be discarded.
An open resistor will indicate no deflection on the meter. a shorted resistor causes full-scale deflection to the right on the lowest range scale, such as if the leads were shorted together.
4-5 Measuring dc Voltages
You set the multimeter to operate as a dc voltmeter by placing the function switch in either of two positions: +DC or -DC. The meter leads, as in the case of the ohmmeter function, must be connected to the proper meter jacks. When you measure dc voltages, be sure the red lead is the positive lead and the black lead is the negative, or common, lead. View a of figure 4-4 is a functional block diagram of dc voltage circuits in a multimeter. View B shows the jacks and switch positions for measuring dc voltages.
Figure 4-4. - Functional block diagram of dc voltage circuits.
When the meter is connected in a circuit, it becomes a circuit component. Because all meters have some resistance, they alter the circuit by changing the current. The resistance presented by the voltmeter depends on the amount of voltage being measured and the position of the function switch.
Some multimeters use a 20,000 ohms-per-volt meter sensitivity for measuring dc voltage and a 5,000 ohms-per-volt sensitivity for measuring ac voltage. The higher the meter resistance, the less it will load the circuit. The idea is to keep circuit loading to an absolute minimum so that the circuit under test is unaffected by the meter. In this way, you can get a clearer picture of what the circuit malfunction is, not the effect of the meter on the circuit.
Again, refer to figure 4-4. With the function switch set to either +DC or -DC, let's consider the effect of the range switch on the meter scale to be used. When measuring dc voltages, you have eight voltage ranges available: .25V, 2.5V, 10V, 50V, 250V, and 500V (1- and 1,000-volt special application plug-ins are also available). The setting of the range switch determines the maximum value represented on the meter. When measuring dc voltages, use the scale marked DC (figure 4-3). The last number at the extreme right side of the DC scale indicates the maximum value of the range being used. When the range switch is in the 2.5V position, the scale represents a maximum of 2.5 volts.
To simplify the relationship between the digits on the meter scale and the setting of the range switch, always use the multiple of the full-scale-deflection digits on the meter face that correspond to the numbers of the range switch. For example, use the 250 scale for the 250MV jack, 2.5V, and 250V ranges; the 50 on the scale for 50V and 500V ranges; and the 10 on the scale for the 10V and 1,000V ranges.
4-6 For explanation purposes, let's assume you wish to measure 30 volts dc. In this case, select the next higher range position, 50V. When you place the range switch to the 50V position (as shown in view B of figure 4-4), the meter pointer should rise from a little more than midscale to 30, which represents 30 volts dc.
When measuring a known dc voltage, position the range switch to a setting that will cause approximately midscale deflection. Readings taken near the center of the scale are the most accurate. When measuring an unknown dc voltage, always begin on the highest voltage range. Using the range switch, work down to an appropriate range. If the meter pointer moves to the left, you should reverse the polarity of the function switch.
Caution
Always check the polarity before connecting the meter.
Q-4. Besides setting up the meter for expected voltage ranges, what must be strictly observed when taking dc voltage readings?
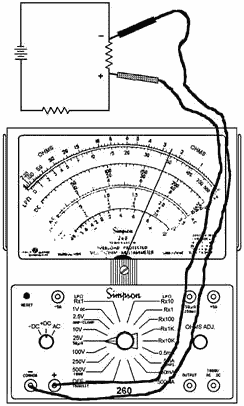
Now let's discuss how you take a voltage measurement on a component within a circuit. As an example, let's measure the voltage drop across the resistor shown in figure 4-5.
4-7
Figure 4-5. - Measuring the voltage drop of a resistor.
When measuring a dc voltage drop across a component in a circuit, you must connect the voltmeter in parallel with the component. As you can see in figure 4-5, the positive (red) lead is connected to the positive side of the resistor, and the negative (black) lead is connected to the negative side. a voltage reading is obtained on the meter when current flows through the resistor.
Some voltmeter readings will require the use of a ground as a reference point. Under these conditions, one voltmeter lead is connected to the equipment ground, and the other lead is connected to the test point where voltage is to be measured. Be sure to observe polarity.
Measuring ac Voltages
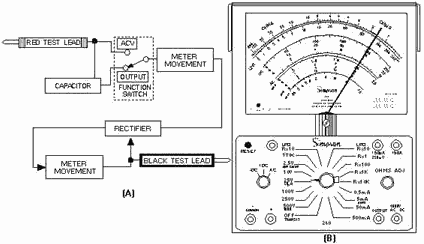
To measure ac voltages, you must set the function switch to the AC position. The same procedure used to measure dc voltages applies, except that in reading the voltage, you use the AC volts scale (the polarity of the test leads is not important). When measuring very low or high frequencies of ac voltages, you should be aware that the multimeter has a tendency to be inaccurate. View a of figure 4-6 is a
4-8 functional block diagram of the ac and output voltage circuits in the multimeter. View B shows the jacks and switch positions used to measure ac voltages.
Figure 4-6. - Functional block diagram of ac and output voltage circuits.
Measuring Output Voltages
You will often measure the ac component of an output voltage where both ac and dc voltage levels exist. This occurs primarily in amplifier circuits.
The multimeter has a 0.1-microfarad, 400-volt blocking capacitor in series with the Output jack. The capacitor blocks the dc component of the current in the circuit under test, but allows the ac component to pass on to the indicating circuits.
Caution
When using Output, do not attempt to use the meter in a circuit in which the dc voltage component exceeds the 400-volt rating of the blocking capacitor.
To use the multimeter to measure output voltage, you must follow these steps:
1. Set the function switch to AC.
2. Plug the black test lead into the Common jack and the red test lead into the Output jack.
3. Set the range switch at the appropriate range position, marked as 2.5V, 10V, 50V, or 250V.
4. Connect the test leads to the component being measured with the black test lead to the negative side of the component.
4-9 5. Turn on the power in the test circuit. Read the output voltage on the appropriate ac voltage scale. For the 2.5V range, read the value directly on the scale marked 2.5. For the 10V, 50V, or 250V range, use the red scale marked AC and read the black figures immediately above the scale.
Measuring Current
The multimeter can function as an ammeter to measure current flow.
Caution
When using the multimeter as a current-indicating instrument, NEVER connect the test leads directly across a voltage. ALWAYS connect the instrument in series with the load.
To use the multimeter as an ammeter, you must take the following steps:
1. Set the function switch at +DC (assuming the current to be positive).
2. Plug the black test lead in the Common jack and the red test lead into the + jack.
3. Set the range switch at one of the five ampere-range positions.
4. Ensure the equipment is ofF and then physically open the circuit in which the current is being measured.
5. Connect the VOM in series with the circuit, ensuring that proper polarity is observed when making this connection.
6. Turn the equipment ON and then read the current on the DC scale. (This is the same scale used to measure dc voltages.)
The setting of the range switch determines the maximum value represented by the DC scale. Always use the range scale that corresponds to the range switch setting.
Caution
Never attempt to measure currents greater than the setting of the range switch. Increase the range with a shunt, if necessary, but do not exceed the marked current.
When measuring unknown currents, follow the same procedures as when measuring voltages. Always start with the highest range available and work down. use the range that gives approximately half-scale deflection. If this procedure isn't followed, the meter could be burned out.
Figure 4-7 is a functional block diagram of the dc current circuits in a multimeter.
4-10
|
||||||||||||||||||||||||||||||||||||||||||||||||||