Module 21 - Test Methods and Practices |
||||||||||||||||||||||||||||||||||||||||||||||||||
|
Module 21 − Test Methods and Practices
Pages i , 1−1, 1−11, 1−21, 2−1, 2−11, 2−21, 2−31, 2−41, 3−1, 3−11, 3−21, 3−31, 4−1, 4−11, 5−1, 5−11, 5−21, 5−31, AI−1 to AI−3, Index
Chapter 4
QUALITATIVE MEASUREMENTS
Learning Objectives
Upon completion of this chapter, you will be able to do the following:
1. Identify the various methods of measuring standing-wave ratios.
2. Identify the various methods of determining electrical losses caused by deterioration of transmission lines.
3. Identify the methods of measuring intermodulation distortion.
Introduction to QUALITATIVE MEASUREMENTS
As a technician, you are responsible for repairing and maintaining complex electronic systems. The basic ability to repair a specific piece of equipment is only the first step in becoming a qualified technician. Your ultimate goal should be to become proficient at systems fault isolation - in other words, to know the entire system like the back of your hand. To reach this goal you will need to be familiar with all parts of the system and know how they are interconnected and interact with each other. There are numerous shortcuts or tricks of the trade that can only be learned through experience on any system, but the most practical thing for you to remember is to approach all problems in a logical manner.
Various combinations of electronic equipment are interconnected to form a system capable of performing specific functions. You must be able to apply general test methods and practices to installation, tuning, maintenance, and repair of the system. This requires you to have a thorough knowledge of many types of electronic equipment. When radar, communication, and digital computers are interconnected, they require different maintenance procedures than when they are operated separately. Revised test procedures may be necessary. Detrimental interactions between equipment or facilities must be corrected and effective preventive maintenance procedures must be planned for all equipment within the system. System quality figures, such as sensitivity and coverage, must be determined and measured during equipment preventive maintenance checks to assure efficient operation. System monitoring at specific test points is often used to help localize a problem.
System testing and monitoring are frequently accomplished by using an external piece of electronic equipment, which is designed specifically for testing a particular system. Some computers and computer systems build in their own monitoring and testing devices and will inform the operator when and where failure has occurred. You must realize that any equipment designed to test, monitor, or repair another system is itself subject to malfunction and will require periodic checks and preventive maintenance. This chapter will cover some of the basic test methods and practices associated with system-level troubleshooting.
4-1
Standing-WAVE RATIO (SWR) MEASUREMENTS
Standing-wave ratio (SWR) is the ratio of the maximum voltage or current to the minimum voltage or current at any point along a transmission line. SWR measurements are used to determine the matching quality of the termination of the line.
A variety of methods and test equipments may be used to measure the voltage or current distribution along a transmission line. An open transmission line is accessible for coupling to many types of voltage- measuring devices, such as a wavemeter or a grid-dip meter. However, at higher frequencies where coaxial cables or waveguides are used to minimize skin effect losses, (discussed in NEETS, module 10) access is more complicated. Access to the interior of the waveguide or center conductor of the coaxial cable must be gained by using a unidirectional or bidirectional coupler, which is inserted into the transmission line. The coupler contains a slot into which an RF probe is inserted and positioned with respect to directivity.
The conditions that produce standing waves and their adverse effects are discussed in detail in NEETS, module 10. The different methods of detecting and measuring standing waves are discussed in the following paragraphs.
PROBES
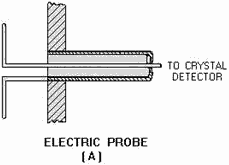
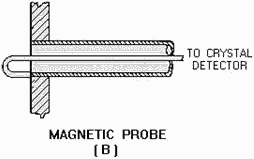
a magnetic or electric probe can be used to observe the standing wave on a short-circuited, terminated line. The wavelength is obtained by measuring the distance between alternate maximum or minimum current points along the line. a typical setup operating at 300 megahertz might use two 10-foot lengths of number 14 phosphor-bronze wires, which are spaced 1 inch apart and supported parallel to a set of probe guide rails. The line should be partially matched to the source generator by means of a parallel- wire shorting stub connected in parallel with the transmission line and the oscillator output line. Figure 4- 1, view a and view B, illustrates the types of probes required for this method of measurement.
Figure 4-1A. - Typical electromagnetic probe.
4-2
Figure 4-1B. - Typical electromagnetic probe.
NEON-LAMP and MILLIAMMETER Methods
In this method of measurement, a neon bulb or milliammeter is moved along the two-wire parallel transmission line. Points of maximum voltage (standing-wave voltage peaks) with the lamp or points of maximum current (standing-wave current peaks) with the indicator will have maximum brilliance or indication, respectively.
Q-1. At what points along a transmission line will a neon lamp glow the brightest? BRIDGE Methods
The bridge method permits measurement of the standing-wave ratio without actually measuring the standing waves. The bridge method is applicable because the input impedance of a line terminated in its characteristic impedance is a pure resistance equal to the characteristic impedance. a line terminated in this way can be used as the unknown resistance in a bridge circuit and a null can be obtained in the indicating device when the other resistance arms of the bridge are properly adjusted.
Many types of bridges can be used. For example, an ac bridge that is independent of the applied frequency can be used. The bridge will become unbalanced when the line is no longer properly terminated. Improper termination will produce a reactive component as well as a resistive component in the input impedance of the line and result in a standing wave. The reading of the indicating device depends on the degree of imbalance, which becomes more severe as the mismatch caused by the termination becomes worse. The indicating device can be calibrated directly to indicate the standing-wave ratio. The most common indicator consists of a crystal rectifier, a filtering circuit, and a sensitive dc meter movement in series with a high resistance.
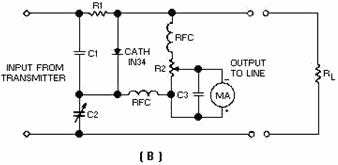
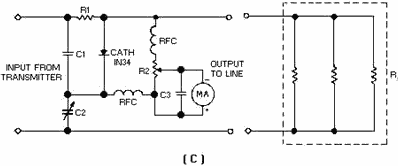
Resistance-Capacitance BRIDGE
A resistance-capacitance bridge circuit is shown in view a of figure 4-2. The bridge is theoretically independent of the applied frequency.
4-3
Figure 4-2A. - Resistance-capacitance bridge circuit for measuring standing-wave ratio.
However, the applied frequency must be low enough to avoid skin effect, stray inductance, capacitance, and coupling between circuit elements and wiring. The leads must be kept short to eliminate stray reactance, which causes bridge imbalance. The rectifier circuit wiring must be isolated from other bridge component fields so that induced voltages do not cause an erroneous indication. You should only use resistors having negligible capacitance and inductance effects.
Before you calibrate a newly constructed bridge, the following procedure must be followed if residual readings caused by stray effects are to be held to a minimum:
1. Connect a noninductive resistor (RL in view B) that is equal to the characteristic impedance of the line to the output terminals of the bridge.
Figure 4-2B. - Resistance-capacitance bridge circuit for measuring standing-wave ratio.
2. Apply an RF voltage to the input terminals and adjust the variable capacitor for a minimum reading on the meter.
3. Reconnect the resistor (R L) to the input terminals and connect the RF power source to the output terminals.
4-4 4. Adjust the RF voltage amplitude applied to the bridge until a full-scale meter reading is obtained.
5. Reconnect the bridge in the normal manner (resistor RL to the output terminals, etc.). If the meter reading is now more than 1% or 2% of the full-scale reading, different arrangements (lead dress) of the internal wiring must be tried until the null is reduced to 0 or as close as possible to the 0 point.
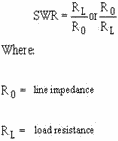
The bridge can be calibrated after completion of the preceding check. Connect the transmission line under investigation to the output terminals of the bridge and connect a succession of noninductive resistors (RO in view C) to the load end of the transmission line until the bridge is balanced. Assuming that the bridge was originally balanced for the characteristic impedance of the line, the standing-wave ratio can be computed from the following equation:
Figure 4-2C. - Resistance-capacitance bridge circuit for measuring standing-wave ratio.
Select the formula that yields a ratio greater than unity. The SWR calibration can be recorded on the meter scale directly, recorded on a chart in terms of the meter deflection, or plotted on a graph against the meter deflection. The variable capacitor, in turn, can be calibrated for various characteristic impedances. This is accomplished by applying suitable resistors (RO) across the output terminals and noting the capacitor settings at the respective balance points. a range of 50 to 300 ohms should prove attainable.
4-5 ACCURACY of BRIDGE MEASUREMENTS
To assure accurate measurements, the RF signal applied to the bridge must be properly adjusted each time a calibrated instrument is used. Essentially, this adjustment is a repetition of the previously described reversed-bridge procedure. The following steps are to be performed:
1. Connect the line to the input terminals of the bridge and connect the transmitter to the output terminals.
2. Adjust the transmitter coupling until full-scale deflection is obtained. From this point on, the coupling must be left untouched.
3. Reconnect the bridge in the usual way and proceed with the measurement.
Power Output VERSUS Impedance MATCHING
For maximum transfer of the power out of an RF source, with minimum heating from reflected power, the total output impedance sensed by the RF source must be equal to the internal impedance of that source. a perfect impedance match between transmitter and load would exist if the SWR were 1 to 1. As discussed in NEETS, module 10, test equipment designed to measure the instantaneous voltage of a standing wave will give you a voltage standing-wave ratio (VSWR). Test equipment designed to measure the instantaneous current component of a standing wave will give you the current standing-wave ratio (IsWR). Regardless of the type of test equipment selected, both ratios will be the same.
Q-2. What VSWR is a perfect match between a transmitter and its load?
SWR METERS
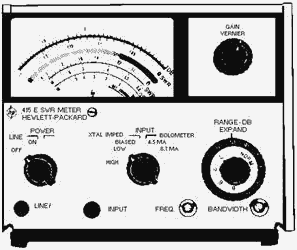
The Hewlett-Packard Model 415E SWR meter, shown in figure 4-3, is a commonly used SWR meter. It is extremely accurate, sensitive, lightweight, easy to use, and portable. It is essentially a high-gain, tuned audio amplifier with a square-law meter that is calibrated to read SWR directly. The meter is designed to be operated at a mean center frequency of 1,000 hertz.
4-6
Figure 4-3. - Typical SWR meter.
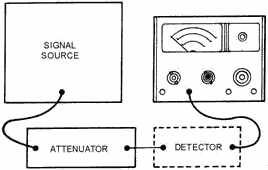
Figure 4-4 shows a typical SWR measurement setup using the SWR meter. The signal source is usually a sinusoidal wave that is square-wave modulated at 1,000 hertz.
Figure 4-4. - Typical setup for measuring SWR.
The SWR meter usually gets its input from a detector, either a barretter or a crystal diode. This detector must be a square-law device (its output voltage is proportional to the applied RF power) to ensure
4-7 the accuracy of the meter. The input is amplified and applied directly to the meter. To perform the measurement as shown in figure 4-4, you move the detector along the slotted line so that its probe is at a voltage maximum and adjust the gain of the meter with the RANGE-DB, Gain, and VERNIER controls (EXPand switch to NORM) for full-scale deflection (1.0 on the 1.0 to 4 SWR scale). Then move the probe toward a minimum. If the meter drops below 3.2, rotate the RANGE-DB switch one position clockwise and read on the 3.2 to 10 SWR scale. If the pointer drops below this scale, rotate the RANGE- DB switch one more position clockwise and read on the 1.0 to 4 scale and multiply by 10. This pattern continues for still higher SWR readings.
The dB scales can be used for a standing-wave-ratio measurement by setting the meter to full scale at a voltage maximum, then turning the RANGE-DB switch clockwise for an on-scale reading at a voltage minimum and noting the difference in dB reading at the maximum and minimum. a dB reading is obtained by adding the RANGE-DB switch setting and meter indication. The SWR meter may also be used for high resolution insertion loss measurements.
The setup for performing insertion loss or attenuation measurements is shown in figure 4-5. It requires that you initially establish a convenient reference on the DB scale of the meter. This is accomplished by connecting the signal source directly to the detector and using the Gain and VERNIER controls to adjust the meter pointer to a convenient reference. Then you can insert the device to be measured between the signal source and the detector and note the change in dB, as shown on the meter.
Figure 4-5. - Typical setup for measuring attenuation or insertion loss.
ATTENUATION and INSERTION LOSS MEASUREMENTS of Transmission Lines
Transmission lines are sometimes subjected to extremes of weather and the corrosive effects of salt water. You should be aware of the adverse effects of this environment on transmission lines and how to determine electrical losses caused by transmission-line deterioration.
Q-3. What are the two common causes of transmission-line deterioration?
LOSS MEASUREMENT
Insertion loss measurement of transmission lines requires the use of a good signal generator and an accurate power meter. The method is identical to the insertion loss measurements used on most couplers. When a known frequency, at a predetermined level of power, is inserted into one end of a transmission
4-8 line, then the same frequency and the same level of power should be transmitted to the other end of a transmission line. Because all transmission lines contain some degree of resistance, some loss of power will occur during the test.
Exposure to the elements over a period of time causes transmission-line deterioration. To determine the accuracy of this test, you should use the power meter to measure the output of the signal generator at the end of the test cable to be attached to the transmission line. Any power loss associated with the test cables should be recorded and subtracted from the measurement taken with the transmission line connected.
You should note that transmission lines, like all other electronic components, are designed to operate over a specific range of frequencies. It is not uncommon for a transmission line to operate improperly at one frequency, yet operate properly over the remainder of its frequency spectrum. You should check transmission-line losses over their entire frequency range. Insertion loss measurements are normally taken when a system is first installed or the transmission line is replaced. Periodic measurements should be performed to enable you to determine if system performance is being degraded by transmission-line deterioration.
Q-4. Is it possible for a transmission line to operate improperly at certain frequencies and properly at others?
Transmission-LINE forMULAS
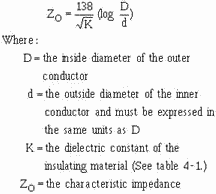
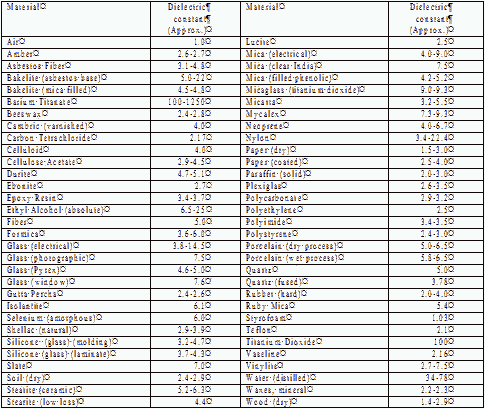
Transmission lines are engineered and manufactured to meet certain specifications. The most important of these specifications relates to frequency, power-handling capabilities, and characteristic impedance. The dielectric constant (K) of the insulating material is probably the manufacturer's most important consideration and is the primary factor that affects the size of the coaxial cable. The formulas in the following sections discuss some aspects of coaxial transmission-line engineering.
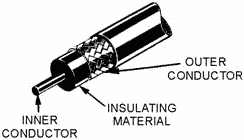
A cross section of a coaxial line is shown in figure 4-6. The characteristic impedance of a coaxial line can be determined by the following formula:
4-9
Figure 4-6. - Coaxial line.
Table 4-1. - Dielectric Constants of Materials
4-10
|
||||||||||||||||||||||||||||||||||||||||||||||||||