Module 21 - Test Methods and Practices |
||||||||||||||||||||||||||||||||||||||||||||||||||
|
Module 21 − Test Methods and Practices
Pages i , 1−1, 1−11, 1−21, 2−1, 2−11, 2−21, 2−31, 2−41, 3−1, 3−11, 3−21, 3−31, 4−1, 4−11, 5−1, 5−11, 5−21, 5−31, AI−1 to AI−3, Index
Figure 1-9. - Current probe used with electronic ammeter.
Q-9. What is the primary advantage of using a current probe?
OSCILLOSCOPE METHOD
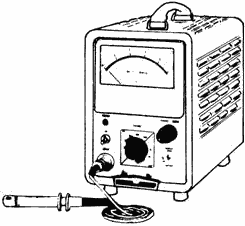
Current can be measured with an oscilloscope by shunting the input terminals with a low-value resistor. The input terminals must then be connected in series with the circuit being tested. The value of the resistor must be small enough not to interfere with the operation of the circuit under test. At the same time, it must be large enough that the voltage developed will cause adequate deflection of the oscilloscope trace. For example, if an oscilloscope with a vertical deflection sensitivity of 0.1volt rms per centimeter (cm) is used in conjunction with a 10-ohm shunt resistor to measure a 25-milliamp current, the vertical trace will be deflected 2.5 centimeters, as shown in the following example:
For current measurements the oscilloscope can be calibrated by connecting an ammeter in series with the input terminals and the calibration signal source. An alternate method is to determine the value of the
shunt resistor and measure the calibration signal voltage developed across it with an accurate voltmeter. The calibration signal current can then be calculated by means of Ohm's law. Since the oscilloscope merely indicates the voltage developed across the shunt resistor, the measurements for alternating or direct current will be similar to voltage measurements using an oscilloscope.
Resistance MEASUREMENTS
A high percentage of technical manuals contain point-to-point resistance charts that list correct resistance readings for major test points. These resistance charts are extremely useful when you troubleshoot faulty equipment. Without them, equipment resistance measurements within a complicated circuit would not mean much. Many circuits contain other circuit elements, such as capacitors, coils, or other resistors in parallel with the resistances being measured. This, of course, is a possible source of measurement error that you eliminate when you disconnect or unsolder one side of the resistor or a group of resistors under test.
You should be thoroughly familiar with the calibration of your ohmmeter. Analog meters are typically more accurate and easier to read at midscale. With the exception of bridge circuits, a meter may provide only approximate resistance readings. However, these readings may be adequate when you also consider the wide tolerances of resistors themselves. An ohmmeter that you use in field testing should be portable, convenient, and simple to operate - factors that usually are more important than extreme accuracy.
When an ohmmeter is used, completely de-energize the circuit under test and remove any current- sensitive elements before the resistance measurement is performed. Low-resistance measurements that require precision readings should be taken with a bridge type of instrument.
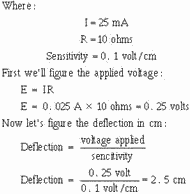
An ohmmeter consists of a galvanometer, batteries, and resistors of known value that are connected in such a way that unknown resistors to be measured are compared with standard values. Figure 1-10 illustrates three basic ohmmeter circuits: (A) single range type, (B) series multirange type, and (C) shunt type.
Figure 1-10A. - Basic ohmmeter circuits.
Figure 1-10B. - Basic ohmmeter circuits.
Figure 1-10C. - Basic ohmmeter circuits. MULTIMETER METHOD
When you use an analog multimeter to perform resistance measurements, the first thing you do is zero the meter. The meter indication varies greatly depending on the resistance of the test leads, the condition of the batteries within the meter, and the resistance range selected on the multimeter. The meter should be zeroed every time you change range settings. To zero a multimeter you short the leads together and adjust the meter for a full-scale deflection. Scale markings are spaced closer together toward the infinity point on the meter; therefore, more accurate readings are obtained near center scale. You should select a range setting that will give you a mid-scale indication.
Ohmmeter applications include resistance measurements; continuity checks; and inductor, capacitor, and transformer checks. a transformer, for example, may be tested by checking whether there is an open or short, low-insulation resistance to ground, or improper continuity between transformer windings. a capacitor may be tested to determine whether it is open or shorted. Ensure that capacitors are properly discharged before you test them; otherwise, damage to the multimeter may occur. When an ohmmeter is placed in series with a capacitor, the changing current will cause a meter deflection that is proportional to the capacitance. The deflection obtained is compared with the deflection from a similar capacitor of known value. This deflection may be small or large, depending on the type and size of the capacitor and the voltage of the battery within the meter. An external series battery will increase the sensitivity of the instrument.
Q-10. How do you compensate for the resistance of the test leads of a meter?
DIGITAL MULTIMETER
The two major advantages of using a digital multimeter are its ease of operation and accuracy. Most digital multimeters can be ordered with an optional battery pack, which makes them just as portable as an analog multimeter. Another advantage is that their LED or LCD readouts are much easier to read than the scale on an analog multimeter. Digital multimeters also are ideally suited for measuring sensitive devices that might otherwise be damaged by the excessive current associated with analog multimeters - maximum current flow through the component being tested is typically limited to less than 1 milliamp. When measuring small values of resistances, remember to consider the resistance of your test leads. Most digital multimeters cannot be zeroed in the way analog multimeters can. With digital multimeters, you have to short the leads, read the lead resistance displayed, and then subtract the reading from subsequent component measurements that you make.
Q-11. Why are digital multimeters well suited for testing sensitive devices?
RCL BRIDGES
The 250DE+1325 is a typical resistance, capacitance, inductance (rcl) bridge. Like the vtvm, the rcl bridge has several disadvantages. It requires ac power and a lengthy warm-up period, and its accuracy is limited to ±2%. The rcl bridge uses a tuning indicator electron tube, commonly referred to as the bridge's "eye," and an internal arrangement of resistors that form a Wheatstone bridge. As discussed in NEETS, module 16, the rcl bridge can be a time-consuming method of performing resistance measurements.
Difficulty may be experienced when you attempt to measure wire-wound resistors. To obtain a sharp balance on the indicator, you can shunt the resistor with a variable capacitor and adjust the capacitor for the clearest indication. The resistance measurement will not be affected by this reactance neutralization.
MEGGERS
Meggers produce the large voltages that are required to measure resistances as high as 10,000 megohms - only high resistance values can be measured. The unknown resistance is connected between the megger terminals, and the hand generator part of the meter is cranked. Some meggers are capable of producing in excess of 500 volts, so use caution when you operate them. Typical applications for a megger are testing unterminated transmission lines and ac power cords for insulation breakdown.
Differential VOLTMETERS
It is a seldom-known fact that the Fluke 893 ac-dc differential voltmeter can be used for measuring extremely high resistances from 10 megohms to 106 megohms with a typical accuracy of ±5%. This measurement method, however, requires some basic calculations on your part. The obvious advantage of the differential voltmeter is its capability of measuring extremely high resistances. Consult the Fluke 893 technical manual for initial switch settings and a more detailed explanation of its operation.
Capacitor MEASUREMENTS
Capacitance is that property of a circuit that produces an electrostatic field when two conducting bodies separated by a dielectric material have a potential applied to them. Capacitors are made by compressing an insulating material (dielectric) between two conductors (plates). The farad is the basic measurement of capacitance. It is dependent upon the area of the plates, the distance between the plates, and the type of dielectric used. Electrically, the farad is a measure of 1 coulomb of potential charged by 1 volt. a coulomb (the amount of current flow maintained at 1 ampere that passes a given point of a circuit in 1 second) is a large charge. Most capacitors are measured in millionths of a farad (microfarad), expressed as µF, or in one-millionth of a microfarad (picofarad), expressed as pF.
Capacitors incur various losses as a result of such factors as resistance in the conductors (plates) or leads, current leakage, and dielectric absorption, all of which affect the power factor of the capacitor. Theoretically, the power factor of an ideal capacitor should be zero; however, the losses listed above cause the power factors of practical capacitors to range from near 0 to a possible 100%. The average power factor for good capacitors, excluding electrolytics, is 2% to 3%. Current leakage, which is an inverse function of frequency, is important only at the lower frequencies and becomes negligible at higher frequencies. Dielectric absorption (sometimes referred to as dielectric viscosity) results in losses that produce heat. The effect of this type of loss is the same as resistance in series with the capacitor.
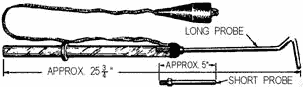
You have probably learned the hard way that some capacitors can retain a charge long after the voltage has been removed. The electrical charge retained by capacitors in de-energized electronic circuits is, in many cases, sufficient to cause a lethal shock. Be sure you and those working with you consider this hazard before performing any type of maintenance on any electrical or electronic circuit and before making connections to a seemingly dead circuit. use extreme caution prior to working on or near de- energized circuits that employ large capacitors. Be safe - discharge and ground all high-voltage capacitors and exposed high-voltage terminal leads by using only an authorized shorting probe, as shown in figure 1-11. Repeat discharge operations several times to make sure that all high-voltage terminations are completely discharged. It is of the utmost importance that you use only an authorized safety shorting probe to discharge the circuits before performing any work on them. An authorized general-purpose safety shorting probe for naval service application may be requisitioned using the current stock number listed in the ELECTRONICS INSTALLATION and Maintenance BOOK (EIBM), General NAVSEA 0967-LP-000-0100, Section 3, Safety Equipment. Certain electronic equipment are provided with built-in, special-purpose safety shorting probes. These probes are not considered general purpose. use them only with the equipment for which they are provided and only in a manner specified by the technical manuals for the equipment. It is considered to be poor practice to remove them for use elsewhere.
Figure 1-11. - Safety shorting probe.
When using the general-purpose safety shorting probe, always be sure first to connect the grounding clip to a good ground connection (if necessary, scrape the paint off the grounding metal to make a good contact - paint can be replaced, lives can't). Then, while holding the safety shorting probe by the handle behind the protective shield, touch the end of the metal rod to the points to be discharged. Touch each point several times to ensure that the circuit is completely discharged. Be extremely careful that you do not touch any of the metal parts of the safety shorting probe while touching the probe to the exposed "hot" terminal. Don't develop a nonchalant or routine attitude about these procedures. It pays to be safe; use the safety shorting probe with care.
Large capacitors, dormant in storage, can also develop a large static charge. This charge is caused by environmental conditions such as a close proximity to an RF field. An easy way to avoid this condition is to short the stored capacitor's terminals with a piece of wire before putting it in storage. Remember to remove the wire before installing the capacitor. If you receive a large capacitor that is not shorted, short the terminals together. Remember, CHARGED Capacitors CAN KILL.
Q-12. Charged capacitors can kill. True or false?
BRIDGE-TYPE MEASUREMENTS
Capacitor tests involving quality and value must be made in The Course of everyday troubleshooting. You must make the important decision of whether to reject or continue to use a certain capacitor after it has been tested. Capacitance measurements are usually accomplished by either a bridge-type or a reactance-type capacitance meter. The bridge-type capacitance meter is much more accurate than the reactance-type meter. You may want to review rcl bridges in chapter 1 of NEETS, module 16, before reading further. Capacitance tolerances vary more widely than resistance tolerances and are dependent upon the type of capacitor, the capacitance value, and the voltage rating. The results of capacitance tests must be evaluated to determine whether a particular capacitor will fulfill the requirements of the circuit in which it is used.
The power factor of a capacitor is important because it is an indication of the various losses attributable to the dielectric, such as current leakage and dielectric absorption. Current leakage is of considerable importance, especially in electrolytic capacitors.
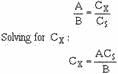
Figure 1-12 is a simplified schematic of a capacitance bridge. As you can see, a capacitance bridge is very similar in construction to a resistance bridge with the exception of the standard capacitor (CS) and the unknown capacitor (CX). Because current varies inversely with resistance and directly with capacitance, an inverse proportion exists between the four arms of the bridge. The following expression shows the inverse proportion between resistors a and B and capacitors CS and CX:
Figure 1-12. - Simplified capacitance bridge.
It is actually the capacitive reactance, rather than the capacitance, that is balanced in this circuit. In addition to its reactive properties, the capacitor under test always exhibits some loss. This loss may have the characteristics of either a shunt or series resistance, or it may be a combination of both. Regardless of its true nature, the loss can always be represented as a simple series resistance, which is shown in figure 1-12 as RX. This loss is balanced by the calibrated resistor RS. Rather than calibrate this control in terms of resistance, it is convenient to calibrate it in terms of the dissipation factor (the ratio of the energy dissipated to the energy stored in a capacitor). The RS control then provides the means for completing the capacitance balance, and its dial reading indicates a loss figure for the capacitor under test.
Q-13. Which is more accurate, the bridge- or reactance-type meter?
REACTANCE-TYPE MEASUREMENTS
The reactance type of capacitance measuring equipment makes use of the following principle: If an ac voltage (usually 6.3 volts) at a fixed frequency is applied across a capacitor and resistor in series, the voltage drop produced across the reactance of the capacitor by the resulting current flow is inversely proportional to the capacitance. The voltage drop is used to actuate a meter that is calibrated in capacitance values. This test equipment gives approximate values only and, like the ohmmeter, is used mostly when portability and speed are more important than precision. The accuracy of the reactance-type measurement is less for capacitors that have a high power factor. In capacitors with high power factors, the losses incurred effectively place a certain amount of resistance in series with the capacitive reactance. The effect of this resistance, when the capacitor is measured, is to cause a greater voltage drop across the capacitor. This drop is not because of the reactance above, but is the result of the impedance, which of
course is made up of both the reactance and the resistance. Therefore, the capacitance indicated by the analyzer will be lower than the actual value.
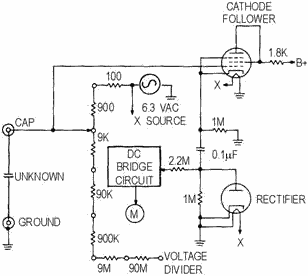
Figure 1-13 shows a simplified schematic diagram of the capacitance-measuring section of a typical reactance-type electronic volt-ohm-capacitance milliammeter. a 6.3-vac voltage is taken from the filament source and applied across the resistive voltage divider network to determine the designated value of the capacitor. Because of a particular use or circuit application, some capacitors are permitted an even wider variation of capacitance value than is indicated by their rated tolerances.
Figure 1-13. - Reactance-type capacitance meter.
Inductance MEASUREMENT
A current flowing through a conductor produces a magnetic field around that conductor. If the conductor is formed into a coil, a stronger magnetic field is set up. The relationship between the strength of the field and the intensity of the current causing it is expressed by the inductance of the coil (or conductor). When the current producing the magnetic field ceases, the energy of the magnetic field is returned in part to the circuit source in the form of a reverse current. Inductance, then, is the ability of a coil to function as a storehouse of energy in magnetic form and is determined by the shape and dimensions of the coil. Inductance is measured in henries, millihenries, or microhenries. Inductors can be described generally as circuit elements used to introduce inductive reactance into ac circuits.
An inductor is essentially a coil of wire wound around a form using a core of air, magnetic metal, or nonmagnetic metal. a core of magnetic metal produces greater inductance (for a coil of given size and number of turns) than does an air core; a core of nonmagnetic metal produces less inductance than does an air core. At frequencies in the HF and higher regions of the frequency spectrum, coils of small size and
high Q (discussed briefly at the end of this section) are generally required. These coils usually are single- layered with air or metallic cores. Since comparatively low values of inductance are required, this type of coil is very compact, and relatively high values of Q are obtained.
At frequencies in the lf and mf regions of the frequency spectrum, single-layered, universal, spiral, and other types of windings are used. When size is a factor, the more compact windings are preferred to the single-layered type of coil. At frequencies below 500 kilohertz, the single-layered type is too large for practical use; therefore, the more compact types are used exclusively.
The inherent resistance of the conductor with which an inductor is wound is the most important factor contributing to the losses of the inductor. Losses caused by this resistance increase with frequency. This results in a concentration of current near the outer surface of the wire, called SKIN EFFECT. Skin effect is negligible at low frequencies, but can be an important factor at high frequencies. Other contributing factors to inductor losses are (1) eddy currents set up in the core and surrounding objects (if they are conductors); (2) the dielectric properties of the form used for the coil and surrounding objects; and (3) hysteresis in the core and surrounding objects, if they are magnetic metals. Losses occur as a result of the dielectric properties of the coil form because of the distributed capacitance of the inductor (for example, between turns and between the terminals and leads). To some extent the core and surrounding objects serve as a dielectric of the distributed capacitance, and the resulting dielectric losses contribute to the overall losses of the inductor.
As we discussed earlier, an inductor has the ability to act as a storehouse of magnetic energy. However, because of the various loss factors described above, all of the energy stored in the magnetic field is not returned to the source when the applied voltage decreases to zero. The losses of an inductor may be represented by an equivalent series resistance. The value that it would dissipate would be an amount of energy equal to the total amount dissipated by the inductor. The losses of an inductor may be expressed in terms of the ratio of its inductive reactance to its equivalent series resistance. This ratio is referred to as the Q of the inductor and is stated in equation form as shown below:
Q-14. What type of core produces the greatest inductance?
HAY BRIDGE
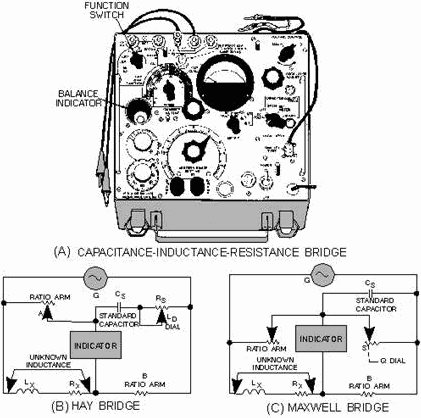
Inductance measurements are seldom required in The Course of troubleshooting. However, in some cases inductance measurements are useful and instruments are available for making this test. Many capacitance test sets can be used to measure inductance. Most manufacturers of capacitance test sets furnish inductance conversion charts if the test equipment scale is not calibrated to read the value of inductance directly. For the measurement of inductance, the following basic types of test equipment circuitry are used: (1) the bridge-circuit type, which is the most accurate, and (2) the reactance type, which is often an additional test circuit incorporated into another piece of test equipment to increase its utility. The measurement of capacitance using the capacitance-inductance-resistance bridge instrument was discussed. Since the measurement of capacitance and inductance are interrelated, the existing capacitance standards and loss controls of this test equipment are used whenever possible. a wider range of dissipation must be provided to accommodate the practical value of inductors. The 250DE+1325 (view a of fig. 1-14), a typical RCL bridge and our reference in this discussion, uses two basic bridge circuits (Hay bridge and Maxwell bridge) to accommodate the extensive range in inductor loss factors. You should take time to review the bridges in NEETS, module 16, or other bridge-circuit descriptions before continuing.
Figure 1-14. - Bridge circuits.
The Hay bridge (view B of fig. 1-14) measures inductance by comparing it with a capacitance; it differs from the Maxwell bridge (view C) in that the resistance associated with the capacitance is a series instead of a shunt resistance. The inductance balance depends upon the losses (Q) of the inductor. The Hay bridge is used for inductors with low losses low D dial reading or high Q) at 1 kilohertz. This circuit is in effect when the Function switch is turned to the L(D) position. For a D dial reading up to 0.05, the error is 0.25%. Above this point the error increases rapidly and affects the basic accuracy of the test equipment. This limitation is expressed on the front panel of the test equipment as follows: IF D>0.05 ON L(D) - REBALANCE ON L(Q) . In other words, if the dissipation of an inductor, as read on the D dial when using the Hay bridge (Function switch set to L(D) position), exceeds 0.05, then you should change to the Maxwell bridge (Function switch set to L(Q) position), which is discussed in the following paragraph. The loss factor of the inductor under test is then balanced in terms of the Q of the inductor.
Q-15. a Hay bridge measures inductance by comparing an inductor to what component?
1-20
|
||||||||||||||||||||||||||||||||||||||||||||||||||