Introduction to Test Equipment |
||||||||||||||||||||||||||||||||||||||||||||||||||
|
NEETS Module 15 − Principles of Synchros, Servos, and Gyros Pages i, 1−1, 1−11, 1−21, 1−31, 1−41, 1−51, 1−61, 1−71, 2−1, 2−11, 2−21, 2−31, 3−1, 3−11, 3−21, 4−1, Index
Now, consider what happens in view D when the TX rotor is turned manually to 75º and the TDX rotor is set manually on 30º. When the TX rotor is turned to 75º, magnetic coupling increases between the rotor and S1. This, in turn, increases the voltage in S1 and, therefore, the magnetic field surrounding it. At the same time, the field in S2 and S3 decreases proportionately. This causes the resultant TX stator field to line up in the direction of its rotor. The increased voltage in S1 of the TX also causes an increase in current flow through S1 in the TDX, while decreased currents flow through S2 and S3. Therefore, a strong magnetic field is established around the S1 winding in the TDX. This field has the greatest effect on the resultant TDX stator field and causes it to line up in the same relative direction as the TX stator field (75º). The TDX stator field does not move from this 75º position because it is controlled by the position of the TX rotor. However, its angular position with respect to the R2 winding decreases by 30 when the TDX rotor is turned. Therefore, the signal induced into the TDX rotor and transmitted to the TR is 45º. The TR rotor responds to the transmitted signal and turns counterclockwise to 45º. This system has just solved the equation 75º - 30º = 45º.
TX-TDX-TR System Operation (Addition)
Frequently it is necessary to set up a TX-TDX-TR system for addition. This is done by reversing the S1 and S3 leads between the TX and the TDX, and the R1 and R3 leads between the TDX and the TR. With these connections, the system behaves as illustrated in figure 1-21. Consider what happens when the TX rotor is turned to 75º, while the TDX is set at 0º view A. In the TX, with the rotor at 75º, increased coupling between the rotor and S1 increases the current in, and consequently the magnetic field around, that coil. At the same time, the field strengths of S2 and S3 decrease proportionately. This causes the resultant field of the TX stator to rotate counterclockwise and align itself with its rotor field. The system is now connected so the increased current in S1 of the TX flows through S3 of the TDX, while decreased currents flow through S1 and S2. Therefore, in the TDX, the resultant stator field is shifted 75º clockwise because of the stronger field around S3. Since the rotor of the TDX is on 0º, the voltage in the rotor is not changed but simply passed on to the TR. Remember, the R1 and R3 leads between the TDX and the TR have also been reversed. Just as in the simple TX-TR system with S1 and S3 leads interchanged, torque is developed in the TR, which turns the rotor in a direction opposite to the rotation of the TDX stator field. Therefore, the TR rotor rotates 75º counterclockwise and aligns itself with the TX rotor. Thus, the TX- TDX-TR system connected for addition behaves in the same way as the system connected for subtraction as long as the TDX rotor remains on 0º. When this condition exists, the TR rotor follows the TX rotor exactly. As you can see, the system in view. a just solved the equation 75º + 0º = 75º.
Figure 1-21A. - TX-TR system operation (addition).
1-31
Figure 1-21B. - TX-TR system operation (addition).
Now, with the TX in the same position (75º), the TDX rotor is turned to 30º (view B). The angle between the TDX stator field and R2 is then increased by 30º. This appears to the TR as an additional rotation of the TDX stator field. In transmitting the TX signal to the TR, the TDX adds the amount its own rotor has turned. The TR rotor now turns to 105º. Thus, the equation 75º + 30º = 105º is solved.
Q-34. In a TDX system when does the TR rotor follow the TX rotor exactly?
Q-35. What is the angular position of a TX rotor when it is pointing toward the S1 winding? (Hint. Remember synchros are labeled counter clockwise from 0º.)
Q-36. In a TDX system with standard synchro connections, the TX rotor is at 120º and the TDX rotor is at 40º. What position will the TR indicate?
Q-37. What connections in a TDX system are reversed to set up the system for addition?
TX-TDR-TX System Operation (Subtraction)
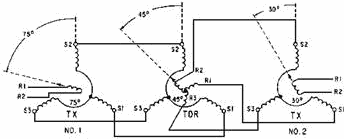
As we previously explained, the differential receiver differs chiefly from the differential transmitter in its application. The TDX in each of the previous examples combined its own input with the signal from a synchro transmitter (TX) and transmitted the sum or difference to a synchro receiver (TR). The synchro receiver then provided the system's mechanical output. When the differential receiver (TDR) is used, the TDR itself provides the system's mechanical output. This output is usually the sum or difference of the electrical signals received from two synchro transmitters. Figure 1-22 shows a system consisting of two TXs (No. 1 and No. 2) and a TDR connected for subtraction.
Figure 1-22. - TX-TDR-TX system operation (subtraction).
1-32 In this figure the signal from TX No. 1 rotates the resultant TDR stator field 75º counterclockwise. In a similar manner, the signal from TX No. 2 rotates the resultant TDR rotor field counterclockwise 30º. Since the two resultant fields are not rotated by equal amounts, a torque is exerted on the rotor to bring the two fields into alignment. This torque causes the rotor to turn to 45º, the point at which the two fields are aligned. To bring the two fields into alignment, the TDR rotor need turn only through an angle equal to the difference between the signals supplied by the two TXs. TX-TDR-TX System Operation (Addition)
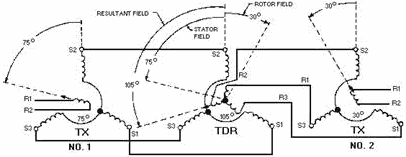
To set up the previous system for addition, it is necessary to reverse only the R1 and R3 leads between the TDR rotor and TX No. 2. With these connections reversed, the system operates as shown in figure 1-23.
Figure 1-23. - TX-TDR-TX system operation (addition).
Assume the TDR rotor is initially at 0º. TX No. 1 is turned to 75º, and TX rotor No. 2 is turned to 30º. The TDR stator field still rotates counterclockwise 75º, but because R1 and R3 on the TDR rotor are reversed, its rotor field rotates 30º clockwise. The angular displacement of the two fields then, with respect to each other, is the sum of the signals transmitted by the two TXs. The magnetic force pulling the TDR rotor field into alignment with that of the stator turns the TDR rotor to 105º. Therefore, the system solves the equation 75º + 30º = 105º.
Q-38. What connections in a TDR system are reversed to set up the system for addition?
Q-39. In a TDR system connected for addition in what direction will the TDR rotor field turn when the TX rotor to which it is connected turns counterclockwise?
CONTROL SYNCHRO Systems
It should be clear to you from our discussion of torque synchro systems that, since they produce a relatively small mechanical output, they are suitable only for very light loads. Even when the torque system is moderately loaded, it is never entirely accurate because the receiver rotor requires a slight amount of torque to overcome its static friction.
When large amounts of power and a higher degree of accuracy are required, as in the movement of heavy radar antennas and gun turrets, torque synchro systems give way to the use of CONTROL
1-33 SYNCHROS. Control synchros by themselves cannot move heavy loads. However, they are used to "control" servo systems, which in turn do the actual movement. Servo systems are covered in depth in the next chapter in this module.
There are three types of control synchros: the CONTROL Transmitter (CX), the CONTROL Transformer (CT), and the CONTROL Differential Transmitter (CDX). The control transmitter (CX) and the control differential transmitter (CDX) are identical to the TX and the TDX we discussed previously except for higher impedance windings in the CX and CDX. The higher impedance windings are necessary because control systems are based on having an internal voltage provide an output voltage to drive a large load. Torque systems, on the other hand, are based on having an internal current provide the driving torque needed to position an indicator. Since we discussed the theory and operation of the TX and the TDX earlier, we will not discuss their counterparts, the CX and CDX. However, we will cover the third control synchro, the CT, in depth during this discussion.
CONTROL TransformerS
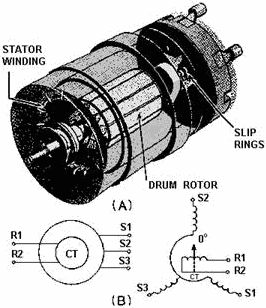
a control transformer is just what its name implies-a control synchro device accurately governing some type of power amplifying device used for moving heavy equipment. Figure 1-24 shows a phantom view of a typical CT and its schematic symbols.
Figure 1-24. - (A) Phantom view of a typical CT; (B) CT schematic symbols.
1-34 The CT compares two signals, the electrical signal applied to its stator and the mechanical signal applied to its rotor. Its output is a difference signal that controls a power amplifying device and thus the movement of heavy equipment.
The unit construction and physical characteristics of a control transformer are similar to those of a control transmitter or torque receiver, except that there is no damper and the rotor is a drum or wound rotor rather than a salient-pole rotor.
An interesting point about the rotor is that it is never connected to an ac supply and, therefore, induces no voltages in the stator coils. As a result, the CT stator currents are determined solely by the voltages applied to the high-impedance stator windings. The rotor itself is wound so that its position has very little effect on the stator currents. Also, there is never any appreciable current flowing in the rotor because its output voltage is always applied to a high-impedance load. As a result, the CT rotor does not try to follow the magnetic field of its stator and must be turned by some external force.
The stator windings of the CT are considered to be the primary windings, and the rotor windings the secondary windings. The output, which is taken off the R1 and R2 rotor leads, is the voltage induced in the rotor windings. The phase and amplitude of the output voltage depend on the angular position of the rotor with respect to the magnetic field of the stator.
Q-40. What type of synchro is used in systems requiring large amounts of power and a high degree of accuracy?
Q-41. What are the three types of control synchros?
Q-42. How do the CX and CDX differ from the TX and TDX?
Q-43. What three things prevent a CT rotor from turning when voltages are applied to its stator windings?
CONTROL SYNCHRO System Operation
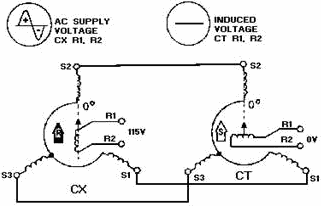
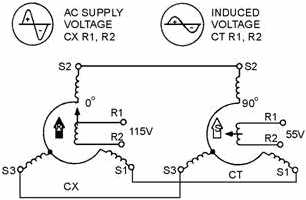
a control synchro system consisting of a control transmitter and a control transformer is illustrated in figure 1-25. The stator windings of the CX are connected to the stator windings of the CT and both synchros are shown on 0º. Notice, that at 0º, the CT rotor is perpendicular to its S2 winding. This is contrary to what we have learned so far about synchros, but it is just another peculiarity of the CT. When the rotor of the CX is on 0º, the rotor's magnetic field points straight up as shown (the black arrow). The voltages induced in the CX stator windings, as a result of this field, are impressed on the CT stator windings through the three leads connecting the S1, S2, and S3 terminals. Exciting currents proportional to these voltages flow in the CT stator windings and establish a magnetic field in the CT in the same direction (white arrow) as the magnetic field (black arrow) in the CX. Observe that the rotor of the CT is perpendicular to the stator magnetic field and, therefore, the induced voltage in the rotor is zero, as indicated by the straight line on the oscilloscope presentation.
1-35
Figure 1-25. - CX-CT system operation with rotor in correspondence.
When the CT rotor is rotated 90º, as shown in figure 1-26, the rotor is parallel to the resultant stator field Maximum magnetic coupling occurs between the rotor and stator fields at this point. As a result of this coupling, the stator windings induce a maximum of 55 volts into the rotor winding. The phase of this voltage depends upon the direction in which the CT rotor is turned. The rotor of the CT is wound so that clockwise rotation of the stator magnetic field induces a voltage across the rotor which is proportional to the amount of rotation and in phase with the ac supply voltage. Counterclockwise rotation of the stator magnetic field produces a voltage that is still proportional to the amount of rotation, but 180º out of phase with the supply voltage. Keep in mind that the clockwise rotation of the CT stator magnetic field is the same as the counterclockwise rotation of the CT rotor. This phase relationship between the ac supply voltage and the CT output voltage becomes more apparent in figure 1-27.
Figure 1-26. - CX-CT system operation with the CX rotor at 0º and the CT rotor at 90º.
1-36
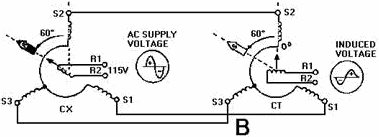
Figure 1-27A. - Control synchro system operation.
Figure 1-27B. - Control synchro system operation.
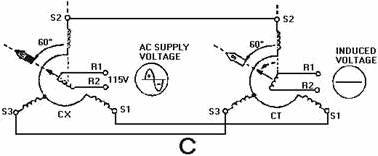
Figure 1-27C. - Control synchro system operation.
1-37 When the rotor of the CX in view a of figure 1-27 is turned 60º clockwise, the magnetic field in the CX (black arrow) and the magnetic field in the CT (white arrow) also rotate 60º clockwise. This action induces a voltage in the CT rotor that is in phase with the ac supply, as indicated by the oscilloscope presentation. If the rotor of the CX in view B is turned 60º in a counterclockwise direction from its 0º position, the magnetic field (white arrow) in the CT also rotates counterclockwise through the same number of degrees as the CX. Since the magnetic field in the stator of the CT cuts through the rotor in the opposite direction, the induced voltage in the rotor is now out of phase with the ac supply to the CX, as shown in the oscilloscope presentation.
At times it is necessary, because the CT is used to control servo systems, to have the CT output reduced to zero volts to prevent any further movement of a load. To accomplish this, it is necessary to turn the rotor of the CT through the same number of degrees and in the same direction as the rotor of the CX. This places the CT rotor perpendicular to its own stator field and reduces its output to zero volts as illustrated in view C.
The CT output voltage discussed throughout this section is commonly referred to as an ERROR Signal. This is because the voltage represents the amount and direction that the CX and CT rotors are out of correspondence. It is this error signal that eventually is used in moving the load in a typical servo system.
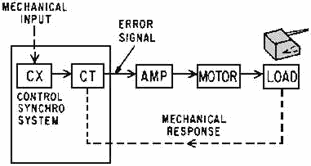
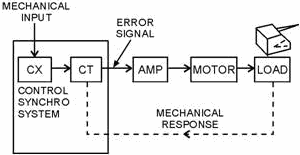
Now that we have covered the basic operation of the control synchro system, let us see how this system works with a servo system to move heavy equipment. Figure 1-28 shows a block diagram of a typical servo system that uses a control synchro system. Assume the shaft of the CX in this system is turned by some mechanical input. This causes an error signal to be generated by the CT because the CX and the CT rotors are now out of correspondence. The error signal is amplified by the servoamplifier and applied to the servomotor. The servomotor turns the load, and through a mechanical linkage called Response, also turns the rotor of the CT. The servomotor turns the rotor of the CT so that it is once again in correspondence with the rotor of the CX, the error signal drops to zero volts, and the system comes to a stop.
Figure 1-28. - a positioning servo system using a control synchro system.
Q-44. When a CT is on electrical zero, what is the relationship between its rotor and the S2 winding?
Q-45. What is the amplitude and voltage induced into the rotor when the CX is turned 90º while the CT remains on electrical zero?
Q-46. What is the name given to the electrical output of a CT?
Q-47. In a control synchro system, when is the output of the CT reduced to zero?
1-38
SYNCHRO Capacitors
As we stated earlier, the speed and accuracy of data transmission are most important. With the use of more complex synchros, like the differential and the control transformer, the accuracy of the synchro systems may be affected. The following discussion will deal with how complex synchros affect the accuracy of synchro systems and what can be done to keep this accuracy as high as possible. Synchro capacitors play a major role in maintaining a high degree of accuracy in synchro systems.
When a torque transmitter is connected to a torque receiver (TX-TR), very little, if any, current flows in the stators when the rotors are in correspondence. This is because the voltages induced in the TR windings almost exactly balance out the voltages induced in the TX windings. As a result, the TR is very sensitive to small changes in the position of the TX rotor, causing the TR to follow the TX with a high degree of accuracy.
When a synchro system contains differential synchros (TDX or CDX), the stator currents at correspondence are greater than they are in a single TX-TR system. The reason is the step-up turns ratio between the stator and rotor in the differential synchro.
In a synchro system that uses a CT, stator current at correspondence is also greater than in a TX-TR system. In this case, however, this reason is that the CT rotor is not energized and as a result no voltage is induced in the stator to oppose the voltage in the transmitter stator. The overall effect of this increase in stator current is to reduce the accuracy of the system. To maintain high accuracy in a synchro system containing either differential units or CTs, the stator currents must be kept to a minimum. This is done by connecting synchro capacitors in the circuit.
To understand the operation of a synchro capacitor and how it reduces current drain on the transmitter requires a recollection of the voltage and current relationships in inductive and capacitive circuits. As you learned in module 2 of this series, current lags voltage by 90º in a purely inductive circuit. You also know that an ideal inductor is impossible to make because there is always resistance present. Therefore, an inductor has a combination of inductive reactance and resistance. Since current and voltage are always in phase in a resistive circuit and 90º out of phase in an inductive circuit, we can say that there are two currents in an inductor-the loss current, which is the resistive (in-phase) current, and the magnetizing current, which is the inductive (out-of-phase) current. It is this magnetizing current that we would like to eliminate in the stator coils of the TDX, CDX, and CT because it makes up most of the line current.
Keeping in mind that current leads voltage by 90º in a capacitive circuit, let's see what happens to magnetizing current when a capacitor is added to the circuit.
Suppose a capacitor is hooked up across one of the stator coils of a TDX and its capacitance is adjusted so that its reactance equals the reactance of the coil. Since the two reactances are equal, the current they draw from the line must also be equal. However, these currents are going to be 180º out of phase, because the current in the coil lags the line voltage, while the capacitor's current leads it. Since the two currents are equal in magnitude but opposite in phase, they cancel. The total line current is reduced by this effect and, if a capacitor is placed across each coil in the TDX, the line current decreases even further. This, in effect, increases torque in synchro systems near the point of correspondence and, therefore, increases overall system accuracy.
Connecting capacitors across individual stator windings is impractical because it requires that the stator winding's common connection be outside the synchro. Since this is not done with synchros, another method has been devised to connect up the capacitors which works just as well. This method is shown in figure 1-29.
1-39
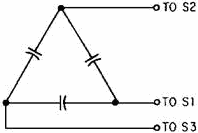
Figure 1-29. - The synchro capacitor.
The three delta-connected capacitors, shown in figure 1-29, usually come as a unit mounted in a case with three external connections. The entire unit is called a SYNCHRO Capacitor. The synchro capacitor is made in many sizes to meet the requirements of all sizes of standard differentials and control transformers. The synchro capacitor is rated by its total capacity, which is the sum of the individual capacities in the unit.
Figure 1-30 shows how a synchro capacitor affects the operation of a control synchro system. In this figure, the capacitor is placed between the CX and the CT. Two current meters are also placed in the circuit to show the effect the capacitor has on stator current. The meter connected between the capacitor and the CT reads normal stator current, 32 milliamperes (mA). This current would normally flow in the stator of the CX if the synchro capacitor were not connected. The other meter reads 10 mA, which is what is left of the original stator current after the magnetizing current has been canceled by the synchro capacitor. By reducing the current drain on the transmitter, the sensitivity and accuracy of the system increase.
Figure 1-30. - The use of a synchro capacitor with a CT.
Figure 1-31 shows another application of a synchro capacitor; this time in a differential system in this circuit the capacitor is placed between a TX and a TDX. The meter readings show the same comparison between currents as in the previous paragraph. The only significant difference between this circuit and the one in figure 1-30 is that the differential draws more stator current than the CT.
1-40
|
||||||||||||||||||||||||||||||||||||||||||||||||||


